This blog is for technology oriented people who wants to know new rapidly changing technologies. http://feeds.feedburner.com/blogspot/farjad
Tuesday, November 18, 2008
Autometically sort the program Menu Alphabetically
2. Go to:
HKEY_Current_User\Software\Microsoft\
Windows\CurrentVersion\Explorer\MenuOrder
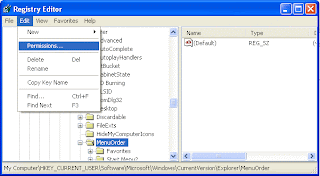
3. With MenuOrder highlighted, open the Edit menu (on the Tool bar), select permissions.
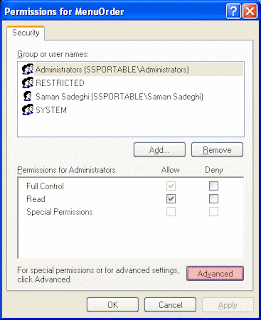
4.This will open the “Permissions for MenuOrder” dialog box. Click the Advanced button
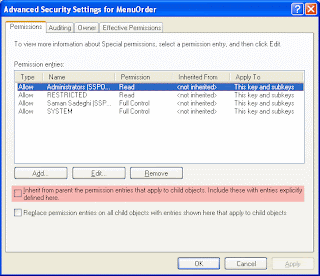
5.This will open the “Advanced Security Settings for MenuOrder” dialog box. Clear the “Inherit From Parent . . .” check box.
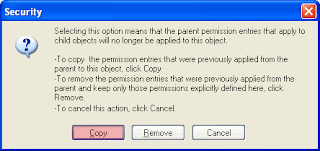
6.In the security dialog box that appears, click Copy:
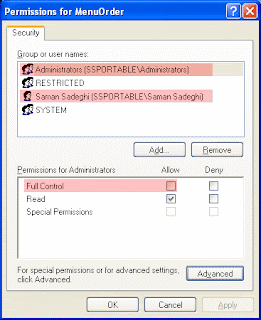
7.Click OK to return the “Permissions for MenuOrder“dialog box, and then clear the “Full Control Access” entry for your own account and for any security groups that you’re a member of, leaving the “Read Access Control” entry in place.
8.Click OK and you’re done!
Autometically kill program at shutdown
1. Hit the Windows Key+R, type regedit into the run dialog and hit OK.
2. Now that you’re in the the Registry, navigate to this key:
HKEY_CURRENT_USER\Control Panel\Desktop
The AutoEndTasks Key In The System Registry
3. Double click the AutoEndTasks key (in the right pane) and change the Value Data to 1
4. Close the Registry and restart your machine to enable the change!
Now, when you shut down this computer, all programs will be killed and the computer shouldn’t be delayed!
Thursday, November 13, 2008
The Golden Rule of Deleting a 'Cannot Delete File error' file in WinXp
2 - Select the process called "explorer.exe" and right click and end this process.
3 - You will get a blank desktop with only the windows task manager running.
4 - Click top left menu; File > New task (Run...)
5 - A window opens for you to select the new task, click
6 - A browse window opens. Make sure that you change the selection: "Files of types" from 'Programs' to 'All files'
7 - Then Browse to the folder and file that you want to delete. Select it and press delete. You should be able to delete it now.(unless it is a persistent primary windows system file)
8 - once deleted, go browse to c:windowsexplorer and open it.
You should be returned to where you were in the first place. Happy deleting.
Increase Harddrive read/write speed
In any case, it won't harm your system, so try it yourself and let me know what you find!
Steps:
1. Run SYSEDIT.EXE from the start & then Run command.
2. Expand the system.ini file window.
3. Scroll down almost to the end of the file untill you find a line called [386enh].
4. Press Enter to make one blank line, and in that line type
5. Irq14=4096 (note: This line IS CASE SENSITIVE)
6. Click on the File menu, then choose Save.
7. Close SYSEDIT and reboot your computer.
8. Restart windows!
The speed improvement will be noticed just after the system reboots, any system info. software can be used to check the improvement.
Make Mozilla Firefox 10 time faster
1. Type "about:config" into the address bar and hit enter. Scroll down and look for the following entries:
2. Alter the entries as follows:
Set "network.http.pipelining" to "true"
Set "network.http.proxy.pipelining" to "true"
set "network.http.pipelining.maxrequests" to some number like 30. This means it will make 30 requests at once.
3. Lastly right-click anywhere and select New-> Integer. Name it "nglayout.initialpaint.delay" and set its value to "0". This value is the amount of time the browser waits before it acts on information it recieves.
NOTE:this trick only works for broadband users not for dialup
Set default folder for attachment in Outlook 2003
Do not panic I am here to provide you the solution. The default download location can be changed by opening regedit and drilling down to this registry key:
HKEY_CURRENT USER\Software\Microsoft\Office\11.0\Outlook\Options
Create a new string value under this key (If it does not already exist) named DefaultPath, and set the value to the absolute path you would like to use as your default location.
In my case I wanted to change it to c:\downloads\ Here is what it looks like in the registry:
so now when I go to save an attachment, I don't need to fish around for the downloads folder - it automatically defaults right to it:
Here you are.
Set Multiple home pages for IE 7 from the command line
I added some websites, and then I dug into the registry to see what was changed. Here is a snapshot:
That there are actually two parts to the home page setting. They are both under HKEY_CURRENT_USER\Software\Microsoft\Internet Explorer\Main
The first website to be displayed is stored under the string value named:
Start Page
The rest of the websites displayed are stored in a string array value named:
Secondary Start Pages
The first string is very easy to script and change.
The second is not as simple. This is because it is an array of strings separated by NULL characters, and terminated with two NULL characters.
There are a few ways to do this. One way would be to update one machine with all of your desired settings...and create an exported reg key. You could then use regedit in silent mode to import the settings on other machines.
This has its downfalls - if not done right you could accidentally pull in other values you don't want thrown around to every machine.
Another way would be to use VB Script. I wanted something cleaner, and an excuse to start using our new internal API for writing cross-compilable software (64 and 32 bit). I came up with this little command line program named IESetHomeTabs.exe
Here is how you call it from the command line:
C:>IESetHomeTabs.exe "[URL1]" "[URL2]" "[URL3]"
So if I wanted http://www.intelliadmin.com, http://www.slashdot.org, and http://www.technet.com as my 3 tabs I could call it like this:
C:>IESetHomeTabs.exe "http://www.intelliadmin.com" "http://www.slashdot.org" "http://www.technet.com"
Shutdown your computer in one click
It is really simple, and this will work under Windows XP, and 2003 - not sure if it will work under Vista, but I would imagine the UAC prompt would ruin the whole experience.
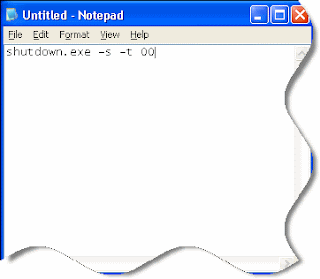
Open notepad and put in the following text:
shutdown.exe -s -t 00
Save it on the desktop as "Shutdown.bat"
Now if you double click on the icon "Shutdown" your system will shutdown immediately with no questions asked.
How to remove a misspelled word from MSWord 2007 Dictionary
However, once you add a word to a dictionary, you can also delete it at any time using the steps listed below.
To delete a word from a dictionary in Word 2007:
• Click the Microsoft Office Button and click Word Options.
• Click Proofing.
• Click Custom Dictionaries.
• Select the dictionary list you want to modify and click Edit Word List.
• Select the appropriate word in the Dictionary box and click Delete.
• Repeat this step for each additional word you want to remove from the dictionary.
Wednesday, November 5, 2008
23 Hidden XP Applications
1) Character Map = charmap.exe (very useful for finding unusual characters)
2) Disk Cleanup = cleanmgr.exe
3) Clipboard Viewer = clipbrd.exe (views contents of Windows clipboard)
4) Dr Watson = drwtsn32.exe (Troubleshooting tool)
5) DirectX diagnosis = dxdiag.exe (Diagnose & test DirectX, video & sound cards)
6) Private character editor = eudcedit.exe (allows creation or modification of characters)
7) IExpress Wizard = iexpress.exe (Create self-extracting / self-installing package)
8 Mcft Synchronization Manager = mobsync.exe (appears to allow synchronization of files on the network for when working offline. Apparently undocumented).
9) Windows Media Player 5.1 = mplay32.exe (Retro version of Media Player, very basic).
10) ODBC Data Source Administrator = odbcad32.exe (something to do with databases)
11) Object Packager = packager.exe (to do with packaging objects for insertion in files, appears to have comprehensive help files).
12) System Monitor = perfmon.exe (very useful, highly configurable tool, tells you everything you ever wanted to know about any aspect of PC performance, for uber-geeks only )
13) Program Manager = progman.exe (Legacy Windows 3.x desktop shell).
14) Remote Access phone book = rasphone.exe (documentation is virtually non-existant).
15) Registry Editor = regedt32.exe [also regedit.exe] (for hacking the Windows Registry).
16) Network shared folder wizard = shrpubw.exe (creates shared folders on network).
17) File siganture verification tool = sigverif.exe
18 Volume Contro = sndvol32.exe (I've included this for those people that lose it from the System Notification area).
19) System Configuration Editor = sysedit.exe (modify System.ini & Win.ini just like in Win98! ).
20) Syskey = syskey.exe (Secures XP Account database - use with care, it's virtually undocumented but it appears to encrypt all passwords, I'm not sure of the full implications).
21) Mcft Telnet Client = telnet.exe
22) Driver Verifier Manager = verifier.exe (seems to be a utility for monitoring the actions of drivers, might be useful for people having driver problems. Undocumented).
23) Windows for Workgroups Chat = winchat.exe (appears to be an old NT utility to allow chat sessions over a LAN, help files available).
Note:- Some of them might not run in Windows XP Home edition
Tuesday, November 4, 2008
Remove The Text From An Icon
Are you very good with figuring out what program corresponds to what icon? If so, you may be interested in this guide. This guide with show you how to remove the titles of the various icons. You may be thinking that it is very easy to remove the titles. Probably your first thought would be to rename the icon and make a blank name. Well, that doesn’t work, if you don’t believe me try it out for yourself and see….
What happens when you try to rename the icon to a blank name? It simply reverts back to the previous name.
For this trick to work, we need to make sure that File and Folder Settings has the Show File Extensions for known File Types Enabled. This is the default setting in XP, so if you have not made any changes it should be set properly. If you are not sure, then check. Here is how …
Click Start, then My Computer. Click on Tools then Folder Options.
On the View tab check mark Hide Extensions For Known File Types then Click Apply Ok, now that we have that set...Here is the trick to removing the icon title and having a Blank Text untitled icon First, right click on the icon that you want to remove it’s title, then go to Rename Now, what you need to do, is hold the ALT button down. With the ALT button held down, and using the keypad type 255 then release the ALT button and hit enter, and voila you now have a untitled icon. This trick will work only for icon, if you are creating multiple Blank Text icons then you will need to name them like this: AFTER:
The reason we need to do this is because part of Windows XP rules state that you cannot have a file/folder/shortcut with the same name in the same folder. To get around this restriction, we simply name the first icon with 1 blank space, the second icon with 2 blank spaces, the third with 3 blank spaces and so on.
FUN, TECH. HOW TO HIDE A FILE IN A IMAGE ! ! !
-The image will hereby be referred to in all examples as fluffy.jpg
-The file will hereby be referred to in all examples as New Text Document.txt
2. Add the file/files you will be injecting into the image into a WinRar .rar or .zip. From here on this will be referred to as (secret.rar)
3. Open command prompt by going to Start > Run > cmd
4. In Command Prompt, navigate to the folder where your two files are by typing
cd location [ex: cd C:\New Folder]
5. Type [copy /b fluffy.jpg + secret.rar fluffy.jpg] (remove the brackets)
Congrats, as far as anyone viewing is concerned, this file looks like a JPEG, acts like a JPEG, and is a JPEG, yet it now contains your file.
In order to view/extract your file, there are two options that you can take
a) Change the file extension from fluffy.jpg to fluffy.rar, then open and your file is there
b) Leave the file extension as is, right click, open with WinRar and your file is there
3D Desktop
Tired of your old desktop????
Here's a free software to convert your desktop into a 3D desktop. Here's a screenshot
A normal graphic card can also this application. So what are you waiting for, get this free software and convert your normal desktop into a 3D desktop.
Minimum system requirements
- Operating system Windows® XP / Vista
- Windows® DirectX 9.0c
- Intel® Pentium IV 1500 MHz
- 256 MB main memory
- DirectX capable graphic card: 64 MB NVIDIA® Geforce™ 3 or better,
ATI® Radeon™ 8500 or better - Screen resolution 800x600 at True Color (16 million colours)
- Internet connection
Day and Night on Your Desktop ! ! !
All in all its a very good tool, if you wish to see the earth from outer space and see how the day and night changes.
Download Desktopearth setup