Monday, March 30, 2009

Creating Rules in Lotus Notes

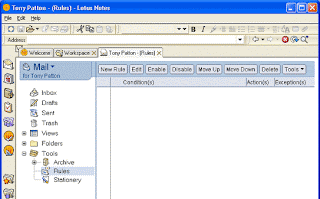
If you do not want to make your inbox cluttered then Mail Rules are just for you. As far as Lotus Notes is concerned Mail rules were added to the Lotus Notes client beginning with version 5. They are a standard part of the Inbox. Figure A shows the standard Lotus Notes 6 client interface with Rules selected.

Fig A


Basically, a mail rule decides how to process incoming messages as they are received. You can create rules to divert messages from a specific person or group to a designated folder. For example, you can customize rules to block spam e-mail or to intercept messages with questionable content.
Mail rules work like this: Whenever a message is received, the Inbox evaluates the fields in the message against registered mail rules. When a message meets a defined condition, Lotus Notes takes the specified action with that message.
When creating a new rule, users must define two parts of the rule: the condition and the action. The condition defines the rule criteria, and the action defines what the system does to the message if the condition is met.

Available rules

To create a rule, click the Create Rule button shown in Figure A to get to the dialog box shown in Figure B, which allows the user to set the various characteristics of a rule. To set the characteristics, the user chooses a property of the e-mail, and adds the condition under which the e-mail should be diverted.

Fig B
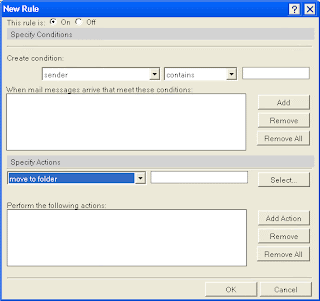

Rules may be created using the following mail message properties:
* Sender
* Subject Line
* Body
* Importance
* Delivery Priority
* To
* CC
* BCC
* To Or CC
* Body Or Subject Line
* Internet Domain
* Message Size (In Bytes)
* All Documents

Fig C

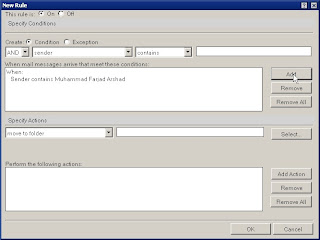
Now Add this rule

Fig D


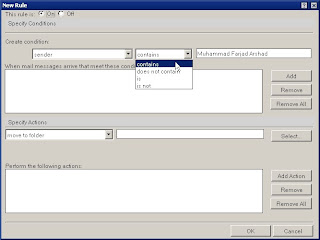
The last option (All documents) is used to define a rule for every message received. The other options allow specific aspects of the message to be used in the rule. Once the property is selected, the next step is adding the condition. Figure C shows the options, which include:

* Contains: The rule property must contain the specific text
* Does Not Contain: The rule property does not contain the specific text
* Is: The rule property equals the specific text
* Is Not: The rule property does not equal the specific text

Next, users should add the specific criteria in the text box. For example, Figure C shows the creation of a rule that processes all messages that have Muhammad Farjad Arshad in the sender line. Then, the criteria is added to the rule by selecting the Add button. Existing criteria may be removed with the Remove button, or the Remove All button may be used to delete all criteria.

Adding the action

At this point, the rule criteria have been established. Now users must specify where the messages that meet the criteria should go. The Specify Actions section at the bottom of the dialog box, shown in Figure D, allows a user to indicate what should happen to messages. You have the following options for Actions:

* Move To Folder: The message is moved to the specified folder; message removed from Inbox
* Copy To Folder: The message is copied to the specified folder; message remains in Inbox
* Send Copy To: A copy of the message is sent to the specified user(s); can send full message or only the headers
* Set Expire Date: Message expiration date is set (number of days, weeks, months, or years)
* Change Importance To: Message importance is set (high, medium, low)
* Delete: The message is deleted from the Inbox
For this Press "Select" button and press "Create New Folder"

FIG E
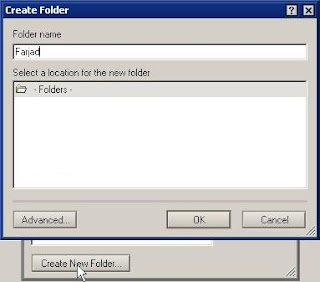


After this Press "OK" then Press "OK"
The Copy To Folder and Move To Folder options allow the user to choose a destination folder. Users should click the Select button and they will be presented with the Folders box shown in Figure E where they can choose the destination folder. Multiple folder options can be created; they can be added with the Add button (shown in Figure). Again, the Remove and Remove All buttons are used to delete existing options.
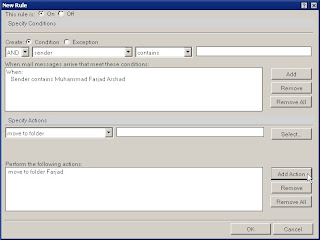

Now press Ok
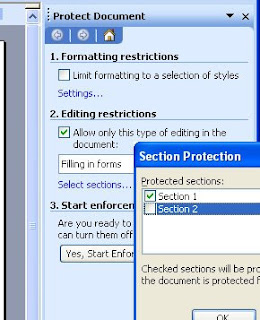
Selected protection in MS Word document

Although Word has a document protection feature you can use but it only protects the whole document. If you want to protect only a part of a document we have to tweak this feature. So, you have to add section breaks around the area to protect. Pretty easy to do. Click just above where you want to start protection and choose Insert > Break > Continuous - this adds a continuous section break in at this point and, because it's continuous there isn't really any indication it's there.

Move to just beyond the area to protect and repeat to add another continuous section break. If you just want to protect the beginning or end of your document you only need one section break.

So far, so good. Now for the protection bit. Choose Tools > Protect Document and in the Editing Restrictions area, click the checkbox and from the list choose Filling in Forms. Now click Select Sections and check the sections to protect (ie leave the ones you want to be able to edit unchecked).

Then click Yes, Start Enforcing Protection and, if desired, add a password.

Now users are locked out of the protected area of the document and they can't change it.

In Word 2007 it works just the same. Find the section breaks in Page Layout > Breaks > Continuous and the protection tool in Review > Protect Document > Restrict Formatting and Editing.

Tweaking MS Word

Tables are a bread and butter tool for most Microsoft Word users. However, under the surface there are lots of things that you can do with tables that you may not initially realize. Now I gonna tell you some techniques for working with tables that will ease your workload while also helping make your documents look more professional.

Adding Tables:
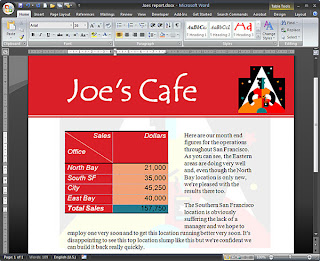
First, to create a table choose the Insert tab > Tables and either insert or draw a table in your document or choose Quick Tables to insert a custom-designed table into your document. When you do this, the table will be inserted at the cursor.

You can erase the data in it by selecting the table, clicking in it, and then clicking the plus sign in its top left corner. Now press Delete to remove its contents but not its formatting.

You can also type a pattern to create a table. To do this type a plus symbol to start and then a series of dashes the width of the first column. Type another plus symbol and dashes for each subsequent column and then finish with another plus symbol. The line should look something like this:

+---------------+---------------+---------------+----------+

Now when you press Enter Word will automatically convert the text into a four column table with one row. To add more rows, click in the last cell and press Tab. If this process does not work, enable it by selecting the Office button, then choosing the Word Options > Proofing > AutoCorrect Options > Auto Format as You Type tab, and finally clicking on the Tables checkmark.


Adding Lines and Borders
Click in the table to display the Table Tools > Design tab and the Layout tab on the Ribbon. The Design tab has options you can use to draw and erase lines from your table.

You can use the draw tool, for example, to draw an angle line through a table cell so you can create both row and column headings in one cell — this is often used in the top left cell of a table. The line is only a visible divider and doesn't split the cell in two parts so you will need to right align one piece of text and left align the other to ensure the headings appear in the correct parts of the cell. Use the Borders options to configure borders for the selected cell, or select the table and use it to format the entire table.


Totaling Numbers
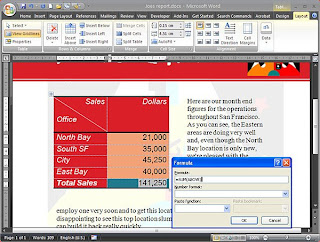
If you have a column of numbers in a table you can add them using a formula. So, for example, to place at total in a cell at the foot of a column, click in the last cell in the column and from the Table Tools > Layout tab select Formula. Now type the formula:
=SUM(ABOVE)
Select a Number Format and click OK. The cell will now contain the result of the calculation. Note that if any of the values in the column change, you must recalculate the formula by clicking on it and press F9.

You can highlight cells that contain formulas so they are easy to see by clicking the Office button, selecting Word Options > Advanced, and selecting the Field Shading: Always option. This ensures that fields are shaded on the screen but they won't be shaded on the printed version.

Repeating Headings
If your table spans more than one page, Word can repeat the header rows on each page to make the pages easier to read. To do this, select the rows that contain the header information that is to be repeated on each page and choose Table Tools > Layout tab and click Repeat Header Rows.

Numbering Rows
To number the rows in a table, select the column to contain the numbers and click the Numbering button on the Home tab. Each cell will be numbered appropriately — if the cells are empty the numbers will fill them, and if there is text in the cell the numbers will appear before the text.

If you move the contents of a row up or down — which you can do by pressing Alt + Shift + Up Arrow (or Alt + Shift + Down Arrow), the numbers will adjust accordingly.

Formatting with Styles and Themes
To format a table click in it and from the Design tab choose a Table Design from those displayed. To highlight alternate columns or rows, click Banded Columns or Banded Rows from the Design tab.

You can add your own formatting to a table by selecting various options from the formatting area of the Home tab and the Table Tools > Design tab. If you use theme colors for the changes and later change the theme, the entire table look will change accordingly.

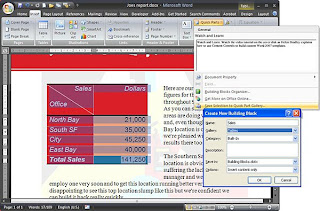
If you have a nicely formatted table that you want to be able to reuse later on, save it by selecting the table and choosing the Insert tab > Quick Parts. Select Save Selection to Quick Part Gallery, type a name for the Building Block, and then select Tables as the Gallery to save it to. To use this in future, click Insert > Table > Quick Tables, choose the table from the list and then edit it as required.

Sorting Data
You can sort the data in a table so it appears in alphabetical or numeric order based on a column's contents. To do this, select the table and choose Layout > Sort.

Select the column to sort by and the type of data in that column. If your table has a header row, select Header Row to protect that row from being sorted.

If you have column totals or more than one header row, don't select the entire table. Instead, select only the rows to sort. Then select No Header Row and Word will only sort the selected rows protecting your headings and totals.

Sunday, March 29, 2009

Brainstorming Softwares

Mind mapping is a great way to add structure to brainstorming sessions and visualize your ideas. Check out the applications your fellow readers use to do their best brainstorming.


MindMeister
MindMeister is by far the most simplistic mind mapping tool in the top five, but its simplicity is definitely an asset. Once you're logged into the service, you can create a fully functional mind map using little more than the directional arrows and the Insert key to add new nodes to your map. Additional customizations like font size and node colors are available for when you want to go beyond the basics. In the upper right corner is a navigation window, handy for when your mind maps become larger than the display space. Exporting is also a strong point for MindMeister; you can export your files to a text outline, PDF, JPG, PNG, or GIF. MindMeister's history function lets you view past versions of your mind map and revert to them if you desire. You can share your maps for public collaboration or hand-select collaborators. Upgrading from the free account to the premium account gives you some handy additional features like map searching, offline editing, and the ability to export your maps to popular software like FreeMind and MindManager.


MindJet
MindJet MindManager isn't cheap by any means, but you get more than your share of value and sophistication for the hundreds you spend on the program. The interface and feature set of MindManager are very polished, and the primary menus are set up like the Microsoft Office Ribbon. After the initial installation, MindManager walks you through the creation of a sample mind map—helpful both to familiarize you with the interface but also to show you features you may have overlooked. MindManager is definitely oriented towards corporate environments, including extensive integration with the Office suite and support for linking your mind maps directly into common database formats like MySQL and Access. Finding information in large mind maps is easy thanks to topic sorting, filtering, and text search tools. Mind maps can be exported in a variety of formats, but most notably in interactive PDF files and embeddable Flash animations. MindManager is available as a 30 day trial.


XMind
XMind is the kind of free application that makes you forget you're not paying for the privilege of using it. The interface is simple and intuitive to use. You can quickly move through your entire mind map with only a handful of keystrokes or jump over to the outline view for even quicker navigation. In addition to a basic mind map you can also create fishbone, organizational, tree, and logic charts. You can export charts as HTML, images, or text, and XMind comes a free account on XMind.net which allows you to share your charts online and embed them into blogs and web sites. There is a professional version of XMind which expands on the functionality of the base application and allows you to create online charts and collaborate with others. XMind Pro is $49 per year, but most people will find the free version more than robust enough for their mind mapping needs. Portable versions available for all three supported platforms.


FreeMind
One of FreeMind's strongest selling points is a Java-based implementation. Whether you use it on Ubuntu or Windows, the features and user interface remain consistent. FreeMind is keyboard friendly with the core functionality well covered by keyboard shortcuts—I made the sample mind map pictured here without ever touching the mouse. The visual elements of your mind maps are highly customizable, including custom icons for flagging nodes on the map, color coding, grouping, and more. Mind maps created with FreeMind can be exported as HTML, PDF, and PNG files, among others.The support wiki for FreeMind is extensive and goes well beyond simply explaining how the application functions, covering things like how to add your own keyboard shortcuts and how to make the application portable.


IMindMap
iMindMap can claim two distinctions among the top five tools. First, it's the biggest download—weighing in at 135MB. Second it's the only application on the list developed by Tony Buzan—who lays claim to being the inventor of the mind map. iMindMap takes a different approach to mapping than the other applications in the list. Rather than create new nodes off the main idea by adding boxes, nodes are created by clicking in the center or the main idea and drawing away from it with the mouse. Each new idea is a branch off the center. Strangely, many of basic feature available in free mind-mapping software are only found in the more expensive versions of iMindMap, like the ability to expand and collapse branches. Mind maps created in iMindMap can be exported as PDF, JPG, PNG and text outline; a 7 day trial is available.

Thursday, March 26, 2009

Firefox Tips & Tricks

Everybody’s favorite open-source browser, Firefox, is great right out of the box. And by adding some of the awesome extensions available out there, the browser just gets better and better.
But look under the hood, and there are a bunch of hidden (and some not-so-secret) tips and tricks available that will crank Firefox up and pimp your browser. Make it faster, cooler, more efficient.

1) More screen space. Make your icons small. Go to View - Toolbars - Customize and check the “Use small icons” box.

2) Smart keywords. If there’s a search you use a lot (let’s say IMDB.com’s people search), this is an awesome tool that not many people use. Right-click on the search box, select “Add a Keyword for this search”, give the keyword a name and an easy-to-type and easy-to-remember shortcut name (let’s say “actor”) and save it. Now, when you want to do an actor search, go to Firefox’s address bar, type “actor” and the name of the actor and press return. Instant search! You can do this with any search box.

3) Keyboard shortcuts. This is where you become a real Jedi. It just takes a little while to learn these, but once you do, your browsing will be super fast. Here are some of the most common (and my personal favs):

* Spacebar (page down)
* Shift-Spacebar (page up)
* Ctrl+F (find)
* Alt-N (find next)
* Ctrl+D (bookmark page)
* Ctrl+T (new tab)
* Ctrl+K (go to search box)
* Ctrl+L (go to address bar)
* Ctrl+= (increase text size)
* Ctrl+- (decrease text size)
* Ctrl-W (close tab)
* F5 (reload)
* Alt-Home (go to home page)

4) Auto-complete. This is another keyboard shortcut, but it’s not commonly known and very useful. Go to the address bar (Control-L) and type the name of the site without the “www” or the “.com”. Let’s say “google”. Then press Control-Enter, and it will automatically fill in the “www” and the “.com” and take you there - like magic! For .net addresses, press Shift-Enter, and for .org addresses, press Control-Shift-Enter.

5) Tab navigation. Instead of using the mouse to select different tabs that you have open, use the keyboard. Here are the shortcuts:

* Ctrl+Tab (rotate forward among tabs)
* Ctrl+Shft+Tab (rotate to the previous tab)
* Ctrl+1-9 (choose a number to jump to a specific tab)

6) Mouse shortcuts. Sometimes you’re already using your mouse and it’s easier to use a mouse shortcut than to go back to the keyboard. Master these cool ones:

* Middle click on link (opens in new tab)
* Shift-scroll down (previous page)
* Shift-scroll up (next page)
* Ctrl-scroll up (decrease text size)
* Ctrl-scroll down (increase text size)
* Middle click on a tab (closes tab)

7) Delete items from address bar history. Firefox’s ability to automatically show previous URLs you’ve visited, as you type, in the address bar’s drop-down history menu is very cool. But sometimes you just don’t want those URLs to show up (I won’t ask why). Go to the address bar (Ctrl-L), start typing an address, and the drop-down menu will appear with the URLs of pages you’ve visited with those letters in them. Use the down-arrow to go down to an address you want to delete, and press the Delete key to make it disappear.

8) User chrome. If you really want to trick out your Firefox, you’ll want to create a UserChrome.css file and customize your browser. It’s a bit complicated to get into here, but check out this tutorial.

9) Create a user.js file. Another way to customize Firefox, creating a user.js file can really speed up your browsing. You’ll need to create a text file named user.js in your profile folder (see this to find out where the profile folder is) and see this example user.js file that you can modify. Created by techlifeweb.com, this example explains some of the things you can do in its comments.

10) about:config. The true power user’s tool, about.config isn’t something to mess with if you don’t know what a setting does. You can get to the main configuration screen by putting about:config in the browser’s address bar. See Mozillazine’s about:config tips and screenshots.

11) Add a keyword for a bookmark. Go to your bookmarks much faster by giving them keywords. Right-click the bookmark and then select Properties. Put a short keyword in the keyword field, save it, and now you can type that keyword in the address bar and it will go to that bookmark.

12) Speed up Firefox. If you have a broadband connection (and most of us do), you can use pipelining to speed up your page loads. This allows Firefox to load multiple things on a page at once, instead of one at a time (by default, it’s optimized for dialup connections). Here’s how:

* Type “about:config” into the address bar and hit return. Type “network.http” in the filter field, and change the following settings (double-click on them to change them):
* Set “network.http.pipelining” to “true”
* Set “network.http.proxy.pipelining” to “true”
* Set “network.http.pipelining.maxrequests” to a number like 30. This will allow it to make 30 requests at once.
* Also, right-click anywhere and select New-> Integer. Name it “nglayout.initialpaint.delay” and set its value to “0″. This value is the amount of time the browser waits before it acts on information it receives.

13) Limit RAM usage. If Firefox takes up too much memory on your computer, you can limit the amount of RAM it is allowed to us. Again, go to about:config, filter “browser.cache” and select “browser.cache.disk.capacity”. It’s set to 50000, but you can lower it, depending on how much memory you have. Try 15000 if you have between 512MB and 1GB ram.

14) Reduce RAM usage further for when Firefox is minimized. This setting will move Firefox to your hard drive when you minimize it, taking up much less memory. And there is no noticeable difference in speed when you restore Firefox, so it’s definitely worth a go. Again, go to about:config, right-click anywhere and select New-> Boolean. Name it “config.trim_on_minimize” and set it to TRUE. You have to restart Firefox for these settings to take effect.

15) Move or remove the close tab button. Do you accidentally click on the close button of Firefox’s tabs? You can move them or remove them, again through about:config. Edit the preference for “browser.tabs.closeButtons”. Here are the meanings of each value:

* 0: Display a close button on the active tab only
* 1:(Default) Display close buttons on all tabs
* 2:Don’t display any close buttons
* 3:Display a single close button at the end of the tab bar (Firefox 1.x behavior)

How to customize MS Word’s blank page

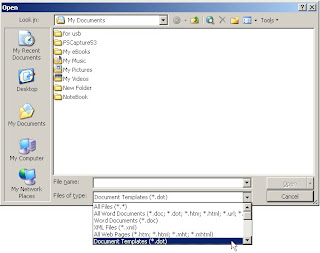
To customize the default blank page of MS Word move into File menu → Open
Now browse for a file normal.dot which you can find at

C:\Documents and Settings\user\Application Data\Microsoft\Templates\normal.dat

Select “Document Template (*.dot)” from Files of Type drop down menu


Now close the document it will automatically save your settings and Next time when you open MS Word you can see whatever you have written on the file.

Monday, March 23, 2009

Google Voice


Last week Google launched Google Voice, a new service that creates a single phone number and inbox for managing all of your phones, transcribing voicemail, and more. It's in closed beta, but we've got a sneak peek.

If you remember, Google Voice is the all-grown-up version of previously mentioned GrandCentral, which Google acquired last year. Google Voice boasts many of the same features as GrandCentral did, but it also adds a few cool features, too. If you're already a GrandCentral user, chances are you'll be joining Google Voice sometime soon (if you haven't already). Let's take a look.

The Inbox Aggregates Your Voicemail and Text Messages

As you can see in the picture above, all SMS and voicemail messages all come to Google Voice through the inbox. You can selectively filter calls to view voicemail only, SMS only, calls placed, received, or missed.

Voicemail Transcription is Fast and Searchable


My test calls to Google Voice were very quickly transcribed (we're talking within two minutes), and the results were... not bad. One would only guess that transcription will be improved over time, but it's already been decent in my tests. You should expect some gibberish to start out, though. Google indicates the certainty of the transcription by the greyscale text; the darker the text, the more sure Google is.

The coolest part about voicemail transcription is that it's searchable, allowing you to dig up a voicemail in Google Voice the same way you can find an old email in Gmail. In fact, if you tell Google Voice to send you an email when you get new voicemail, the transcription is included, meaning that your voicemail actually will be searchable from Gmail.

Place Calls and Send SMS from Google Voice

You can place any call or send a text message to any contact quickly and easily with Google Voice's quick Call and SMS buttons. At first blush placing a call from Google Voice may seem like more trouble than it's worth, but if you think about it, the contact autocompletion makes placing a call extremely fast.


Integration with Google Contacts


If you're using Google Contacts in Gmail, your effort will pay off bigtime. Not only does Google Voice plug into the same contacts, but every box in Google Voice sports contact autocompletion—from the search box to the SMS or Call To: fields.

Group Settings Send Specific Calls to Specific Phones

One of Google Voice's coolest features is the ability to send phone calls and text messages to more than one phone based on rules that you set up. For example, you can set all calls from your boss or co-workers to only reach your work phone, or have calls from your significant other ring every phone so you're always reachable.

How to set multiple homepages in firefox

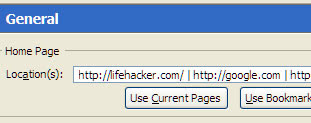
If there's more than one site you always visit after starting up Firefox, you can set your homepage to open several tabs of different web sites at once automatically.


From Firefox's Tools menu, Options, General, enter the addresses of sites separated by a pipe |, as shown above. Or, you can open up all the sites in tabs and hit the "Use Current Pages" button.

Thursday, March 19, 2009

Remote access for users with the Cisco ASA.

There are eight basic steps in setting up remote access for users with the Cisco ASA.

* Step 1. Configure an Identity Certificate
* Step 2. Upload the SSL VPN Client Image
* Step 3. Enable AnyConnect VPN Access
* Step 4. Create a Group Policy
* Step 5. Configure Access List Bypass
* Step 6. Create a Connection Profile / Tunnel Group
* Step 7. Configure NAT Exemption
* Step 8. Configure User accounts

So let’s get started!

Step 1. Configure an Identity Certificate

Here I am creating a general purpose, self-signed, identity certificate named sslvpnkey, and applying that certificate to the ‘outside’ interface. You can purchase a certificate through a vendor such as Verisign, if you choose.

corpasa(config)#crypto key generate rsa label sslvpnkey

corpasa(config)#crypto ca trustpoint localtrust

corpasa(config-ca-trustpoint)#enrollment self

corpasa(config-ca-trustpoint)#fqdn sslvpn. mycompany.com

corpasa(config-ca-trustpoint)#subject-name CN=sslvpn.mycompany.com

corpasa(config-ca-trustpoint)#keypair sslvpnkey

corpasa(config-ca-trustpoint)#crypto ca enroll localtrust noconfirm

corpasa(config)# ssl trust-point localtrust outside

Step 2. Upload the SSL VPN Client Image to the ASA

You can obtain the client image at Cisco.com. As you choose which image to download to your tftp server, remember that you will need a separate image for each OS that your users have. After you select and download your client software, you can tftp it to your ASA.

corpasa(config)#copy tftp://192.168.81.50/anyconnect-win-2.0.0343-k9.pkg flash

After the file has been uploaded to the ASA, configure this file to be used for webvpn sessions. Note that if you have more than one client, configure the most commonly used client to have the highest priority. In this case, we’re only using one client and giving it a priority of 1.

corpasa(config)#webvpn

corpasa(config-webvpn)#svc image disk0:/anyconnect-win-2.3.0254-k9.pkg 1

Step 3. Enable AnyConnect VPN Access

corpasa(config)#webvpn

corpasa(config-webvpn)#enable outside

corpasa(config-webvpn)#svc enable

Step 4. Create a Group Policy

Group Policies are used to specify the parameters that are applied to clients when they connect. In this case, we’ll create a group policy named SSLClient. The remote access clients will need to be assigned an IP address during login, so we’ll also set up a DHCP pool for them, but you could also use a DHCP server if you have one.

corpasa(config)#ip local pool SSLClientPool 192.168.100.1-192.168.100.50 mask 255.255.255.0

corpasa(config)#group-policy SSLCLient internal

corpasa(config)#group-policy SSLCLient attributes

corpasa(config-group-policy)#dns-server value 192.168.200.5

corpasa(config-group-policy)#vpn-tunnel-protocol svc

corpasa(config-group-policy)#default-domain value mysite.com

corpasa(config-group-policy)#address-pools value SSLClientPool

Step 5. Configure Access List ByPass

By using the sysopt connect command we tell the ASA to allow the SSL/IPsec clients to bypass the interface access lists.

corpasa(config)#sysopt connection permit-vpn

Step 6. Create a Connection Profile and Tunnel Group

As remote access clients connect to the ASA, they connect to a connection profile, which is also known as a tunnel group. We’ll use this tunnel group to define the specific connection parameters we want them to use. In our case, we’re configuring these remote access clients to use the Cisco AnyConnect SSL client, but you can also configure the tunnel groups to use IPsec, L2L, etc.

First, let’s create the tunnel group SSL Client:

corpasa(config)#tunnel-group SSLClient type remote-access

Next, we’ll assign the specific attributes:

corpasa(config)#tunnel-group SSLClient general-attributes

corpasa(config-tunnel-general)#default-group-policy SSLCLient

corpasa(config-tunnel-general)#tunnel-group SSLClient webvpn-attributes

corpasa(config-tunnel-webvpn)#group-alias MY_RA enable

corpasa(config-tunnel-webvpn)#webvpn

corpasa(config-webvpn)#tunnel-group-list enable

Note that the alias MY_RA is the group that your users will see when they are prompted for login authentication.

Step 7. Configure NAT Exemption

Now we need to tell the ASA not to NAT the traffic between the remote access clients and the internal network they will be accessing. First we’ll create an access list that defines the traffic, and then we’ll apply this list to the nat statement for our interface.

corpasa(config)#access-list no_nat extended permit

ip 192.168.200.0 255.255.255.0 192.168.100.0 255.255.255.0

corpasa(config)#nat (inside) 0 access-list no_nat

Step 8. Configure User Accounts

Now we’re ready for some user accounts. Here we’ll create a user and assign this user to our remote access vpn.

corpasa(config)#username hyde password l3tm3in

corpasa(config)#username hyde attributes

corpasa(config-username)#service-type remote-access

Finishing up

Don’t forget to save your configuration to memory.

corpasa#write memory

Verify your configuration by establishing a remote access session and use the following show command to view session details.

corpasa #show vpn-sessiondb svc

This guide should help you to get your remote access users up and running in no time. If you run into any difficulties, use the debug webvpn commands to diagnose the problem.

Tuesday, March 17, 2009

Power Shell in Windows 2008 server

The Windows PowerShell environment allows object interaction through providers or native integration. Using this tool can make automating the management of AD fairly straightforward for all administrators.

—————————————————————————————————————————————————————————————————————————————————————

With Windows Server 2008 Microsoft has included Windows PowerShell as an available feature that brings a new object-oriented command shell environment to aid in managing the operating system. Power Shell is the primary management shell of other Microsoft products, including Exchange 2007 and SQL Server 2008.

Available as a download for Windows Server 2003 and Windows XP, PowerShell brings additional capabilities in automation and command-line management to Active Directory (AD). I’ll concentrate on the management of AD objects with PowerShell. Using simple scripts or interactive commands, users, groups, and computers can be added, modified, or deleted. With a simple example, I will walk you through the process. If PowerShell really is the future of the command shell in Windows, getting started early will certainly benefit the Windows administrator. Even though there’s a bit of a learning curve, PowerShell will make the life of an administrator much simpler when dealing with users, groups, and computers in AD.

Note: For those who have worked with VBScript in managing AD objects, you should fall right in with PowerShell.
Adding PowerShell to Windows Server 2008

Before using Windows PowerShell, it must first be installed in your environment. To do this, complete the following steps:

1. Open the Windows Server 2008 Server Manager.
2. Select the features node.
3. Click Add feature.
4. In the features node, scroll down the list and select Windows PowerShell.
5. Click Next and then click Install.

Creating a User Object with Windows PowerShell

Now that Windows PowerShell is installed, open the PowerShell command shell by entering powershell.exe at the command line or choosing the executable from the Start Menu. When the command shell opens, the command prompt will display:

C:\ PS>

Note: Windows PowerShell does not include in this release a native set of tools for working with Active Directory. Version 1.0 uses a provider to hook into AD and manipulate objects.

In Windows PowerShell you can create variables to speed the entry process and allow the reuse of text when running a script. To create a variable, enter the name of the variable and prepend a dollar sign. For example, $variable, would create a variable called variable.

Creating a user object in AD requires the following actions:

1. Connect to the container object in AD where you want to create the user object.
2. Use the Create method of the container object to add the user.
3. Specify the type of object and provide the name.
4. Set the required properties of the object with the Put method of the newly created object.
5. Commit the changes and new object to Active Directory.

For example, let’s create a user object for a new user named Kevin Jefferson in the Accounting Users OU.

At the PowerShell command prompt, enter the following:

$objTargetOU = [ADSI]"LDAP://OU=Accounting Users,DC=yourcompany,DC=com"

$objUser=$objTargetOU.Create("user", "CN=Kevin Jefferson")

$objUser.Put("sAMAccountname","kevin.jefferson")

$objUser.setinfo()

The [ADSI] specifies that the variable should use the Active Directory Services Interface (ADSI) provider to connect to the Accounting Users organization unit (OU) object within the yourcompany.com domain. The provider is required because the current release of Windows PowerShell does not include native support for AD.

When specifying a property for the object you have created, you will use the Put method of the object and specify the attribute and its value. You can repeat these steps once the object has been created to add other properties. To commit them to AD you must specify the setinfo() method for the object.
Specifying passwords

Passwords are not added using the Put method; you will need to use the SetPassword method. Also in Windows Server 2008, security principal objects are disabled by default, using the following command:

$objUser.pbase.invokeset(”AccountDisabled”, false)

This sets the disabled value to false.

Notes about reusing code in a script

* To work with Windows PowerShell it needs to be installed on each system where it will be used.
* Running scripts in Windows PowerShell is disabled by default. To enable it, enter the following from the PowerShell command prompt:

Set-ExecutionPolicy remotesigned

Using scripts in Windows PowerShell also requires that the path to the script be specified. Specifying the local directory can be done using a .\ (dot backslash) notation.

I hope that you will give Windows PowerShell a look when working with objects in Active Directory in Windows Server 2008 to automate the maintenance of AD objects. Keep in mind that Windows PowerShell is capable of many things, and this post is focused on creating an object. A great resource for Windows PowerShell is available at http://www.microsoft.com/technet/scriptcenter/default.mspx.

Hard reset for Routers

Essentially all broadband routers used for home networking provide a reset switch, often a very small, recessed button on the back of the unit. This button allows you to override the current state of the device and restore it to the default settings it had when it was first manufactured.

Some people don't realize that pressing a router's reset button for just a second or two may do nothing. Depending on the type of router and its current state (including the nature of any problems it may have), you may need to hold down the button longer. Networking enthusiasts have developed this so-called 30-30-30 hard reset procedure that should fully reset any home router to its default settings at any time. Follow these steps to perform a router hard reset:

1. when the unit is powered on, hold down its reset button for 30 seconds
2. while still holding down the reset button, unplug the router from power and hold for an additional 30 seconds
3. still holding down the reset button, turn on power to the router again and hold for 30 more seconds

After this process (a total of 90 seconds) is complete, your router should be restored to its factory default state. Note that your particular router may not require the full 30-30-30 procedure. For example, some routers can at times be hard reset after only 10 seconds and without power cycling. Nevertheless, I still recommended memorizing this 30-30-30 rule as a general guideline.

TFTP client for Router firmware upgrade

Last week, I spent some hours trying to reload the firmware on an old Linksys router. Normally you can update a router's firmware via its console (http://192.168.1.1/), but the console sometimes doesn't work on failing routers, such as the one I was troubleshooting.

An alternative method for firmware updates involves using TFTP (Trivial File Transfer Protocol). TFTP is a simplified version of FTP that most routers can support.

Like FTP, TFTP requires you to use a client program to talk to the receiving device. Operating systems like Windows have a command line utility called 'tftp' that functions as the client. Linksys provides a free TFTP client with a graphic interface (GUI) that you may prefer using instead of the command line.

The Linksys TFTP client offers similar functionality to the command line. Through their utility you specify the location of the firmware .bin file, the router's administrative password, and its IP address. The client displays status and error messages as would appear on the command line, and the GUI can be set to automatically retry a firmware download if it fails on the initial attempt. The client also works with other TFTP capable routers, not just Linksys ones.

Unfortunately, even though I could ping the router I was troubleshooting at its default address (192.168.1.1), the router's TFTP server was not functional and I was unable to establish a TFTP connection through either the Linksys GUI or Windows command line. It happens. For download

ftp://ftp.linksys.com/pub/network/tftp.exe

Monday, March 16, 2009

How to add a Voting Poll in Lotus Notes

I've been asked several times by Users, "Can I send a poll via email in Lotus Notes and have the recipients reply with their vote". Well the answer is, not "out of the box", but due to the flexibility and power of Notes, of course you can set this up in just a few minutes!

This tip explains how to create a button in an email message which when pressed, prompts the reader to enter their vote, and automatically sends the response back to the address you define.

1. Create a new email message, and enter the text/graphics you want, explaining to the reader what the poll is about.

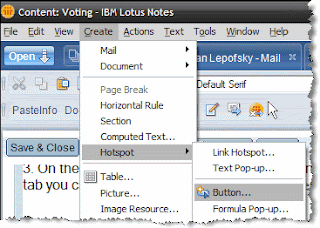
2. From the Lotus Notes menus at the top of the screen choose "Create - Hotspot - Button".


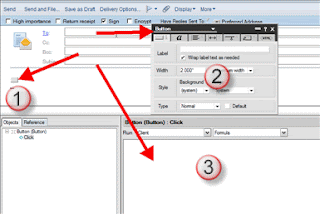
This will insert a small grey button into the email (#1 in the image below), open the Properties Box (#2 in the image below), and at the bottom of your screen you will see a new section open up where you will enter the information about the vote (#3 in the button below).


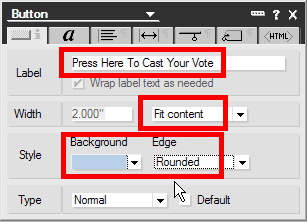
3. On the first tab of the Properties Box enter the text you want displayed on the button (called Label) and customize the button's size, background colour, edge style, etc. As you can see in the image below, I've choosen to have the button's width exactly fit the text I enter for the Label, have a light blue background, and have rounded corners. If you wish, on the second tab of the Properties Box you can change the font size, colour, typeface, etc used for the Label.


So what started as a little grey button now looks like this:


4. Next you will enter the fomula that the button executes when it is pushed.

First, copy the text below to your clipboard:

choicelist:="Yes":"No";
email:="your full lotus notes email address";
title:="Voting";
message:="Please select your choice:";

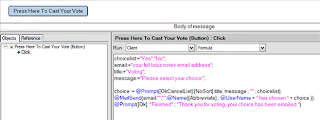
choice := @Prompt([OkCancelList]:[NoSort];title; message ; "" ; choicelist);
@MailSend(email;"";"";@Name([Abbreviate] ; @UserName + " has chosen " + choice ));
@Prompt([Ok] ;"Finished" ; "Thank you for voting, your choice has been emailed.")

Second, paste it into the button's formula box as shown below:


Third, customize the first four lines to meet the specific needs for your poll.

For example, you could do something like this:

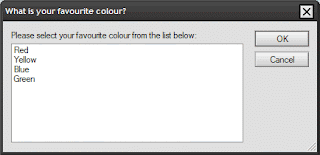
choicelist:="Red":"Yellow":"Blue":"Green";
email:="Alan Lepofsky/Cambridge/IBM@Lotus";
title:="What is your favourite colour?";
message:="Please select your favourite colour from the list below:";

When the email recepient presses the button, they will see the following. When they make their choice and press OK, an email will be sent to the address you defined.


If you want users to be able to select more than one value, replace the line

choice := @Prompt([OkCancelList]:[NoSort];title; message ; "" ; choicelist);

with

choice := @Prompt([OkCancelListMult]:[NoSort];title; message ; "" ; choicelist);

That is all there is to it! What are you waiting for, go show off your new Lotus Notes Polling skills!


Additional Tip:
If you plan on sending polls often, instead of creating the voting button from scratch each time, you can place the button into a Stationary form, and then just change the things you need for each poll.

Note: To put a button back into edit mode, right click on it, and you will see the following menu:

Friday, March 13, 2009

How to ping multiple IPs through a single script

TCL (Tool Control Language) scripting can be used on many of the Cisco router platforms to quickly perform a variety of duties. These scripts are affectionately referred to as “tickle” scripts. Since ping is one of the most common network connectivity tools, we’ll set up a TCL script that can be run on your router to do the work for you. This sweet little script is one you’ll want to be familiar with and keep handy in your toolbox.
First, you’ll need to verify that your router and IOS support TCL. To do this, enter the tclsh command in the Global Configuration Mode.
Router# tclsh
The router prompt should return something like this:
Router(tcl) #
This means that TCL is supported on your IOS platform and you are now ready to enter your script commands.
I’ve found it’s easiest to write your script with a text editor such as Notepad, and then copy this to the router. For this script, we’ll use the foreach command to set up a routine that will loop through each IP address we supply.
Here is the format for this script:
foreach ip {
216.239.122.102
206.190.60.37
216.239.113.101
209.70.46.40
74.125.45.100
157.166.226.25
68.180.206.184
} { puts [exec "ping $ip"] }
We’ve set up “ip” as a variable, and then specified the IP addresses that become the data for this variable. We then finish with the actual exec level command that will be used with the variable.
Now we’re ready to apply this script to the router. To begin, start by entering tclsh at the router prompt in enable mode.
Router#tclsh
The router prompt then indicates that we have entered into the tcl script mode as indicated by the added (tcl) at the prompt. Next, copy and paste the script from Notepad. Note that the router automatically adds the +> before each of the IP addresses. The router then runs the script and displays the results of each ping individually.
Router(tcl)#foreach ip {
+>216.239.122.102
+>206.190.60.37
+>216.239.113.101
+>209.70.46.40
+>74.125.45.100
+>157.166.226.25
+>68.180.206.184
+>} { puts [exec "ping $ip"] }
Type escape sequence to abort.
Sending 5, 100-byte ICMP Echos to 216.239.122.102, timeout is 2 seconds:
!!!!!
Success rate is 100 percent (5/5), round-trip min/avg/max = 60/60/64 ms
Type escape sequence to abort.
Sending 5, 100-byte ICMP Echos to 206.190.60.37, timeout is 2 seconds:
!!!!!
Success rate is 100 percent (5/5), round-trip min/avg/max = 24/25/28 ms
Type escape sequence to abort.
Sending 5, 100-byte ICMP Echos to 216.239.113.101, timeout is 2 seconds:
!!!!!
Success rate is 100 percent (5/5), round-trip min/avg/max = 88/89/93 ms
Type escape sequence to abort.
Sending 5, 100-byte ICMP Echos to 209.70.46.40, timeout is 2 seconds:
!!!!!
Success rate is 100 percent (5/5), round-trip min/avg/max = 28/28/28 ms
Type escape sequence to abort.
Sending 5, 100-byte ICMP Echos to 74.125.45.100, timeout is 2 seconds:
!!!!!
Success rate is 100 percent (5/5), round-trip min/avg/max = 36/37/40 ms
Type escape sequence to abort.
Sending 5, 100-byte ICMP Echos to 157.166.226.25, timeout is 2 seconds:
.....
Success rate is 0 percent (0/5)
Type escape sequence to abort.
Sending 5, 100-byte ICMP Echos to 68.180.206.184, timeout is 2 seconds:
!!!!!
Success rate is 100 percent (5/5), round-trip min/avg/max = 80/81/84 ms
Router#
The script runs very fast, much faster than pinging each ip separately, and it’s easy to spot the failed pings. So create a script with your key network IP addresses and have it saved and ready for easy use when trouble arises. You’ll be glad to have it!

Wednesday, March 11, 2009

How to shorten your URL

Originally, the process of URL shortening was developed to avoid broken URLs in e-mail messages. The increased popularity of instant messaging (IM) and Twitter has escalated the use of URL-shortening services like TinyURL and Bit.ly, especially Twitter with its 140 characters per message limit.

How they work

TinyURL, Bit.ly, and other Web sites that offer URL shortening are similar in how they work. All that’s required is to:

1. Go to the respective Web site.
2. Copy/paste the actual URL into the appropriate field.
3. Click on Shorten if you want the Web site to append a generic ending on the URL.
4. If a custom URL is desired, enter your chosen ending and then click on Shorten.

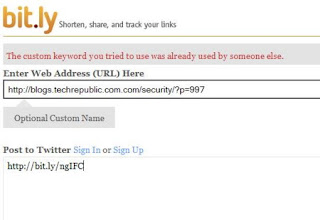
Presto, you have a new shortened URL, as shown below.


From the slide you can see that the finished URL has little meaning and isn’t visually related in any way to the official URL.

Potential phishing method

As with many applications that are helpful to normal law-abiding users, attackers and spammers tend to leverage that same usefulness for ill-gotten gain. URL-shortening services provide attackers and spammers with the following options:

* Allow spammers to side step spam filters as domain names like TinyURL are automatically trusted.
* Prevent educated users from checking for suspect URLs by obfuscating the actual Web-site URL.
* Redirect users to phishing sites in order to capture sensitive personal information.
* Redirect users to malicious sites loaded with drive-by droppers, just waiting to download malware.

As you can see, there are all sorts of opportunities for misuse, just because the victim has no idea where the shortened URL is pointing.

An example

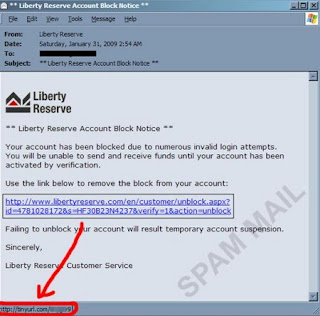
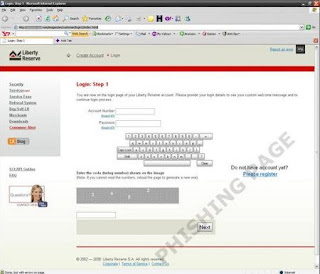
Trend Micro has been very active in researching this particular attack vector and the following slides are borrowed from their Web site. The example uses a typical scam e-mail message to send the message recipient a bogus link. The first slide is the phishing e-mail message:


You may have noticed that the e-mail message displays the actual link instead of a truncated version. Attackers are cognizant of the fact that we as users are constantly told to copy and paste the URL into the browser instead of clicking on the link. So they use extremely long URLs, making the copy/paste as difficult as possible. Come on, why not click on the link, the URL looks right.

Power users who are a bit more paranoid may also check out the link’s properties to see if the advertised URL makes any sense. That’s why attackers now go through the additional effort to use services like Bit.ly and TinyURL. As it prevents the user from truly knowing where the link is pointing. Talk about cat and mouse.

The next slide shows the Web site the link points to and even though the Web site is a fake one, it’s a fairly accurate representation of the bank’s actual Web site:


So, if the victim is fooled, important log in information more than likely will be captured by the phisher.

That’s old news

I dare say that most users aren’t going to fall for the IM or e-mail message phishing exploit, even with the use of shortened URLs. Bad types know that as well and are shifting gears by leveraging the increased use of Twitter. Shortened URLs in tweets (Twitter messages) are so common place; it’s almost an automatic response to click on them, which is exactly what a phisher/attacker wants.

Even better yet, many people use Twitter on their computers. Making URL-shortened links a simple yet effective way to send the computer to a phishing or malicious Web site without the user knowing what’s going on. Not to be overly pessimistic, but security experts say it’s only a matter of time before SMS-enabled phones will be exploited in the same manner.

There’s hope

Every day, I get dozens of tweets that have shortened URLs. I twinge a bit; yet usually click on them if I want to learn more. I already know what you are going to say. I picked the sources that I want to follow, so I should trust them. Yes, No, Maybe?

Well, I’m happy to say that I know of at least two URL-shortening Web sites that offer a preview feature. This means the user can make an educated choice of whether to go to the link or not, because the full-length URL is displayed.

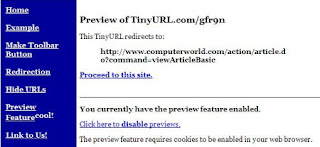
TinyURL preview feature

To initiate TinyURL’s preview all that’s required is to start your computer or smart phone’s Web browser, go to TinyURL’s Web site, and enable the preview opt-in feature. After that every time a TinyURL link is clicked, the browser immediately goes to a preview Web page like the one shown next:


TinyURL’s preview didn’t work when I used any of the Twitter client applications for my iPhone. For example, when I clicked a TinyURL link in Tweetie, it opened Safari and went straight to the linked Web page. That’s not good, I’ll have to remember to only open links in the SMS application.

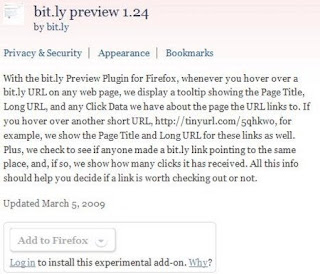
Bit.ly preview feature

Bit.ly uses a slightly different approach. They have created an add-on for Firefox. Once it’s installed, hovering over the URL-shortened Bit.ly link will open a window displaying the full-length URL. The add-on is still experimental, so before you can install it, you are required to log into the Mozilla Web site.


Previewing Bit.ly’s shortened URLs on smart phones is a bit more complicated as Firefox is required. I know Firefox has a mobile Web browser for Windows Mobile 6, but I’m not using any Windows-based smart phones. So I’d appreciate hearing from you as to whether the Bit.ly preview works in the mobile Firefox browser or not.

Final thoughts

Many industry pundits say that we shouldn’t click on active links, whether they’re in e-mail messages, IM messages, or tweets. That’s an unrealistic expectation; so just make sure to approach links (especially those with shortened URLs) with caution. If possible, use one of the preview features to check out the link first.

Wednesday, March 4, 2009

Microsoft coming up with the new ideas

Work Place of the future

At Microsoft's TechFest, it takes a little imagination to see how the research technologies might eventually come to market.

A new video from Microsoft shows in an elegant, if utopian way, what it might look like if all of those gadgets came together several years hence. Earlier on Friday, Microsoft Business Division President Stephen Elop showed the video in a speech at the University of Pennsylvania's Wharton School of Business.

One of the concepts that Microsoft is big on is the idea that people will be able to have all their information with them and be able to work from any computer display. And, since they expect nearly every flat surface to be a display some day, that means working just about anywhere.

Stephen also step back and talk about how the precursors to many of the technologies shown in the video exist today in Microsoft Research labs.

This slide and the following are screenshots from the video.


Two girls from different countries communicate using a clear whiteboard that can do on-the-fly translation.


A worker in the future will find that nearly everything in the office can serve as a computer display when needed. So much for that window view.

Robotic Receptionist


Chief Research and Strategy officer Craig Mundie on Thursday demonstrated a software-based robot that uses a combination of visual and voice recognition as well as speech synthesis to handle basic tasks. Microsoft itself plans to use the software robot to handle shuttle requests in its own buildings, which typically have a pair of receptionists to handle visitors and shuttle requests.

In a video, two Microsoft employees approach the robot, who said (in a rather robotic voice) "Which building do you want to go to?"

After checking that she heard the visitors correctly, and double-checking both workers want to take the same shuttle, the robot declares: "It should be here in four minutes."

"This is what a natural user interface is all about and it won't be just a receptionist," Mundie said. "This is just the tip of the iceberg."

Microsoft has launched a robotics effort, though it is still in its early stages.

The demo came as part of Mundie's presentation at the company's Financial Analysts Meeting here. Mundie is one of two executives (Ray Ozzie is the other) tasked with filling the very large shoes left by Bill Gates, who stepped down from full-time work at Microsoft last month.

How to open winmail.dat files

Winmail.dat files contain formatting information for Rich Text (RTF) messages sent from Microsoft Exchange Server; they are added to the end of e-mails when a recipient's e-mail client does not support RTF messages; the Winmail.dat file is not useful to users that do not use Outlook or Exchange Server to retrieve their mail.
So for opening such files One must download "Win Mail Reader" or "Win Mail Decoder"