This tip explains how to create a button in an email message which when pressed, prompts the reader to enter their vote, and automatically sends the response back to the address you define.
1. Create a new email message, and enter the text/graphics you want, explaining to the reader what the poll is about.
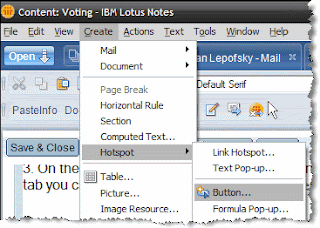
2. From the Lotus Notes menus at the top of the screen choose "Create - Hotspot - Button".
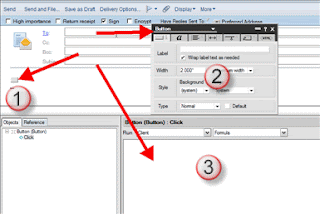
This will insert a small grey button into the email (#1 in the image below), open the Properties Box (#2 in the image below), and at the bottom of your screen you will see a new section open up where you will enter the information about the vote (#3 in the button below).
3. On the first tab of the Properties Box enter the text you want displayed on the button (called Label) and customize the button's size, background colour, edge style, etc. As you can see in the image below, I've choosen to have the button's width exactly fit the text I enter for the Label, have a light blue background, and have rounded corners. If you wish, on the second tab of the Properties Box you can change the font size, colour, typeface, etc used for the Label.
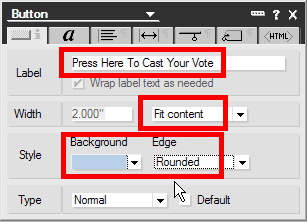
So what started as a little grey button now looks like this:

4. Next you will enter the fomula that the button executes when it is pushed.
First, copy the text below to your clipboard:
choicelist:="Yes":"No";
email:="your full lotus notes email address";
title:="Voting";
message:="Please select your choice:";
choice := @Prompt([OkCancelList]:[NoSort];title; message ; "" ; choicelist);
@MailSend(email;"";"";@Name([Abbreviate] ; @UserName + " has chosen " + choice ));
@Prompt([Ok] ;"Finished" ; "Thank you for voting, your choice has been emailed.")
Second, paste it into the button's formula box as shown below:
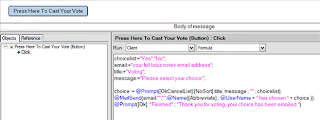
Third, customize the first four lines to meet the specific needs for your poll.
For example, you could do something like this:
choicelist:="Red":"Yellow":"Blue":"Green";
email:="Alan Lepofsky/Cambridge/IBM@Lotus";
title:="What is your favourite colour?";
message:="Please select your favourite colour from the list below:";
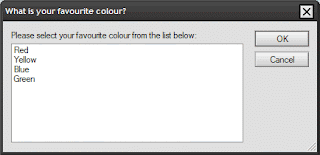
When the email recepient presses the button, they will see the following. When they make their choice and press OK, an email will be sent to the address you defined.
If you want users to be able to select more than one value, replace the line
choice := @Prompt([OkCancelList]:[NoSort];title; message ; "" ; choicelist);
with
choice := @Prompt([OkCancelListMult]:[NoSort];title; message ; "" ; choicelist);
That is all there is to it! What are you waiting for, go show off your new Lotus Notes Polling skills!
Additional Tip:
If you plan on sending polls often, instead of creating the voting button from scratch each time, you can place the button into a Stationary form, and then just change the things you need for each poll.
Note: To put a button back into edit mode, right click on it, and you will see the following menu:

No comments:
Post a Comment