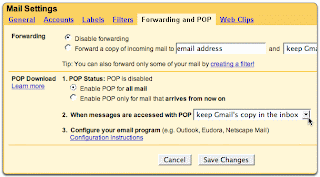
You can retrieve your Gmail messages with a client or device that supports POP, like Microsoft Outlook or Netscape Mail.
To enable POP in Gmail:
#. Sign in to Gmail.
#. Click Settings at the top of any Gmail page.
#. Click Forwarding and POP/IMAP.

#. Select Enable POP for all mail or Enable POP for mail that arrives from now on.
#. Choose the action you'd like your Gmail messages to take after they are accessed with POP.
#. Configure your POP client* and click Save Changes.
2.Open Thunderbird, and select 'Account Settings...' from the 'Tools' menu.

3.Select 'Email account,' and click 'Next.'

4.Enter your full name in the 'Your Name:' field. Enter your full Gmail email address (username@gmail.com) in the 'Email Address:' field, and click 'Next.' Google Apps users, enter your full address in the format 'username@your_domain.com.'

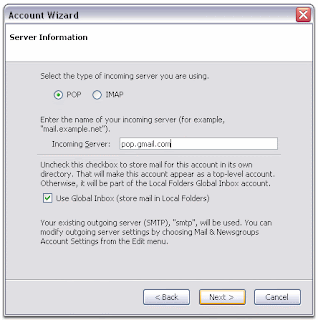
5.Select 'POP' as the type of incoming server you are using. Enter 'pop.gmail.com' in the 'Incoming Server:' field, and click 'Next.' Google Apps users, enter the server names provided, don't add your domain name in this step.

6.Enter your email address (including '@gmail.com' or '@your_domain.com') in the 'User Name:' field, and click 'Next.'

7.Enter a name for your email account in the 'Account Name:' field, and click 'Next.'

8.Verify your account information in the dialogue box, and click 'Finish.'
9.Select 'Server Settings' listed beneath your new account.
10.Check the box next to 'Use secure connection (SSL),' and ensure that '995' appears in the 'Port:' field.

11.Select 'Outgoing Server (SMTP)' listed beneath your new account.
12.Enter 'smtp.gmail.com' in the 'Server Name:' field under 'Outgoing Server (SMTP) Settings,' and enter '587' in the 'Port:' field.

13.Check the box next to 'Use name and password,' and enter your email address (including '@gmail.com' or '@your_domain.com) in the 'User Name:' field.
14.Select 'TLS' under 'Use secure connection,' and click 'OK.'
15.Verify that the information listed under 'Congratulations!' is correct, and click 'Finish.'
No comments:
Post a Comment