Good News folks after Open DNS now Google has announced its public DNS servers as well. Google Public DNS is a free, global Domain Name System (DNS) resolution service, that you can use as an alternative to your current DNS provider. Only thing you want to use this service is, configure your network with following DNS IP address,
8.8.8.8
8.8.4.4
Microsoft Windows
DNS settings are specified in the TCP/IP Properties window for the selected network connection.
Example: Changing DNS server settings on Microsoft Windows Vista
1. Go the Control Panel.
2. Click Network and Internet, then Network and Sharing Center, then Manage network connections.
3. Select the connection for which you want to configure Google Public DNS. For example:
* To change the settings for an Ethernet connection, right-click Local Area Connection, and click Properties.
* To change the settings for a wireless connection, right-click Wireless Network Connection, and click Properties.
If you are prompted for an administrator password or confirmation, type the password or provide confirmation.
4. Select the Networking tab. Under This connection uses the following items, click Internet Protocol Version 4 (TCP/IPv4), and then click Properties.
5. Click Advanced and select the DNS tab. If there are any DNS server IP addresses listed there, write them down for future reference, and remove them from this window.
6. Click OK.
7. Select Use the following DNS server addresses. If there are any IP addresses listed in the Preferred DNS server or Alternate DNS server, write them down for future reference.
8. Replace those addresses with the IP addresses of the Google DNS servers: 8.8.8.8 and 8.8.4.4.
9. Restart the connection you selected in step 3.
Mac OS X
DNS settings are specified in the Network window.
Example: Changing DNS server settings on Mac OS 10.5
1. From the Apple menu, click System Preferences, then click Network.
2. If the lock icon in the lower left-hand corner of the window is locked, click the icon to make changes, and when prompted to authenticate, enter your password.
3. Select the connection for which you want to configure Google Public DNS. For example:
* To change the settings for an Ethernet connection, select Built-In Ethernet, and click Advanced.
* To change the settings for a wireless connection, select Airport, and click Advanced.
4. Select the DNS tab.
5. Click + to replace any listed addresses with, or add, the Google IP addresses at the top of the list: 8.8.8.8 and 8.8.4.4.
6. Click Apply and OK.
Linux
In most modern Linux distributions, DNS settings are configured through Network Manager.
Example: Changing DNS server settings on Ubuntu
1. In the System menu, click Preferences, then click Network Connections.
2. Select the connection for which you want to configure Google Public DNS. For example:
* To change the settings for an Ethernet connection, select the Wired tab, then select your network interface in the list. It is usually called eth0.
* To change the settings for a wireless connection, select the Wireless tab, then select the appropriate wireless network.
3. Click Edit, and in the window that appears, select the IPv4 Settings tab.
4. If the selected method is Automatic (DHCP), open the dropdown and select Automatic (DHCP) addresses only instead. If the method is set to something else, do not change it.
5. In the DNS servers field, enter the Google Public DNS IP addresses, separated by a space: 8.8.8.8 8.8.4.4
6. Click Apply to save the change. If you are prompted for a password or confirmation, type the password or provide confirmation.
Wednesday, December 30, 2009
Thursday, December 17, 2009
Online TO-DO list
TeuxDeux is a minimal and uncomplicated tool that you can use to manage your to-do lists inside the browser.
Type something in the input box and it will added to your pending task list for that day. Hover your mouse over a task and just click once to mark that item as done.
The most interesting part about TeuxDeux is this – if the due date of a task is today and you don’t complete it in time, it will automatically be added to your next day’s pending task list.
If that’s not what you want, you can manually drag tasks and pending items to any other future dates but there’s no need for you to look back in the past to catch up with any pending tasks.
To download it please visit follwing link
http://teuxdeux.com/
Thursday, December 3, 2009
Enhance your internet activities with Sea Monkey
Folks today i gonna tell you about a very interesting internet suite named "SeaMonkey". It is considered as the modern internet suite. Such a software suite was previously made popular by Netscape and Mozilla, and now the SeaMonkey project continues to develop and deliver high-quality updates to this concept.
SeaMonkey has inherited the successful all-in-one concept of the original Netscape Communicator and continues that product line based on the modern, cross-platform architecture provided by the Mozilla project.
1>The Internet browser at the core of the SeaMonkey suite uses the same rendering engine and application platform as its sibling Mozilla Firefox, with popular features like tabbed browsing, feed detection, popup blocking, smart location bar, find as you type and a lot of other functionality for a smooth web experience.
2>SeaMonkey's Mail and Newsgroups client shares lots of code with Mozilla Thunderbird and features adaptive Junk mail filtering, tags and mail views, web feeds reading, tabbed messaging, multiple accounts, S/MIME, address books with LDAP support and is ready for both private and corporate use.
3>Additional components include an easy-to-use HTML Editor, the ChatZilla IRC chat application and web development tools like a DOM Inspector and a JavaScript debugger.
4>If that's still not enough, SeaMonkey can be extended with numerous Add-Ons that provide additional functionality and customization for a complete Internet experience.

Wednesday, November 25, 2009
Show Desktop icon missing
Many people confronted with this issue that some time they loose "Show Desktop" icon.It can accidentally be deleted or you may loose it for some other reason, but the bottom line is : only few people know how to restore it. So for visitors of this blog the solution is right here.
To recreate it open Notepad and paste following lines on it:
[Shell]
Command=2
IconFile=explorer.exe,3
[Taskbar]
Command=ToggleDesktop
Now save this file with "Desktop.scf" {without quotations. This will save like this:

Now copy it and past this on following location.
C:\Documents and Settings\"User Name"\Application Data\Microsoft\Internet Explorer\Quick Launch
Note:
"User Name" mentioned in above path is your current user name.
Now it is all done. Enjoy.....
Tuesday, November 24, 2009
Display a message box before User Logon
If you want to pop up a message box when Computer starts and before logon screen on Win9X or WinNT, then you can use this trick.
Run the Registry Editor using Start->Run and then type "regedit" and Enter. You will come up with a windows with title Registry Editor. You will see that something like this.
Here is a view of Registry editor. On the left pane we have a tree view with some items. These are actually the roots of different types of keys. We are going to to discuss only two of them which are needed by us. The remaining will wait for another time.
HKEY_CURRENT_USER holds the information about the currently logged on user.
HKEY_LOCAL_MACHINE holds the information about the whole computer.
Go to:
For Win9X
HKEY_LOCAL_MACHINE\Software\Microsoft\Windows\CurrentVersion\WinLogOn
And For WinNT
HKEY_LOCAL_MACHINE\Software\Microsoft\Windows NT\CurrentVersion\WinLogOn
And make two String Keys named
LegalNoticeCaption and LegalNoticeText
Put any value which you want to display. First is the Title of the Message box and second is the text to be displayed. After doing this, you will get welcome message each time windows starts.
NOTE: Modifying the registry is dangerous. If you make any mistake you may corrupt your registry. This may cause your system to crash or become unstable.
Run the Registry Editor using Start->Run and then type "regedit" and Enter. You will come up with a windows with title Registry Editor. You will see that something like this.

Here is a view of Registry editor. On the left pane we have a tree view with some items. These are actually the roots of different types of keys. We are going to to discuss only two of them which are needed by us. The remaining will wait for another time.
HKEY_CURRENT_USER holds the information about the currently logged on user.
HKEY_LOCAL_MACHINE holds the information about the whole computer.
Go to:
For Win9X
HKEY_LOCAL_MACHINE\Software\Microsoft\Windows\CurrentVersion\WinLogOn
And For WinNT
HKEY_LOCAL_MACHINE\Software\Microsoft\Windows NT\CurrentVersion\WinLogOn
And make two String Keys named
LegalNoticeCaption and LegalNoticeText
Put any value which you want to display. First is the Title of the Message box and second is the text to be displayed. After doing this, you will get welcome message each time windows starts.
NOTE: Modifying the registry is dangerous. If you make any mistake you may corrupt your registry. This may cause your system to crash or become unstable.
Tuesday, November 10, 2009
Browse Local hard drives with Admin Privileges
It’s for computer administrator and system persons with admin rights. !
You can open / browse (files and folders) with admin rights from limited user logging
Steps as follows….
Goto to command prompt and type runas /user:localhost\administrator "mmc compmgmt.msc"
it will open computer management.
Select "disk management" under StorageIn right panel you can see the local drives. Just right
click and open the drive which you want to access
Tuesday, October 13, 2009
How to hide partition with Command Prompt
1.Select start then Run in the Run type cmd or start → All Programs → Accessories → Command Prompt or Press Windows + R key and type cmd.
2.In command prompt type DISKPART
3.Then type LIST VOLUME, after this you will get an partition overview
4.Type SELECT VOLUME (number), press ENTER then type REMOVE LETTER (letter)
5.After this partition will be hidden
6.To get it back just type ASSIGN LETTER (letter).
2.In command prompt type DISKPART
3.Then type LIST VOLUME, after this you will get an partition overview
4.Type SELECT VOLUME (number), press ENTER then type REMOVE LETTER (letter)
5.After this partition will be hidden
6.To get it back just type ASSIGN LETTER (letter).
Virus Unwise.exe removing technique
Hi friends after a long break i am back in action, as i have encountered with a virus named unwise.exe so i thought to share its solution with you people.
Unwise_.exe Virus affected in internet browsing. That virus blocked all sites and Run that Virus in computer running process. Below are manual removal instructions for unwise.exe so you can remove the unwanted file from your PC. Always be sure to back up your PC before you modify anything.
Use Windows Task Manager to Remove unwise.exe Processes
1. To open the Windows Task Manager, use the combination of CTRL+ALT+DEL or CTRL+SHIFT+ESC.
2. Click on the “Image Name” button to search for ” unwise.exe” process by name.
3. Select the ” unwise.exe” process and click on the “End Process” button to kill it.
Use Windows File Search Tool to Find unwise.exe Path
1. Go to Start > Search > All Files or Folders.
2. In the “All or part of the the file name” section, type in ” unwise.exe” file name(s).
3. To get better results, select “Look in: Local Hard Drives” or “Look in: My Computer” and then click “Search” button.
4. When Windows finishes your search, hover over the “In Folder” of ” unwise.exe”, highlight the file and copy/paste the path into the address bar. Save the file’s path on your clipboard because you’ll need the file path to delete unwise.exe in the following manual removal steps.
Registry Clearing
Take START then Command Prompt–>Type regedit then Click OK.After one window open .Click on Ctrl+F and type umwise_.exe.Click Search Button and all (unwise_.exe)entries deleted.
Detect and Delete Other unwise.exe Files
1. To open the Windows Command Prompt, go to Start > Run > cmd and then press the “OK” button.
2. Type in “dir /A name_of_the_folder” (for example, C:\Spyware-folder), which will display the folder’s content even the hidden files.
3. To change directory, type in “cd name_of_the_folder”.
4. Once you have the file you’re looking for type in del “name_of_the_file”.
5. To delete a file in folder, type in “del name_of_the_file”.
6. To delete the entire folder, type in “rmdir /S name_of_the_folder”.
7. Select the ” unwise.exe” process and click on the “End Process” button to kill it.
Monday, August 24, 2009
How to build your family tree over internet
Dear Folks! today i gonna tell you about a very interesting site named Geni.com. People like me who are very proud on their families and know their roots will definitely like this site. This site enables you to create your family tree through there simple interface. Your relatives who are added to the tree can join Geni and add other relatives. This make it easy to grow your tree.
Everyone in the tree has a profile which shows more about them and enables other family members to stay in touch with them. Families can work together to build profiles for common ancestors.
Family members can also share photos, videos, events, discussions, and more. A family timeline shows the history of everyone in the family.
Geni is private. Only the people in your family tree can log in to your tree and your profile. Geni will not share your personal information with third parties. We will not sell your email address or spam you. Users control which communications they would like to receive from Geni.
Geni was founded by former executives and early employees of PayPal, eGroups, eBay, and Tribe, and is backed by venture capital firms Founders Fund and Charles River Ventures.
Monday, August 17, 2009
How to convert a partition from FAT32 to NTFS
Guyz... Due to some software requirement or any reason you people need to convert a FAT partition to NTFS. But you don't know how to convert it without formatting or any data loss. So don't worry just be happy becuase the solution is right here.
1. Firstly move on to command prompt by typing "cmd" in Run
2. Enter the command "convert c: /fs:ntfs" to convert the C: partition from FAT32 to NTFS.
Where c: is the partition name. You can use any partition name which you want to convert.
1. Firstly move on to command prompt by typing "cmd" in Run
2. Enter the command "convert c: /fs:ntfs" to convert the C: partition from FAT32 to NTFS.
Where c: is the partition name. You can use any partition name which you want to convert.
Monday, August 3, 2009
Become a Model in Intel's Rockstar Advertisement
Dear Fellows today i am here with an amazing trick. Anyone who is a TV maniac, must have seen the Intel Rockstar Ad, its quite an interesting ad. Now did you ever wish to see yourself in place of the Rockstar, surely i wished a lot whenever i used to see that ad, and i am sure there were thousands like who used to wish the same. Thanks to Intel, you can now put yourself in that ad, YES ITS TRUE. You just have to upload a pic of yours(Only Face), and rest everything will be done automatically and that's it within a few seconds your video will be ready. There are 3 limitations which has to be kept in mind while uploading the pic.
1. No eyewears
2. No hair on the forehead
3. Mouth should be closed
Just keep these three points in mind while uploading your image.
The site also uploads the video on youtube if you want, so that you can share it with your friends.
1. No eyewears
2. No hair on the forehead
3. Mouth should be closed
Just keep these three points in mind while uploading your image.
The site also uploads the video on youtube if you want, so that you can share it with your friends.
Thursday, July 30, 2009
For IT Engineers appreciation
An IT Engineer unpacked the server from its box, installed an operating system, patched it for security, made sure the power and air conditioning was working in the server room, monitored it for stability, set up the software, and kept backups in case anything went wrong.
An IT Engineer installed the routers, laid the cables, configured the networks, set up the firewalls, and watched and guided the traffic for each hop of the network that runs over copper, fiber optic glass, and even the air itself to bring the Internet to your computer. All to make sure the webpage found its way from the server to your computer.
An IT Engineer makes sure your network connection is safe, secure, open, and working. A IT Engineer makes sure your computer is working in a healthy way on a healthy network. A IT Engineer takes backups to guard against disaster both human and otherwise, holds the gates against security threats and crackers, and keeps the printers going no matter how many copies of the tax code someone from Accounting prints out.

An IT Engineer worries about spam, viruses, spyware, but also power outages, fires and floods. When the email server goes down at 2 AM on a Sunday, your IT Engineer is called, wakes up, and goes to work.
An IT Engineer is a professional, who plans, worries, hacks, fixes, pushes, advocates, protects and creates good computer networks, to get you your data, to help you do work -- to bring the potential of computing ever closer to reality.
So if you can read this, thank your IT Engineer -- and know he or she is only one of dozens or possibly hundreds whose work brings you the email from your aunt on the West Coast, the instant message from your son at college, the free phone call from the friend in Australia, and this webpage.
Show your appreciation
Friday, July 31, 2009, is the 10th annual IT Engineer Appreciation Day. On this special international day, give your IT Engineer something that shows that you truly appreciate their hard work and dedication. (All day Friday, 24 hours, your local timezone).
Let's face it, IT Engineers get no respect 364 days a year. This is the day that all fellow IT Engineers across the globe, will be showered with expensive sports cars and large piles of cash in appreciation of their diligent work. But seriously, we are asking for a nice token gift and some public acknowledgement. It's the least you could do.
Consider all the daunting tasks and long hours (weekends too.) Let's be honest, sometimes you don't know your IT Engineers as well as they know you. Remember this is one day to recognize your IT Engineer for their workplace contributions and to promote professional excellence. Thank them for all the things they do for you and your business.
And Donot even dare to forget Me in this appreciation.
Wednesday, July 29, 2009
When your ISP's DNS is down
This for all my Pakistani friends who are using PTCL DSL. Usually People who are using PTCL complains that there DSL link is sync but still they are facing problem in browsing a web site. What they have to do is just first ping their gateway then the DNS. If gateway is pinging but the DNS is not use the following solution.
Before we start firstly we have to understand the work of DNS. When you type an address like www.yahoo.com in your browser address bar, the computer doesn’t know where yahoo.com points and it will therefore ask the DNS server.
The job of a DNS server is to translate this human-readable web address (like www.yahoo.com) into a computer-readable number also known as an IP address (209.131.36.158). Once your computer knows the IP location of a web domain name, it opens the website in your browser.
DNS is such an integral part of our Internet life working behind the scenes every time we connect to a website. In most situations, our Internet Service Provider specifies the DNS Server address that we key into the browser network settings or the router.
Now back to our problem. To solve this problem, we look at a simple and reliable service called OpenDNS that speeds up your Internet connection and also handles some other very important issues. There are no software to install, it’s very easy to set up and the price is just right - $0.
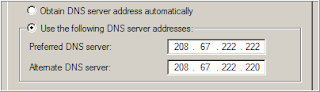
To use OpenDNS, all you have to do is open your Network Connections or Router’s settings page and update the default DNS server to point to the OpenDNS nameservers that are 208.67.222.222 and 208.67.220.220.
Unlike the DNS servers of your less reliable ISP, OpenDNS servers store the IP addresses of millions of websites in their cache so it would take less time to resolve your requests. So if you have asked for an IP address of a website that has been previously requested by another OpenDNS user, you will get the reply instantly.
Another huge advantage of using OpenDNS is that it blocks phishing websites from loading on your computer. It uses data from Phishtank, a community site that is also used by Yahoo! Mail to determine if some particular website is part of any online phishing scam.
OpenDNS also takes care of any typos that you commit while typing the name of popular websites. For instance, if you type www.gogle.com omitting the additional “o” by mistake, OpenDNS will open the main www.google.com site automatically.
If you are a parent worried about kids visiting adult websites on the home computer, you can configure OpenDNS to block any adult website from loading on the computer. In fact, quite a few business places use OpenDNS to block social sites like MySpace and Facebook on employee computers.
Power users can assign abbreviations or OpenDNS Shortcuts to access their favourite websites more quickly.
For instance, you can set “mail” as a shortcut for http://mail.google.com/ or something like “a” for www.reallylongname.com - just type the shortcut to access the site. A good alternative for browser based bookmarks and it works across all computers where you have logged in to your OpenDNS account.
So enjoy...........
Tuesday, July 28, 2009
How to change Windows XP's administrator Password
Dear readers, I am here with an amazing trick. Most of my friends ask me that how can they change their Windows XP forgotten password. So here is the solution.
1. Place your Windows XP CD in your cd-rom and start your computer (it’s assumed here that your XP CD is bootable – as it should be - and that you have your bios set to boot from CD)
2. Keep your eye on the screen messages for booting to your cd Typically, it will be “Press any key to boot from cd”
3. Once you get in, the first screen will indicate that Setup is inspecting your system and loading files.
4. When you get to the Welcome to Setup screen, press ENTER to Setup Windows now
5. The Licensing Agreement comes next - Press F8 to accept it.
6. The next screen is the Setup screen which gives you the option to do a Repair.
It should read something like “If one of the following Windows XP installations is damaged, Setup can try to repair it”
Use the up and down arrow keys to select your XP installation (if you only have one, it should already be selected) and press R to begin the Repair process.
7. Let the Repair run. Setup will now check your disks and then start copying files which can take several minutes.
8. Shortly after the Copying Files stage, you will be required to reboot. (this will happen automatically – you will see a progress bar stating “Your computer will reboot in 15 seconds”
9. During the reboot, do not make the mistake of “pressing any key” to boot from the CD again! Setup will resume automatically with the standard billboard screens and you will notice Installing Windows is highlighted.
10. Keep your eye on the lower left hand side of the screen and when you see the Installing Devices progress bar, press SHIFT + F10. This is the security hole! A command console will now open up giving you the potential for wide access to your system.
11. At the prompt, type NUSRMGR.CPL and press Enter. Voila! You have just gained graphical access to your User Accounts in the Control Panel.
12. Now simply pick the account you need to change and remove or change your password as you prefer. If you want to log on without having to enter your new password, you can type control userpasswords2 at the prompt and choose to log on without being asked for password. After you’ve made your changes close the windows, exit the command box and continue on with the Repair (have your Product key handy).
13. Once the Repair is done, you will be able to log on with your new password (or without a password if you chose not to use one or if you chose not to be asked for a password). Your programs and personalized settings should remain intact.
I tested the above on Windows XP Pro with and without SP1/2/3 and also used this method in a real situation where someone could not remember their password and it worked like a charm to fix the problem. This security hole allows access to more than just user accounts. You can also access the Registry and Policy Editor, for example. And its gui access with mouse control. Of course, a Product Key will be needed to continue with the Repair after making the changes, but for anyone intent on gaining access to your system, this would be no problem.
And in case you are wondering, NO, you cannot cancel install after making the changes and expect to logon with your new password.
Cancelling will just result in Setup resuming at bootup and your changes will be lost.
Ok, now that your logon problem is fixed, you should make a point to prevent it from ever happening again by creating a Password Reset Disk. This is a floppy disk you can use in the event you ever forget your log on password. It allows you to set a new password.
Here's how to create one if your computer is NOT on a domain:
Go to the Control Panel and open up User Accounts.
Choose your account (under Pick An Account to Change) and under Related Tasks, click "Prevent a forgotten password".
This will initiate a wizard.
Click Next and then insert a blank formatted floppy disk into your A: drive.
Click Next and enter your logon password in the password box.
Click Next to begin the creation of your Password disk.
Once completed, label and save the disk to a safe place
How to Log on to your PC Using Your Password Reset Disk
Start your computer and at the logon screen, click your user name and leave the password box blank or just type in anything. This will bring up a Logon Failure box and you will then see the option to use your Password Reset disk to create a new password. Click it which will initiate the Password Reset wizard. Insert your password reset disk into your floppy drive and follow the wizard which will let you choose a new password to use for your account.
Monday, July 27, 2009
Now Recover your files with ZAR
Folks, it some times put you in hell when a disaster strikes to your computer. Data can be lost due to many different reasons. Accidental reformatting, power spikes, virus attacks and hardware malfunction are some of the scenarios where you will find yourself looking for a data recovery solution.
But now we don't need to worry about it alot, Zero Assumption Recovery provides a suite of highly effective and thorough data recovery software for Microsoft® Windows™ operating systems. ZAR is suitable for home users and small businesses who need a powerful data recovery solution for FAT16/FAT32/NTFS file systems. The default settings are reliable and thorough, but more technical users can benefit from a wealth of optional configurations.
Features
The main features of our Windows data recovery software are:
Runs on Windows NT/2000/XP/2003/Vista
Supported filesystems are FAT16, FAT32 and NTFS (all versions)
Provides limited ext2 (Linux filesystem) support
Support for partition recovery
Support for hardware RAID0 and RAID5 recovery
Long and national file names are supported
Native NTFS compression is supported
What makes ZAR different?
There are three main reasons:
Firstly, it is easy to use. You can recover the data yourself as long as you are reasonably familiar with computers. ZAR is ideal for the home user who knows what a hard drive is and how many there are in his system - but more technically minded users can also benefit from a wide range of configuration options.
Secondly, it takes its time. When you are trying to recover critical data, you need to be persistent and painstakingly thorough. ZAR slowly and methodically crawls through your disk, checking and cross-checking everything and recovering as much data as possible. Faster programs may skip though your disk in seconds and come out empty-handed. ZAR persists, and succeeds.
Thirdly, it is more powerful than most. We know that you are trying to recover important data, and that every single piece that you retrieve could be vital. With Zero Assumption Recovery, nothing is assumed - ZAR never relies on anything located on the damaged disk. If incoherencies are discovered, thorough checks and cross-checks are used to derive the necessary information. The algorithms are built to withstand a severe pounding, which means that ZAR can recover data even when things seem hopeless.
ZAR 8.4 system requirements and demo version restrictions
Windows 2000/XP/2003/Vista.
Additional media to recover data to (never save files to the volume you are recovering, for this may cause further damage to the volume!)
Damaged drive must be physically functional. It should be at least detected by BIOS. Multiple bad sectors can be handled (but the data they contained is lost forever), but controller failures are beyond any software repair.
Supported filesystems:
FAT16 (Used in Windows 95) and FAT32 (used in Windows 95 OSR2, 98, ME, 2000 and XP)
NTFS versions 1.2 (Windows NT 4.0), 3.0 (Windows 2000), and 3.1 (Windows XP/2003/Vista).
Limited ext2 (Linux filesystem) support
Digital image recovery function operates regardless of the filesystem type.
Supported RAID layouts:
Hardware RAID0 and RAID5 with any number of member disks.
It is possible to recover Windows 2000 Server, Windows 2003 server software RAID0 and RAID5 if the RAID members occupy the entire physical disk.
There are the following limitations in the evaluation version of ZAR 8.4:
Only (up to) four directories can be recovered in the demo version of our computer data recovery software.
The demo version is unable to load the scan result file. However, it does save these files to avoid having to rescan the disk when you got the full version.
In digital image recovery mode program operates as freeware with no functional limitations. List of known compatible digital camera models and image formats is available Known camera compatibility list here.
Zmeil 2.1 system requirements and demo version restrictions
Windows NT, 2000, XP, 2003 or Vista.
Internet Explorer 5.0 or later.
Plenty of a free disk space to store the recovered files. It is recommended to have a at least twice the size of the damaged email database available.
The evaluation version of Zmeil 2.1 only recovers 9 messages maximum per the database.
Zlon 1.0 system requirements and demo version restrictions
Windows NT, 2000, XP, or 2003.
The evaluation version of Zlon 1.0 expires in 14 days. If you want to use it past the expiration you will need to order the unlock code from us.
Zero Assumption Disk Space Visualizer 1.2 system requirements
Zero Assumption Disk Space Visualizer 1.2 runs generally on any machine Windows runs on, with the exception of the original (pre-OSR2) Windows 95 release and Windows NT 3.51.
You can download it from here
Firefox is not opening HTTPS pages
Dear Folks some of my readers queried me about a problem that firefox is not supporting HTTPS or not opening HTTPS Web pages. So don't worry the solution is very easy, You just have to define gateway IP in SSL Proxy. Now browse whatever SSL pages.
Monday, July 20, 2009
MAC OSX Terminal commands
Friends here are some of the MAC OSX commands which you can run through Terminal (same as Command Prompt in Windows).
alias=> Create an alias •
alloc=> List used and free memory
awk=> Find and Replace text within file(s)
b
basename=> Convert a full pathname to just a folder path
bash=> Bourne-Again SHell
bg=> Send to background •
bind=> Display readline key and function bindings •
bless=> Set volume bootability and startup disk options.
break=> Exit from a For, While, Until or Select loop •
builtin=> Execute a shell builtin •
c
cal=> Display a calendar
caller=> Return the context of a subroutine call •
case=> Conditionally perform a command •
cat=> Display the contents of a file
cd=> Change Directory •
chflags=> Change a file or folder's flags
chgrp=> Change group ownership
chmod=> Change access permissions
chown=> Change file owner and group
chroot=> Run a command with a different root directory
cksum=> Print CRC checksum and byte counts
clear=> Clear terminal screen
cmp=> Compare two files
comm=> Compare two sorted files line by line
command=> Run a command (not a function) •
complete=> Edit a command completion [word/pattern/list] •
continue=> Resume the next iteration of a loop •
cp=> Copy one or more files to another location
cron=> Daemon to execute scheduled commands
crontab=> Schedule a command to run at a later date/time
cut=> Divide a file into several parts
d
date=> Display or change the date & time
dc=> Desk Calculator
dd=> Data Dump - Convert and copy a file
declare=> Declare variable & set attributes •
defaults=> Set preferences
df=> Display free disk space
diff=> Display the differences between two files
diff3=> Show differences among three files
dig=> DNS lookup
dirname=> Convert a full pathname to just a path
dirs=> Display list of remembered directories •
diskutil=> Disk utilities - Format, Verify, Repair
disown=> Unbind a job from the current login session •
ditto=> Copy files and folders
dot_clean=> Remove dot-underscore files
drutil=> Interact with CD/DVD burners
dscacheutil=> Query or flush the Directory Service/DNS cache
dscl=> Directory Service command line utility
du=> Estimate file space usage
e
echo=> Display message on screen •
ed=> A line-oriented text editor (edlin)
enable=> Enable and disable builtin shell commands •
env=> Set environment and run a utility
eval=> Evaluate several commands/arguments •
exec=> Execute a command •
exit=> Exit the shell •
expand=> Convert tabs to spaces
expect=> Programmed dialogue with interactive programs
Also see AppleScript
export=> Set an environment variable •
expr=> Evaluate expressions
f
false=> Do nothing, unsuccessfully
fc=> Fix command (history)
fdisk=> Partition table manipulator for Darwin UFS/HFS/DOS
fg=> Send job to foreground •
find=> Search for files that meet a desired criteria
fmt=> Reformat paragraph text
fold=> Wrap text to fit a specified width
for=> Loop command •
fsck=> Filesystem consistency check and repair
fsaclctl=> Filesystem enable/disable ACL support
fs_usage=> Filesystem usage (process/pathname)
ftp=> Internet file transfer program
g
GetFileInfo=> Get attributes of HFS+ files
getopt=> Parse positional parameters
getopts=> Parse positional parameters •
goto=> Jump to label and continue execution
grep=> Search file(s) for lines that match a given pattern
groups=> Print group names a user is in
gzip=> Compress or decompress files
h
hash=> Refresh the cached/remembered location of commands •
head=> Display the first lines of a file
hdiutil=> Manipulate iso disk images
history=> Command History •
hostname=> Print or set system name
i
id=> Print user and group names/id's
if=> Conditionally perform a command •
info=> Help info
install=> Copy files and set attributes
j
jobs=> List active jobs •
join=> Join lines on a common field
k
kextfind=> List kernel extensions
kill=> Stop a process from running
l
l=> List files in long format (ls -l)
last=> Indicate last logins of users and ttys
launchctl=> Load or unload daemons/agents
ll=> List files in long format, showing invisible files (ls -la)
less=> Display output one screen at a time
let=> Evaluate expression •
lipo=> Convert a universal binary
ln=> Make links between files (hard links, symbolic links)
local=> Set a local (function) variable •
locate=> Find files
logname=> Print current login name
login=> log into the computer
logout=> Exit a login shell (bye) •
lpr=> Print files
lprm=> Remove jobs from the print queue
lpstat=> Printer status information
ls=> List information about file(s)
lsregister=> Reset the Launch Services database
lsbom=> List a bill of materials file
lsof=> List open files
m
man=> Help manual
mdfind=> Spotlight search
mdutil=> Manage Spotlight metadata store
mkdir=> Create new folder(s)
mkfifo=> Make FIFOs (named pipes)
more=> Display output one screen at a time
mount=> Mount a file system
mv=> Move or rename files or directories
n
net=> Manage network resources
netstat=> Show network status
networksetup=> Network and System Preferences
nice=> Set the priority of a command
nohup=> Run a command immune to hangups
ntfs.util=> NTFS file system utility
o
onintr=> Control the action of a shell interrupt
open=> Open a file/folder/URL/Application
osacompile=> Compile Applescript
osascript=> Execute AppleScript
p
passwd=> Modify a user password
paste=> Merge lines of files
pbcopy=> Copy data to the clipboard
pbpaste=> Paste data from the Clipboard
pico=> Simple text editor
ping=> Test a network connection
pkgutil=> Query and manipulate installed packages
plutil=> Property list utility
pmset=> Power Management settings
popd=> Restore the previous value of the current directory •
pr=> Convert text files for printing
printenv=> Print environment variables
printf=> Format and print data •
ps=> Process status
pushd=> Save and then change the current directory
pwd=> Print Working Directory •
q
quota=> Display disk usage and limits
r
rcp=> Copy files between machines
read=> Read one line from standard input •
readonly=> Mark a variable or function as read-only •
reboot=> Stop and restart the system
return=> Exit a function •
rev=> Reverse lines of a file
rm=> Remove files
rmdir=> Remove folder(s)
rpm=> Remote Package Manager
rsync=> Remote file copy - Sync file tree (also RsyncX)
s
say=> Convert text to audible speech
screen=> Multiplex terminal, run remote shells via ssh
screencapture=> Capture screen image to file or disk
sdiff=> Merge two files interactively
security=> Administer Keychains, keys, certificates and the Security framework
sed=> Stream Editor
select=> Generate a list of items •
set=> Set a shell variable = value •
setfile=> Set attributes of HFS+ files
shift=> Shift positional parameters •
shopt=> Set shell options •
shutdown=> Shutdown or restart OS X
sleep=> Delay for a specified time
softwareupdate=> System software update tool
sort=> Sort text files
source=> Execute commands from a file •
split=> Split a file into fixed-size pieces
stop=> Stop a job or process
su=> Substitute user identity
sudo=> Execute a command as another user
sum => Print a checksum for a file
suspend=> Suspend execution of this shell •
sw_vers=> Print Mac OS X operating system version
system_profiler=> Report system configuration
systemsetup=> Computer and display system settings
t
tail=> Output the last part of files
tar=> Tape ARchiver
tee=> Redirect output to multiple files
test=> Condition evaluation •
textutil=> Manipulate text files in various formats (Doc,html,rtf)
time=> Measure Program Resource Use
times => Print shell & shell process times •
touch => Change file timestamps
tr=> Translate, squeeze, and/or delete characters
trap => Execute a command when the shell receives a signal •
traceroute=> Trace Route to Host
true => Do nothing, successfully
tty=> Print filename of terminal on stdin
type=> Describe a command •
u
ufs.util=> Mount/unmount UFS file system
ulimit=> limit the use of system-wide resources •
umask=> Users file creation mask
umount=> Unmount a device
unalias=> Remove an alias •
uname=> Print system information
unexpand=> Convert spaces to tabs
uniq=> Uniquify files
units=> Convert units from one scale to another
unset=> Remove variable or function names •
until=> Loop command •
users=> Print login names of users currently logged in
uuencode=> Encode a binary file
uudecode=> Decode a file created by uuencode
uuidgen=> Generate a Unique ID (UUID/GUID)
uucp => Unix to Unix copy
v
vi => Text Editor
w
wait=> Wait for a process to complete •
wc => Print byte, word, and line counts
where=> Report all known instances of a command
which => Locate a program file in the user's path
while=> Loop command •
who=> Print all usernames currently logged on
whoami=> Print the current user id and name (`id -un')
write => Send a message to another user
x
xargs => Execute utility - passing arguments
yes => Print a string until interrupted
Sunday, July 19, 2009
BIOS Beep Codes
Friends It some times put you into hell when you have to do an important assignment and just at that moment your system does not start and start giving beeps. There are two ways to troubleshoot whether you do it by yourself or wait for the technical support from any hardware shop.
As you are the reader of this blog so i do not make you depend on any one. Now after reading this post you will be able to understand the beep codes and you can easily troubleshoot your system with out the help of any technical freak.
Let's Start
When a computer is first turned on, or rebooted, its BIOS performs a power-on self test (POST) to test the system's hardware, checking to make sure that all of the system's hardware components are working properly. Under normal circumstances, the POST will display an error message; however, if the BIOS detects an error before it can access the video card, or if there is a problem with the video card, it will produce a series of beeps, and the pattern of the beeps indicates what kind of problem the BIOS has detected.
Because there are many brands of BIOS, there are no standard beep codes for every BIOS.
The two most-used brands are AMI (American Megatrends International) and Phoenix.
Below are listed the beep codes for AMI systems, and here are the beep codes for Phoenix systems.
AMI Beep Codes
Beep Code Meaning
1 beep DRAM refresh failure. There is a problem in the system memory or the motherboard.
2 beeps Memory parity error. The parity circuit is not working properly.
3 beeps Base 64K RAM failure. There is a problem with the first 64K of system memory.
4 beeps System timer not operational. There is problem with the timer(s) that control functions on the motherboard.
5 beeps Processor failure. The system CPU has failed.
6 beeps Gate A20/keyboard controller failure. The keyboard IC controller has failed, preventing gate A20 from switching the processor to protect mode.
7 beeps Virtual mode exception error.
8 beeps Video memory error. The BIOS cannot write to the frame buffer memory on the video card.
9 beeps ROM checksum error. The BIOS ROM chip on the motherboard is likely faulty.
10 beeps CMOS checksum error. Something on the motherboard is causing an error when trying to interact with the CMOS.
11 beeps Bad cache memory. An error in the level 2 cache memory.
1 long beep, 2 short Failure in the video system.
1 long beep, 3 short A failure has been detected in memory above 64K.
1 long beep, 8 short Display test failure.
Continuous beeping A problem with the memory or video.
BIOS Beep Codes
Phoenix Beep Codes
Phoenix uses sequences of beeps to indicate problems. The "-" between each number below indicates a pause between each beep sequence. For example, 1-2-3 indicates one beep, followed by a pause and two beeps, followed by a pause and three beeps. Phoenix version before 4.x use 3-beep codes, while Phoenix versions starting with 4.x use 4-beep codes. Click here for AMI BIOS beep codes.
4-Beep Codes
Beep Code Meaning
1-1-1-3 Faulty CPU/motherboard. Verify real mode.
1-1-2-1 Faulty CPU/motherboard.
1-1-2-3 Faulty motherboard or one of its components.
1-1-3-1 Faulty motherboard or one of its components. Initialize chipset registers with initial POST values.
1-1-3-2 Faulty motherboard or one of its components.
1-1-3-3 Faulty motherboard or one of its components. Initialize CPU registers.
1-1-3-2
1-1-3-3
1-1-3-4 Failure in the first 64K of memory.
1-1-4-1 Level 2 cache error.
1-1-4-3 I/O port error.
1-2-1-1 Power management error.
1-2-1-2
1-2-1-3 Faulty motherboard or one of its components.
1-2-2-1 Keyboard controller failure.
1-2-2-3 BIOS ROM error.
1-2-3-1 System timer error.
1-2-3-3 DMA error.
1-2-4-1 IRQ controller error.
1-3-1-1 DRAM refresh error.
1-3-1-3 A20 gate failure.
1-3-2-1 Faulty motherboard or one of its components.
1-3-3-1 Extended memory error.
1-3-3-3
1-3-4-1
1-3-4-3 Error in first 1MB of system memory.
1-4-1-3
1-4-2-4 CPU error.
1-4-3-1
2-1-4-1 BIOS ROM shadow error.
1-4-3-2
1-4-3-3 Level 2 cache error.
1-4-4-1
1-4-4-2
2-1-1-1 Faulty motherboard or one of its components.
2-1-1-3
2-1-2-1 IRQ failure.
2-1-2-3 BIOS ROM error.
2-1-2-4
2-1-3-2 I/O port failure.
2-1-3-1
2-1-3-3 Video system failure.
2-1-1-3
2-1-2-1 IRQ failure.
2-1-2-3 BIOS ROM error.
2-1-2-4 I/O port failure.
2-1-4-3
2-2-1-1 Video card failure.
2-2-1-3
2-2-2-1
2-2-2-3 Keyboard controller failure.
2-2-3-1 IRQ error.
2-2-4-1 Error in first 1MB of system memory.
2-3-1-1
2-3-3-3 Extended memory failure.
2-3-2-1 Faulty motherboard or one of its components.
2-3-2-3
2-3-3-1 Level 2 cache error.
2-3-4-1
2-3-4-3 Motherboard or video card failure.
2-3-4-1
2-3-4-3
2-4-1-1 Motherboard or video card failure.
2-4-1-3 Faulty motherboard or one of its components.
2-4-2-1 RTC error.
2-4-2-3 Keyboard controller error.
2-4-4-1 IRQ error.
3-1-1-1
3-1-1-3
3-1-2-1
3-1-2-3 I/O port error.
3-1-3-1
3-1-3-3 Faulty motherboard or one of its components.
3-1-4-1
3-2-1-1
3-2-1-2 Floppy drive or hard drive failure.
3-2-1-3 Faulty motherboard or one of its components.
3-2-2-1 Keyboard controller error.
3-2-2-3
3-2-3-1
3-2-4-1 Faulty motherboard or one of its components.
3-2-4-3 IRQ error.
3-3-1-1 RTC error.
3-3-1-3 Key lock error.
3-3-3-3 Faulty motherboard or one of its components.
3-3-3-3
3-3-4-1
3-3-4-3
3-4-1-1
3-4-1-3
3-4-2-1
3-4-2-3
3-4-3-1
3-4-4-1
3-4-4-4 Faulty motherboard or one of its components.
4-1-1-1 Floppy drive or hard drive failure.
4-2-1-1
4-2-1-3
4-2-2-1 IRQ failure.
4-2-2-3
4-2-3-1
4-2-3-3
4-2-4-1 Faulty motherboard or one of its components.
4-2-4-3 Keyboard controller error.
4-3-1-3
4-3-1-4
4-3-2-1
4-3-2-2
4-3-3-1
4-3-4-1
4-3-4-3 Faulty motherboard or one of its components.
4-3-3-2
4-3-3-4 IRQ failure.
4-3-3-3
4-3-4-2 Floppy drive or hard drive failure.
3-Beep Codes
Beep Code Meaning
1-1-2 Faulty CPU/motherboard.
1-1-3 Faulty motherboard/CMOS read-write failure.
1-1-4 Faulty BIOS/BIOS ROM checksum error.
1-2-1 System timer not operational. There is a problem with the timer(s) that control functions on the motherboard.
1-2-2
1-2-3 Faulty motherboard/DMA failure.
1-3-1 Memory refresh failure.
1-3-2
1-3-3
1-3-4 Failure in the first 64K of memory.
1-4-1 Address line failure.
1-4-2 Parity RAM failure.
1-4-3 Timer failure.
1-4-4 NMI port failure.
2-_-_ Any combination of beeps after 2 indicates a failure in the first 64K of memory.
3-1-1 Master DMA failure.
3-1-2 Slave DMA failure.
3-1-3
3-1-4 Interrupt controller failure.
3-2-4 Keyboard controller failure.
3-3-1
3-3-2 CMOS error.
3-3-4 Video card failure.
3-4-1 Video card failure.
4-2-1 Timer failure.
4-2-2 CMOS shutdown failure.
4-2-3 Gate A20 failure.
4-2-4 Unexpected interrupt in protected mode.
4-3-1 RAM test failure.
4-3-3 Timer failure.
4-3-4 Time of day clock failure.
4-4-1 Serial port failure.
4-4-2 Parallel port failure.
4-4-3 Math coprocessor.
Thursday, July 16, 2009
Change your Folder Color
iColorFolder enables you to easily customize the color of each WindowsXP folder icons, using one of the standard color choices, or a custom folder skin (Aqua, Mac OS X, Vista and others). iColorFolder is a very light soft, that doesn't stay in memory. It uses a native functionnality of WindowsXP to be more efficient. Discover it's simplicity: with a single right-click on a folder you colorize it ; the necessary and only the necessary. iColorFolder is proudly an Open-Source program. Like the folder icons, iColorFolder makes folder navigation in Windows easier, in this case by letting you assign colors to your folder icons, which is done from the right-click context menu. It also lets you assign custom icons and comes with three different icon skins, but it also works fine if you're already using some icon customization/skin tool. Even better, iColorFolder is open source software and takes up little memory.
Download
Download
Monday, July 13, 2009
How to stop illegal usage of your WIFI
Friends after a long time spending on stressful projects, I am here to tell you some thing really important. As I have discussed in some of my older posts about Wireless hacking and tools which can stop it. Now I am here with an amazing new tool.This tool called Moocher Hunter can help you physically track the users connected in your WiFi network. This tool would come handy for network admins and any personnel who wants to stop unauthenticated use of his wireless router.
1. Its free to use.
2. It can predict the physical location of the computer using the WiFi connection.
The algorithms applied use various signal variables to accurately predict the position of the connected laptop/machine. MoocherHunter™ identifies the location of an 802.11-based wireless moocher or hacker by the traffic they send across the network. If they want to mooch from you or use your wireless network for illegal purposes (e.g. warez downloading or illegal filesharing), then they have no choice but to reveal themselves by sending traffic across in order to accomplish their objectives. MoocherHunter™ enables the owner of the wireless network to detect traffic from this unauthorized wireless client (using either MoocherHunter™’s Passive or Active mode) and enables the owner, armed with a laptop and directional antenna, to isolate and track down the source.
You can download it HERE
1. Its free to use.
2. It can predict the physical location of the computer using the WiFi connection.

The algorithms applied use various signal variables to accurately predict the position of the connected laptop/machine. MoocherHunter™ identifies the location of an 802.11-based wireless moocher or hacker by the traffic they send across the network. If they want to mooch from you or use your wireless network for illegal purposes (e.g. warez downloading or illegal filesharing), then they have no choice but to reveal themselves by sending traffic across in order to accomplish their objectives. MoocherHunter™ enables the owner of the wireless network to detect traffic from this unauthorized wireless client (using either MoocherHunter™’s Passive or Active mode) and enables the owner, armed with a laptop and directional antenna, to isolate and track down the source.
You can download it HERE
Wednesday, July 1, 2009
How to reduce booting time of a PC
Hey folks, I am back with a new tweak so here it is. Today i gonna tell you how to boot up in just 10 seconds but first take backup of your data and registry just for safe side. Now here we go:
1) Press Windows Key and "R" to launch the run command.
2) Type "regedit" inside the input space.
3) Navigate to the registry key
HKEY_LOACAL_MECHINE\SYSTEM\CurrentControlSet\Control\ContentIndex
4) Locate the key"Startup Delay" and double click on it.
5) Select Decimal, and change the value to 40000
Enjoy the reduction in startup time and I look forwarding to hearing good news from all of you.
Monday, June 22, 2009
Water cooled PC
Have you people ever heard about $16,000 PC? No, So lets hear it now.Below is a PC which exactly cost which i have quoted before.So what exactly does spending $16,000 on a custom PC get you? This crazy PC features four quad core Opteron processors, 32GB of RAM and eight hard drives in various RAID configurations.

As you can see from the photos, the $16,000 PC features a custom water cooling system, with a massive external radiator which features nine 120mm fans.
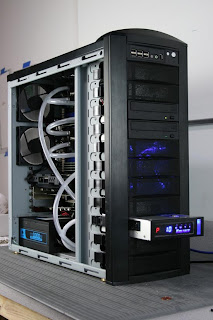
The massive external fans run at 5V which means they are almost silent, but they manage to keep the processors running at 45 degrees C under full load and at 36 degrees C at idle.
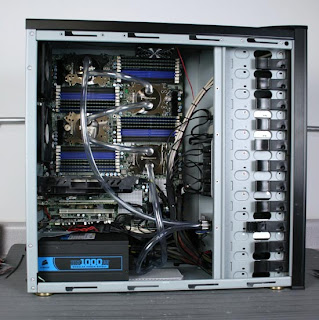
The $16,000 PC features two VelociRaptor hard drives in RAID 1 and six 1TB hard drives in Raid 5, that is a serious amount of hardware in one single PC.
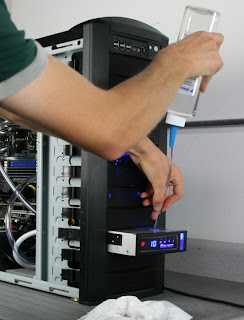

Wednesday, June 17, 2009
SATA HDD Multimedia Dock II
Today i am here with an amazing thing called hard drive dock. We can use this in various ways. Lets have a Look:

The guys over at Brando have released multimedia hard drive dock, the SATA HDD Multimedia Dock II.
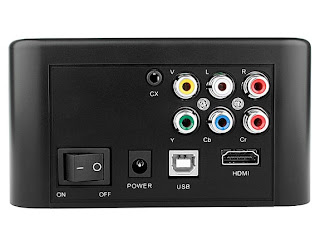
The SATA HDD Multimedia Dock II can take 2.5 inch and 3.5 inch SATA hard drives, it connects to your PC via USB and also has a built in HDMI out port so you can hook it up to your HDTV.
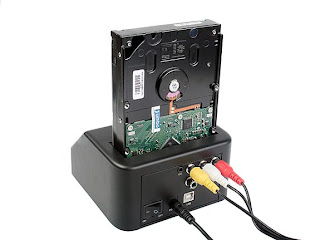
It will playback HD video in 1080i, and it can playback, MPEG-2, MPEG4, DiVX and XviD video files, here are the specifications.
* Supports both SATA 2.5″ HDD and 3.5″ HDD
* PC connection: USB 2.0
* Video format: MPEG-1 (MPG, DAT)
* Video format:
* MPEG-2 (MPG, MPEG, VOB) Video format:
* MPEG-4 (AVI, MP4) Video format:
* DivX 3.11/4/5 (AVI, DIVX) Video format:
* XviD (AVI) Video format:
* AVI decode audio: MP3, AC3, ADPCM Video format:
* VOBSUB: srt, sub, smi, txt, ass, ssa Audio format: MPEG-1 Layer 3,4-320kbps(MP3)
* Audio format:
* AC3 (in the movie) Audio format:
* Microsoft PCM Wave (WAV) Audio format:
* Advance Audio Coding LC (AAC) Audio format:
* Microsoft Windows Media Audio WMA7/8 (WMA), no support for WMA9 Pro Audio
format:
* MP2 (MPA) Image format: JPEG (JPG)
* Video Output: AV, YPbPr, HDMI (576P/1080i)
* Audio Output: CX/5.1H
* Compatible FAT16/32
* Compatible DivX subtitle
* Compatible Multi language
* External port: SD Card
* TV system: NTSC, PAL.AUTO
* Temperature and Humidity: 5 ° ~ 40 °, humidity 10 ~ 75%
* This machine should be used in the operation range of the connected PC
* AC Power Adapter input: 100 ~ 240V, 50/60Hz, 1.8A
* AC Power Adapter output: 12V/3A
* Dimension: 130 x 120 x 68mm (approx.) (HDD Dock)
* Dimension: 45 x 155 x 24mm (approx.) (Remote Controller)
* Weight: 453g (HDD Dock)
* Weight: 74g (Remote Controller)
The SATA HDD Multimedia Dock II is available for $79 from Brando.
Tuesday, June 16, 2009
Design ADN infrastructure with BlueCoat
Blue Coat founded in 1996, Blue Coat provides the ADN infrastructure to more than 15,000 customers worldwide, including 81% of the Fortune® Global 500. We also maintain support centers in Sunnyvale, London, Tokyo, Kuala Lumpur, Waterloo and Dubai. Our experience, backed by a worldwide support team, means we can provide the application-level availability, security and acceleration with comprehensive visibility and user control our customers need.
Blue Coat Systems, Inc. (NASDAQ: BCSI) is a publicly held company based in Sunnyvale, California. Their core capabilities — Application Performance Monitoring, WAN Optimization and Secure Web Gateway technologies — enable the ADN, providing:
* Visibility to classify and prioritize applications, content and user access in real time
* Acceleration of internal, external and real-time applications across the distributed enterprise
* Security of people and information from malicious applications, content and intent
ProxySG:
> Accelerates network applications and improves the performance of businesscritical
applications and content including Web, SSL, rich media and email
> Dramatically reduces bandwidth requirements through caching
> Protects internal users and networks from spyware and other attacks
> Enforces appropriate usage policies for Web access and external content
> Reverse proxy in the DMZ isolates Web servers from direct Internet access and accelerates Web-based applications and public Web sites
ProxyAV:
> Offers enterprise-level manageability with an ICAP+ level of integration
> Delivers wire-speed, enterprise-grade scanning performance
> Provides choice of best-in-class AV engines to secure both the gateway and the desktop
PacketShaper:
> Discover and monitor 600+ applications with exceptional granularity.
> Replace probes with intelligent monitoring and optimization on one platform.
> Deliver outstanding voice and video conferencing with per-call QoS and MOS reporting.
> Identify and control recreational applications on the WAN.
> Assure performance of real-time applications including thin client,transactions and voice.
Blue Coat Director:

> Enables centralized policy management and software distribution through a secure GUI
or CLI
> Easily configures backups and disaster recovery
> Allows IT to securely access controls through a Web browser
> Provides detailed reports about job status and results
Blue Coat IntelligenceCenter:
> Offers a consolidated view of performance across the entire system
> Analyzes application behavior with highly granular detail
> Integrates with legacy reporting tools and scales to support future business needs
> Provides role-based views into performance across the IT infrastructure
Blue Coat PolicyCenter:
> Manages up to 600 PacketShaper deployments through a single, intuitive interface
> Automatically deploys and configures remote appliances in minutes
> Applies unique policies based on location, function or other defined criteria
> Scales IT resources to reduce overhead and total cost of ownership.
Blue Coat Reporter:
> Quickly processes even the largest logs, while minimizing the amount of server disk space required
> Distributes and automatically updates a comprehensive view of user activity
> Allows administrators to quickly drill down from general trends to specific user data
> Measures Web traffic performance, trends, errors, bandwidth impact, streaming traffic levels and more
Blue Coat Systems, Inc. (NASDAQ: BCSI) is a publicly held company based in Sunnyvale, California. Their core capabilities — Application Performance Monitoring, WAN Optimization and Secure Web Gateway technologies — enable the ADN, providing:
* Visibility to classify and prioritize applications, content and user access in real time
* Acceleration of internal, external and real-time applications across the distributed enterprise
* Security of people and information from malicious applications, content and intent
ProxySG:

> Accelerates network applications and improves the performance of businesscritical
applications and content including Web, SSL, rich media and email
> Dramatically reduces bandwidth requirements through caching
> Protects internal users and networks from spyware and other attacks
> Enforces appropriate usage policies for Web access and external content
> Reverse proxy in the DMZ isolates Web servers from direct Internet access and accelerates Web-based applications and public Web sites
ProxyAV:

> Offers enterprise-level manageability with an ICAP+ level of integration
> Delivers wire-speed, enterprise-grade scanning performance
> Provides choice of best-in-class AV engines to secure both the gateway and the desktop
PacketShaper:

> Discover and monitor 600+ applications with exceptional granularity.
> Replace probes with intelligent monitoring and optimization on one platform.
> Deliver outstanding voice and video conferencing with per-call QoS and MOS reporting.
> Identify and control recreational applications on the WAN.
> Assure performance of real-time applications including thin client,transactions and voice.
Blue Coat Director:

> Enables centralized policy management and software distribution through a secure GUI
or CLI
> Easily configures backups and disaster recovery
> Allows IT to securely access controls through a Web browser
> Provides detailed reports about job status and results
Blue Coat IntelligenceCenter:
> Offers a consolidated view of performance across the entire system
> Analyzes application behavior with highly granular detail
> Integrates with legacy reporting tools and scales to support future business needs
> Provides role-based views into performance across the IT infrastructure
Blue Coat PolicyCenter:
> Manages up to 600 PacketShaper deployments through a single, intuitive interface
> Automatically deploys and configures remote appliances in minutes
> Applies unique policies based on location, function or other defined criteria
> Scales IT resources to reduce overhead and total cost of ownership.
Blue Coat Reporter:
> Quickly processes even the largest logs, while minimizing the amount of server disk space required
> Distributes and automatically updates a comprehensive view of user activity
> Allows administrators to quickly drill down from general trends to specific user data
> Measures Web traffic performance, trends, errors, bandwidth impact, streaming traffic levels and more
BluRay Disk Technology
Blu-ray, also known as Blu-ray Disc (BD), is the name of a next-generation optical disc format jointly developed by the Blu-ray Disc Association (BDA), a group of the world's leading consumer electronics, personal computer and media manufacturers (including Apple, Dell, Hitachi, HP, JVC, LG, Mitsubishi, Panasonic, Pioneer, Philips, Samsung, Sharp, Sony, TDK and Thomson). The format was developed to enable recording, rewriting and playback of high-definition video (HD), as well as storing large amounts of data. The format offers more than five times the storage capacity of traditional DVDs and can hold up to 25GB on a single-layer disc and 50GB on a dual-layer disc. This extra capacity combined with the use of advanced video and audio codecs will offer consumers an unprecedented HD experience.

While current optical disc technologies such as DVD, DVD±R, DVD±RW, and DVD-RAM rely on a red laser to read and write data, the new format uses a blue-violet laser instead, hence the name Blu-ray. Despite the different type of lasers used, Blu-ray products can easily be made backwards compatible with CDs and DVDs through the use of a BD/DVD/CD compatible optical pickup unit. The benefit of using a blue-violet laser (405nm) is that it has a shorter wavelength than a red laser (650nm), which makes it possible to focus the laser spot with even greater precision. This allows data to be packed more tightly and stored in less space, so it's possible to fit more data on the disc even though it's the same size as a CD/DVD. This together with the change of numerical aperture to 0.85 is what enables Blu-ray Discs to hold 25GB/50GB.

While current optical disc technologies such as DVD, DVD±R, DVD±RW, and DVD-RAM rely on a red laser to read and write data, the new format uses a blue-violet laser instead, hence the name Blu-ray. Despite the different type of lasers used, Blu-ray products can easily be made backwards compatible with CDs and DVDs through the use of a BD/DVD/CD compatible optical pickup unit. The benefit of using a blue-violet laser (405nm) is that it has a shorter wavelength than a red laser (650nm), which makes it possible to focus the laser spot with even greater precision. This allows data to be packed more tightly and stored in less space, so it's possible to fit more data on the disc even though it's the same size as a CD/DVD. This together with the change of numerical aperture to 0.85 is what enables Blu-ray Discs to hold 25GB/50GB.
Wednesday, June 10, 2009
Security Auditing in Windows
Today I gonna tell you something about security auditing over Network. Being a Network Administrator security is quite an important thing to be entertained. So move on to the solution.
1. Move on Control Panel → Administrative Tools → Local Security Policy.
2. Expand Security Settings → Local Policy → Audit Policy
3. Double click on Audit object access and check the success check box. Click “OK”
4. After doing this Share the desired folder and go to Security tab, move on Advance button, go to auditing tab and click add button enter everyone as object name and click “OK”
5. Now a selection box will be displayed. Choose only the options that you need. If you want to see who delete your files and folders, just check the successful checkbox for Delete and Delete Subfolders and Files. Click OK once you’ve done your selection and also OK through all of the windows you have open.
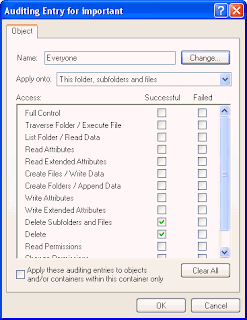
6. To view who deleted your files and folders on your shared folder, go to Control Panel → Administrative Tools → Event Viewer and view Security. The security event logs will tell you which user deleted what files.
7. Now when someone access your shared folders and deletes a file in there, you have no problem knowing who did it.
Note:
Only disadvantage of enabling Audit is, it takes lots of CPU resources. So before implementing this just be prepare for the said issue.
Tuesday, June 9, 2009
Tree Size Professional
Hi, Folks i am here with an exciting new product called TreeSize Pro.TreeSize Professional is a powerful and flexible harddisk space manager for Windows 200X / XP / Vista (32 and 64 Bit). Find out which folders are the largest on your drives and recover megabytes on your disks. TreeSize Professional shows you the size, allocated and wasted space, the number of files, 3D charts, the last access date, the file owner and permissions, the NTFS compression rate and much more information of several folders or drives you choose. It also lets you search drives, entire servers or the entire network for old, big, temporary and duplicate files.
Here are some of the screen shots of Tree Size Pro:-
Screen Shots
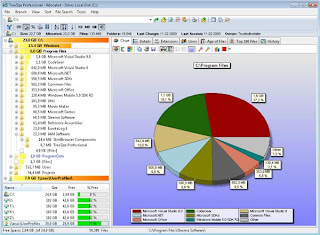
The main window has a clear and easy to use interface which is split into the file system tree on the left and the details view on the right. Optional gradient color bars in the file system tree give a quick review. While the scan is performed you can already browse through the results which get constantly updated. Certainly TreeSize supports Unicode file- and directory names.
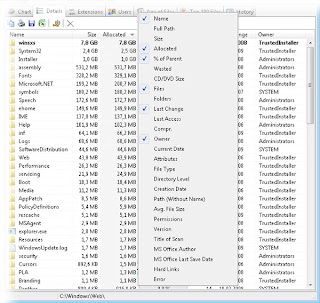
In the details view you will find a lot of valuable information about the disk usage like the folder size, the space wasted by the file system, the last access date, the NTFS compression rate and the owner. The listed can be sorted by any column and more columns can easily be added using the context menu.
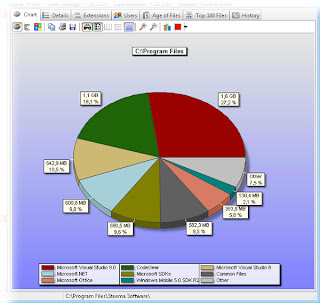
With the pie charts you will quickly get a good impression of the disk usage. The charts can also be printed or copied to the clipboard,
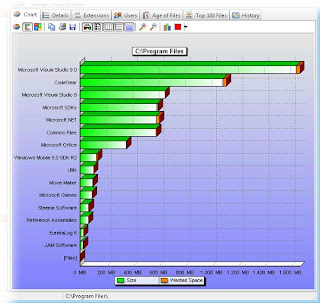
An alternative graphical presentation is the bar chart. The appearance of the charts can be configured in many ways using the chart toolbar.
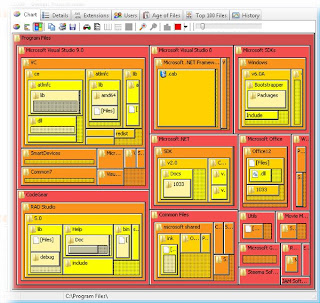
The Tree Map is a hierarchical chart that is able to visualize the sizes of each subfolder (not only direct child folders) of a selected directory branch.
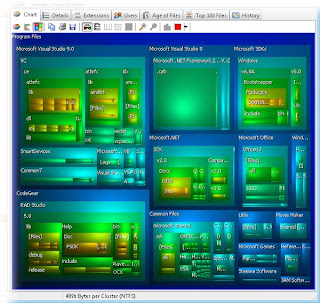
Optionally the Tree Map can be switched to 3D mode.
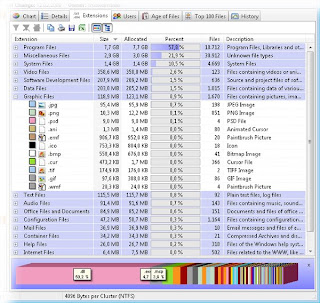
The used disk space can be broken down into the file types. Filtering the file system tree on the left by certain file types will make it easy to find folders containing many of the particular file type.
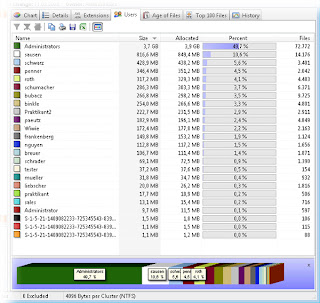
Used disc space can also be grouped and filtered by users, in the same manner as the file types.

It is also possible to analyse used disk space regarding the age of files. Intervals regarding "creation date" , "last change" and "last access" are fully customizable.

The Top 100 pane provides a overview about the top 100 largest files.
Many aspects of TreeSize can be configured in the options dialog, e.g. the view, the export of data or startup options.
In the Dialog "Schedule Tasks" you can now add customized TreeSize Tasks to the Windows Scheduled Tasks.
The file search of TreeSize helps you in finding obsolete and very large files. The particular search types can be configured in detail and certain or recently changed files can automatically be excluded from the search results.
Here are some of the screen shots of Tree Size Pro:-
Screen Shots

The main window has a clear and easy to use interface which is split into the file system tree on the left and the details view on the right. Optional gradient color bars in the file system tree give a quick review. While the scan is performed you can already browse through the results which get constantly updated. Certainly TreeSize supports Unicode file- and directory names.

In the details view you will find a lot of valuable information about the disk usage like the folder size, the space wasted by the file system, the last access date, the NTFS compression rate and the owner. The listed can be sorted by any column and more columns can easily be added using the context menu.

With the pie charts you will quickly get a good impression of the disk usage. The charts can also be printed or copied to the clipboard,

An alternative graphical presentation is the bar chart. The appearance of the charts can be configured in many ways using the chart toolbar.

The Tree Map is a hierarchical chart that is able to visualize the sizes of each subfolder (not only direct child folders) of a selected directory branch.

Optionally the Tree Map can be switched to 3D mode.

The used disk space can be broken down into the file types. Filtering the file system tree on the left by certain file types will make it easy to find folders containing many of the particular file type.

Used disc space can also be grouped and filtered by users, in the same manner as the file types.

It is also possible to analyse used disk space regarding the age of files. Intervals regarding "creation date" , "last change" and "last access" are fully customizable.

The Top 100 pane provides a overview about the top 100 largest files.

Many aspects of TreeSize can be configured in the options dialog, e.g. the view, the export of data or startup options.

In the Dialog "Schedule Tasks" you can now add customized TreeSize Tasks to the Windows Scheduled Tasks.

The file search of TreeSize helps you in finding obsolete and very large files. The particular search types can be configured in detail and certain or recently changed files can automatically be excluded from the search results.
Monday, June 8, 2009
Microsoft Office Accounting Express 2009
Manage your accounting tasks and forecast business financials, all with the familiar look and feel of Microsoft Office.
Product Description

Microsoft Office Accounting Express 2008 is an essential tool for managing your business finances. Whether you're a small or home-based business, you can use this accounting program to make pen and paper-based tasks a thing of the past. With the familiar look and feel of Microsoft Office, Office Accounting Express 2008 helps you get organized, save time and sell online.
You only need to enter data once so you can save time managing everyday financial tasks. All of your customer and financial information is stored in one place so that you can have a complete view of your business. Office Accounting Express 2008 also gives you the tools you need to reach out to millions of potential customers by taking your business online from simplifying sales using eBay to helping making sure that you get paid faster. Third party service required and fees apply for online sales component.
Note:The above version is designed for US small businesses only, and does not support local requirements of countries outside the US.
What's New in This Version
Version 2009 can create tax preparation reports with the Tax Integration add-in, view accounting information conveniently on your desktop with the Amounts to Pay Today gadget and includes Microsoft Office Accounting Spanish Language Pack 2009.
Saturday, June 6, 2009
Increase the browsing Speed
While on internet, it is quite important to surf as faster as you want. Slow loading pages and slow download rate of a site put our mind on fire but don't worry here i am with a solution. First we have to understand the whole phenomena.
Domain Name System (DNS) is a database system that translates a computer's domain name into an IP address. It is easier for us to remember the domain name than the IP address for that site. Therefore this job of translating the site name to IP address is done by the DNS database.
Whenever you enter the site name like www.sitename.com, the browser will go to the site but it will look for a number like this 192.128.18.9. It is faster to look for the number. But every time your browser will look for the DNS address on the net then take you to that site. This searching for the DNS address will take longer time for the site to load. Therefore your computer saves this information in the DNS cache and it will search for this information when you enter a site name which will improve your browsing speed.
You can increase this cache size in Windows to acquire more addresses .You have to add some registry entries for this tip. Here is how
Type regedit in the Run dialog box to go to the registry.
HKEY_LOCAL_MACHINE\SYSTEM\CurrentControlSet\Services\Dnscache\Parameters
In the right pane look for the following entries. If they are not present then create them by right clicking in the blank area in the right pane and selecting New --> DWORD value.
Now create these entries and change their values by double clicking on them and enter the given values.
CacheHashTableBucketSize and give a value of 00000001
CacheHashTableSize with a value of 00000180
MaxCacheEntryTtlLimit give the value 0000fa00
MaxSOACacheEntryTtlLimit with the value 0000012d
You are done. Now restart your system for the changes to take effect. Keep enjoying and don't forget to visit again.
LTO Drive Technology
What is LTO technology?
Linear Tape-Open (or LTO) is a magnetic tape data storage technology originally developed in the late 1990s as an open standards alternative to the proprietary magnetic tape formats that were available at the time. Seagate, Hewlett-Packard, and IBM initiated the LTO Consortium, which directs development and manages licensing and certification of media and mechanism manufacturers. The standard form-factor of LTO technology goes by the name Ultrium, the original version of which was released in 2000 and could hold 100 GB of data in a single cartridge. The most recent version was released in 2007 and can hold 800 GB in the same size cartridge. Since 2002, LTO has been the best selling "super tape" format and is widely used with small and large computer systems, especially for backup. Its popularity can be attributed to both the innovative technology developed as well as the attractive pricing.
LTO Drive
HP StorageWorks LTO-4 Ultrium 1840 Tape Drive represents HP's fourth-generation of LTO tape drive technology positioned as HP's first tape drive capable of storing up to 1.6 TB per cartridge while providing hardware-based encryption to enable greater levels of security and unprecedented performance.
Data hardware encryption using AES 256-bit provides easy-to-enable security to protect the most sensitive data and prevent unauthorized access of tape cartridges. By using LTO-4 Ultrium 1840 encryption, not only is data fully capable of being compressed therefore maximizing capacity, encrypted backups are completed without a loss in performance.
Capable of data transfer rates up to 240 MB/sec, HP’s exclusive Data Rate Matching feature further optimizes performance by matching host system speed to keep drives streaming and enabling the fastest tape performance in the industry.
The Ultrium 1840 provides investment protection with full read and write support with LTO-3 media, and the ability to read LTO-2 cartridge. By doubling the capacity of previous generation Ultrium drives, HP customers now require fewer data cartridges to meet their storage needs, significantly reducing IT costs and increasing ROI.
Support for Write-Once, Read-Many (WORM) media allows customers to implement a cost-effective solution to secure, manage, and archive data to meet stringent compliance regulations.
The LTO-4 Ultrium 1840 Tape Drive provides both U320 SCSI and 3Gbps SAS interfaces and supports the industry’s most comprehensive list of compatible hardware and software platforms. Each drive option includes HP Data Protector Express Software Single Server Edition backup/recovery software and the HP Data Protector Express Software Bare Metal Disaster Recovery option, as well as support for HP One-Button Disaster Recovery (OBDR) and HP StorageWorks Library and Tape Tools (L&TT).
The new HP StorageWorks LTO-4 Ultrium 1840 SAS Tape Drive models provides a 3Gb/sec SAS interface allowing direct connect to SAS-based servers.
Linear Tape-Open (or LTO) is a magnetic tape data storage technology originally developed in the late 1990s as an open standards alternative to the proprietary magnetic tape formats that were available at the time. Seagate, Hewlett-Packard, and IBM initiated the LTO Consortium, which directs development and manages licensing and certification of media and mechanism manufacturers. The standard form-factor of LTO technology goes by the name Ultrium, the original version of which was released in 2000 and could hold 100 GB of data in a single cartridge. The most recent version was released in 2007 and can hold 800 GB in the same size cartridge. Since 2002, LTO has been the best selling "super tape" format and is widely used with small and large computer systems, especially for backup. Its popularity can be attributed to both the innovative technology developed as well as the attractive pricing.
LTO Drive

HP StorageWorks LTO-4 Ultrium 1840 Tape Drive represents HP's fourth-generation of LTO tape drive technology positioned as HP's first tape drive capable of storing up to 1.6 TB per cartridge while providing hardware-based encryption to enable greater levels of security and unprecedented performance.
Data hardware encryption using AES 256-bit provides easy-to-enable security to protect the most sensitive data and prevent unauthorized access of tape cartridges. By using LTO-4 Ultrium 1840 encryption, not only is data fully capable of being compressed therefore maximizing capacity, encrypted backups are completed without a loss in performance.
Capable of data transfer rates up to 240 MB/sec, HP’s exclusive Data Rate Matching feature further optimizes performance by matching host system speed to keep drives streaming and enabling the fastest tape performance in the industry.
The Ultrium 1840 provides investment protection with full read and write support with LTO-3 media, and the ability to read LTO-2 cartridge. By doubling the capacity of previous generation Ultrium drives, HP customers now require fewer data cartridges to meet their storage needs, significantly reducing IT costs and increasing ROI.
Support for Write-Once, Read-Many (WORM) media allows customers to implement a cost-effective solution to secure, manage, and archive data to meet stringent compliance regulations.
The LTO-4 Ultrium 1840 Tape Drive provides both U320 SCSI and 3Gbps SAS interfaces and supports the industry’s most comprehensive list of compatible hardware and software platforms. Each drive option includes HP Data Protector Express Software Single Server Edition backup/recovery software and the HP Data Protector Express Software Bare Metal Disaster Recovery option, as well as support for HP One-Button Disaster Recovery (OBDR) and HP StorageWorks Library and Tape Tools (L&TT).
The new HP StorageWorks LTO-4 Ultrium 1840 SAS Tape Drive models provides a 3Gb/sec SAS interface allowing direct connect to SAS-based servers.
Thursday, June 4, 2009
Team Viewer

TeamViewer 4.1.5960
Share your desktop with another person via the Internet.
Product Description
TeamViewer 4.1.5960 is a simple and fast solution for remote control, desktop sharing and file transfer that works behind any firewall and NAT proxy. To connect to another computer just run TeamViewer on both machines without the need of an installation procedure. With the first start automatic partner IDs are generated on both computers. Enter your partner's ID into TeamViewer and the connection is established immediately. With over 15 million users TeamViewer is a standard tool to give support and assistance to people in remote locations. The software can also be used for presentations, where you can show your own desktop to a partner. TeamViewer is completely free for private use.
What's New in This Version
Version 4.1.5960 has includes full Instant Messaging capabilities with the partners in your partner list and improved handling for permanent 24/7 access to your PCs.
Download
Subscribe to:
Posts (Atom)