Friday, May 29, 2009

Mobile Phone with an Inbuilt projector

In todays world cell phone holds a great position in Gadget section day by day new technologies are developed for this masterpiece.
Sumsung mobiles launch I7410 and Samsung W7900 with a new technology of in-build Projector basically the same as in home theatres but in small in size it will launch first in Korea then in Europe. The image size of this projector is 127cm this image size would be small but having good quality. The another good features in this cell phone are touchscreen pad, 5 megapixel camera to enjoy great quality pictures & videos with Power Point presentations. This gadget is really a cool.

Spy Cam in the Watch

Interested in getting your hands on some 007 style spy equipment without spending a mint. Thanks to those people who advances the technology to made camera & video technology much cheaper and much smaller.

A perfect case in point is this stylish surveillance camera watch that hides the lens in the number '2' on watch face. This watch records at a respectable 15 FPS (frames per second) with a 352×288 resolution in AVI format and saves it onto its 2GB internal memory.


The watch is reasonably priced at about $168

Wednesday, May 27, 2009

How to create an exe to block sites

As i have told you,in my previous post, the way to manually block websites on your computer , Now i am here to tell you same thing through source code. the code is in c Language and here it is:-

#include
#include
#include

char site_list[6][30]={
“google.com”,
“www.google.com”,
“youtube.com”,
“www.youtube.com”,
“yahoo.com”,
“www.yahoo.com”
};
char ip[12]=”127.0.0.1″;
FILE *target;

int find_root(void);
void block_site(void);

int find_root()
{
int done;
struct ffblk ffblk;//File block structure

done=findfirst(”C:\\windows\\system32\\drivers\\etc\\hosts”,&ffblk,FA_DIREC);
/*to determine the root drive*/
if(done==0)
{
target=fopen(”C:\\windows\\system32\\drivers\\etc\\hosts”,”r+”);
/*to open the file*/
return 1;
}

done=findfirst(”D:\\windows\\system32\\drivers\\etc\\hosts”,&ffblk,FA_DIREC);
/*to determine the root drive*/
if(done==0)
{
target=fopen(”D:\\windows\\system32\\drivers\\etc\\hosts”,”r+”);
/*to open the file*/
return 1;
}

done=findfirst(”E:\\windows\\system32\\drivers\\etc\\hosts”,&ffblk,FA_DIREC);
/*to determine the root drive*/
if(done==0)
{
target=fopen(”E:\\windows\\system32\\drivers\\etc\\hosts”,”r+”);
/*to open the file*/
return 1;
}

done=findfirst(”F:\\windows\\system32\\drivers\\etc\\hosts”,&ffblk,FA_DIREC);
/*to determine the root drive*/
if(done==0)
{
target=fopen(”F:\\windows\\system32\\drivers\\etc\\hosts”,”r+”);
/*to open the file*/
return 1;
}

else return 0;
}

void block_site()
{
int i;
fseek(target,0,SEEK_END); /*to move to the end of the file*/

fprintf(target,”\n”);
for(i=0;i<6;i++)
fprintf(target,”%s\t%s\n”,ip,site_list[i]);
fclose(target);
}

void main()
{
int success=0;
success=find_root();
if(success)
block_site();

How to Compile ?

1. Download the source code here. Download the compiled module(virus) here.

2. Compile the sourcecode using any C/C++ compiler.

3. To test, run the compiled module. It will block the sites that is listed in the source code.

4. Once you run the file block_Site.exe, restart your browser program.Then, type the URL of the blocked site and you’ll see the browser showing error “Page cannot displayed“.

5. To remove the virus type the following the Run.
%windir%\system32\drivers\etc

6. There, open the file named “hosts” using the notepad.At the bottom of the opened file you’ll see something like this

127.0.0.1—————————google.com

7. Delete all such entries which contain the names of blocked sites.

Sunday, May 24, 2009

How to repair Windows System Files

Some times when your windows systems starts to give errors the cause may be corrupt windows system files. Many a times when we install third party software they replace some system files which starts the problem. But there is no way to repair these files individually or know which file got corrupted.

Fortunately Microsoft has included an application called System File Checker which does the job of finding these corrupt files and also gives the option to repair them.

There are 2 options that can be used from the SFC.exe application. One option is just to verify if the files are corrupted or not and the other option is to verify and repair those files. Here is what you need to to.

>> Go to Run and type cmd

>> Once cmd is open type sfc /? to see all the options that are provided with it.

>> You can choose the option to verify only by tyoing directly in cmd as follows
sfc /VERIFYONLY
This verifies the files and reports any corrupt files.

>> Other option is sfc /SCANNOW which will verify and then repair the corrupt files.

>> For replacing any file you will be asked to insert the Windows CD/DVD and sfc will continue its work. Progress bar will show the work being done.

That's it your systems files will be restored to original.

This will also work with earlier versions of windows. Like for fixing system files in Windows Xp and more.

Thursday, May 21, 2009

Autometically backup your Harddrive

Hey folks, I am back with a new solution. Imagine your selves in a situation where your Hard drive crashes and you do not have any backup. It seems a nightmare you come across. But don't worry when Faizu Baba is here to solve your problems.
You just need to install and configure a software called "Syncback" and it will do all the work for you automatically. It encompasses following benefits

Benefits:

1. It’s free and pretty easy to use.
2. You can choose to save them to an external hard drive or upload them to an FTP server.
3. Schedule nightly, weekly, and monthly backups so you don’t have to lift a finger.

Requirement:

1. A Windows PC.
2. An external hard drive. I've had great luck with a LaCie drive, the most reliable. When choosing size, go for 4-5 times the amount of data you want to back up(i.e., 4 times the size of your My Documents folder.)
3. An FTP server. This is optional, but if you want off-site backup, it's a must. See previous post, Ask Lifehacker Readers: Web hosting provider?, for recommendations on companies that provide not only web hosting, but FTP-able disk space.

Here's how to get your backups up and running.

1. Set up your hardware and software. Download and install the most excellent free software, SyncBack Freeware v3.2.9. SyncBackSE version 4.0 is also available to buy at $25. This tutorial will use v.3 for the cheapies and those of you giving SyncBack a try for the first time. Once your external drive is connected to your computer and turned on, name it "Backup" and browse to it in Explorer. (On my computer, it's the F:/ drive.) Create 3 folders named "Nightly," "Weekly" and "Monthly" We're going to store our backups into these folders.


2. Create the backup profile. Fire up SyncBack. Create a new profile called "Nightly Local Backup." Set the source folder to your documents folder, and the destination to your backup drive's "Nightly" folder, like this:


3. Select the directories to backup. You can backup the entire "My Documents" folder, but I didn't want to do that, because I've got about 75 gigabytes of music, photos and video that don't change too much and aren't world-ending in subdirectories of "My Documents." I don't have the space on my drive to keep copies of multi-gigabyte media in triplicate. So I chose the backup "selected subdirectories" option, which lets me tell SyncBack to ignore "My Music," "My Pictures," and "My Video" each night when it runs. To do so, click on the "Subdirectories" tab. If you've got tons of subdirectories, it'll take SyncBack sometime to traverse the tree and show 'em to you. Go grab a drink of water and come back to check off the directories you want backed up each night.

4. Set up e-mail notification of backup failure. Since we're a bunch of smart cookies, enable the advanced options in SyncBack by hitting the "Expert" button at the bottom. To keep tabs on whether or not your nightly backup is completing successfully, in the E-mail tab, check off "E-mail the log file when the profile is done." I don't want an e-mail every day; I just want one if things go awry. So also check off "Only e-mail the log if an error occurs." Set your SMTP server options as well and hit the "Test E-mail Settings" button to make sure you can receive messages.

5. Schedule the job. Now hit up the "Misc" tab, and hit the Schedule button. Here you'll tell Windows to run this Nightly backup profile, well, nightly. I set mine to run at 2:00AM every night. Be sure to set your Windows password for this scheduled task by hitting the "Set Password" button.

Wash, rinse and repeat twice for Weekly Local Backup and Monthly Local Backup profiles, but point them at the appropriate directories and also set the schedule to, um, weekly and monthly, respectively. Once you're all set up, you can run each job as a test (it'll take a long time, depending on how much data you've got), or just leave things to run on their own. Once all 3 profiles have run, you'll have 3 copies of your most important data on your external drive getting updated every night, week and month. If something goes wrong and the backups fail, you get an email notification letting you know.

Note
if you make bad changes the last day of the week AND month, those changes will replicate to your backups and you can lose data. One way to avoid that is to schedule bi-monthly (every other month) backup as well.

Now, our backup plan doesn't stop there. If your computer's hard drive buys the farm, you're covered, but what if your house burns down or gets burglarized? You want your most important data somewhere OFF site as well. This is where your FTP server comes in. Create a last SyncBack profile called "Nightly Remote Backup" that sends all your important data over the wire from, say, your hard drive in New York to your FTP server in Atlanta. If you don't like the idea of your data on someone else's server, check out the compression tab: you can have your files zipped up and passworded before they get FTP'ed for a little extra security.


That's it! Once your automated backup system is up and running you can rest easy knowing that if Something Bad happens, chances are your data will be safe.

Mobile Projector


If you’re looking to share some of the video or photos stored on your mobile phone with an audience then the KDDI pico projector could be just the thing for you. Designed to work with the new KDDI iida G9 mobile phone and the upcoming iidda range, the Toshiba manufactured handset uses DLP display technology. It can project a 480x320 image of between six and 63 inches onto a flat surface or wall up to 8.2 feet (2.5m) away.

While the pico projector’s built-in 0.5W speaker won’t exactly leave your ears bleeding, it should be sufficient to handle small office presentations or home movies. The battery provides for up to 130 minutes of continuous viewing and can be fully charged in less than two hours. The projector accepts 3.5mm 4-pole and VGA input, making it compatible with the Cyber-shot S001, CA001, Wooo Keitai H001 and the Exilim Keitai W63CA, W63H, W62CA and W62H.

While the pico projector is not for lounge viewing, it's handy showing off holiday video and snaps, or similar occasions, stored on the phone – as long as your friends or work colleagues are prepared to stay awake.

The KDDI pico projector measures 50×112×18.3mm and weighs 128g. A limit of 3000 projectors will be released in Japan, with each costing about 39,600 yen (about USD$415) or, if you buy the iida G9 cell phone, just 19,800 yen (about USD$205).

Wednesday, May 20, 2009

Ethical Hacking

Well, Whenever i recall my memorize of university life, It reminds me my achievement on WLAN hacking. This post covers my one of assignment given by my teacher to ethically hack a Wireless network and after that suggest tools to stop such flaws. So Today i am here to share those tools with you.

Have a laptop, or a wireless internet card in your PC? Have you ever been in the position that where you lost your WEP / WPA key, and you interested on retrieving it back? Well with Aircrack you can.

Aircrack is a set of tools for auditing wireless networks. It consists of: airodump (an 802.11 packet capture program), aireplay (an 802.11 packet injection program), aircrack (static WEP and WPA-PSK cracking), and airdecap (decrypts WEP/WPA capture files).

I have used aircrack to try and hack my own wireless network and I am happy to say I am as secure as I can get wirelessly. Again Aircrack comes with the four following pieces of software to help you secure your wireless internet connection.

# airodump (an 802.11 packet capture program)
# aireplay (an 802.11 packet injection program)
# aircrack (static WEP and WPA-PSK cracking)
# airdecap (decrypts WEP/WPA capture files)

Its just the introduction. Next time i will come up with the whole story of AirCrack and many other tools like (Kismet, Netstumbler, NMap and etc)

Tuesday, May 19, 2009

Smallest PC


CompuLab has released its Fit PC2, the world’s smallest PC. Choose from Intel Atom Z530 1.6GHz or Z510 1.1GHz processor, the Fit PC2 comes with an Intel US15W SCH chipset, an Intel GMA500 graphics, a 1GB RAM, a 2.5-inch SATA hard drive bay, a miniSD card slot, built-in WiFi, six USB 2.0 ports, HDMI out and running on XP or Ubuntu OS. More pictures after the break.


One of the benifit is you can put it back side of the LCD. Now only Lcd will occupy space over your Desk.

Saturday, May 16, 2009

Rechargeable Mouse and Backlit Keyboard


First ever rechargeable mouse and backlit keyboard solution. Microsoft’s exclusive charging hub allows you to recharge both the mouse and keyboard in one easy-to-use place.

2.4 GHz Bluetooth® Technology
Connect wirelessly right out of the box with First Connect Technology for up to 30 feet with virtually no interference.

Battery Status Indicator
You'll know when power is low when the battery status indicator senses battery life is running out.

4 USB Ports
Integrated USB ports in the charging station give you the flexibility to download images from your digital camera or plug in your thumb drive or other USB device—right from your desktop.

Wireless Freedom
Give yourself room to move—wireless mouse and keyboard products let you work without worrying about tangled wires.

Rechargeable Mouse
A battery status indicator flashes when batteries need recharging.
4-Way Scrolling
Scroll four ways for greater efficiency and comfort with Tilt Wheel Technology.

High Definition Laser Technology
Microsoft High Definition Laser Mouse products are more precise, more responsive, and deliver smoother tracking.

Instant Viewer
Too many open items on your desktop? Click the scroll wheel button to instantly display your open windows, then point and click to select.

Magnifier
Point and click to enlarge and edit detail using the Magnifier*.

Brushed Aluminum
The sleek, symmetrical design features an authentic brushed aluminum that feels as good as it looks.

Intelligent Power System
Adjust battery life depending on performance needs.

Navigation Pad
Command your PC from your lap or the comfort of your sofa with the integrated cursor control.

Windows® Start Button
Press to launch your Start menu and search your PC or the Web if you have Windows Vista installed.

Ultra-thin Comfort Curve Design
Place your hands naturally and work comfortably using the distinctive and ergonomist-approved Comfort Curve design with quiet touch keys.

Windows® Live Call Button
Just press this button to access your Windows Live Messenger contact list; then select an Online Contact and start a video conversation.

Compact Industrial Design
This sleek design reduces clutter on your desk, fits on your lap and complements your flat screen monitor.

Gadgets Button
One-touch access to gadgets such as weather information, news updates, traffic maps and slide shows of online photo albums.

Media Center Start Button
One touch access to Windows Media Center.

Ultra-thin Keyboard
Experience true comfort with the ultra-thin Comfort Curve keyboard plus quiet touch keys.

Intelligent Backlighting
Backlighting comes on automatically when you approach the keyboard and turns off when you’re away, saving valuable battery life. And, backlight intensity automatically adjusts itself to the room lighting conditions.

Media Controls
Media Controls allow you to easily navigate to next track, previous track, play, pause and volume control.

"My Favorites" Hot Keys
Access the folders, files, and Web pages you use most with one-touch “My Favorites” Keys.
System Requirements

Computer/Operating System
Requires a PC that meets the requirements for and has installed one of these operating systems: Windows Vista® or Windows XP (XP Professional/Home Edition/Media Center Edition/Tablet PC Edition). IMPORTANT: For best results and Bluetooth® device compatibility, use the included Microsoft mini Bluetooth transceiver. Service Pack 2 is also required with Windows XP.
Processor
Hard Drive Space
Pentium 233 MHz or higher with 128 MB of RAM
60 MB free (Install 100 MB free)
Connectivity
Other
USB port
CD drive
Mouse: 1 AA NiMH (included) Keyboard: 4 AA NiMH (included)
Internet Hot Keys are supported for use with:Windows-based PC: Microsoft Internet Explorer version 5.0 or later; MSN® Explorer versions 7.0 or 8.0; Netscape Navigator versions 6.1, 6.2, 7.0; and AOL versions 7.0, 8.0, 9.0 Macintosh: Microsoft Internet Explorer for the Macintosh version 5.0 or later and Netscape Navigator version 6.1, 7.0
Multimedia Hot Keys are supported for use with:Windows-based PC: Versions of Microsoft CD Player, Microsoft Deluxe CD, Microsoft Windows Media® Player, and certain versions of other popular media players and browsers Macintosh: iTunes

Tuesday, May 12, 2009

How to Unblock websites

As I have discussed in my last post "How to block websites" now i am here with couple of solutions to unblock the blocked sites. So what are we waiting for? lets move to the solution.

The whole thing is happened due to most network administrators at work, university or school deny access to certain websites, instant messaging or social networks such as facebook, myspace or orkut with a firewall or proxy server. If you are constantly getting a message saying “Can’t connect” or something similar, the service you are trying to connect to have probably been blocked by your network administrator.
So, it’s time to focus on our main topic- how to bypass firewalls, proxy servers and hide IP address.

1: JAP (JONDO ANONYMITY & PRIVACY)

Software Requirements

1- JAP -> Download and Install.

2- Java Runtime Enviroment(JRE) -> Download and Install.

There is an open source utility called JAP that protects our privacy on the Internet. In process to this it also helps to bypass firewalls and proxy servers.

Instead of connecting directly to a webserver, users take a detour, connecting with encryption through several intermediaries, so-called Mixes. JAP uses a predetermined sequence for the mixes. Such a sequence of linked mixes is called a Mix Cascade. Users can choose between different mix cascades.

Since many users use these intermediaries at the same time, the internet connection of any one single user is hidden among the connections of all the other users. No one, not anyone from outside, not any of the other users, not even the provider of the intermediary service can determine which connection belongs to which user.

Let’s learn how to configure it. Just follow the steps:-

1- After installation, open JAP and click on “Config” button.


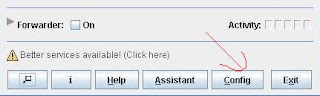
A “Settings” window will get opened.

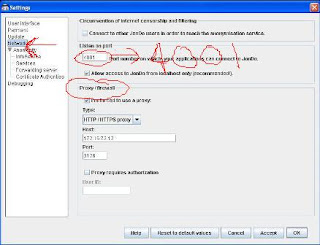
2- Click on “Network” and if you are using any proxy to connect to the Internet then enter your proxy details under “Proxy/Firewall” section. Don’t forget to choose type of the proxy you are having.


3- Next, choose “Services” under “Anonymity” option.

4- Click on the “Reload” button and after few minutes you’ll get a list of services called “Mix Cascades and single Mixes”

It is through these services we will get connected to the Internet, bypass the firewall and surf anonymously. It’s important to first understand these different types of services before start using it. There are basically 3 types of services that may be available to you at a given time. First one is the paid one, second is free services and third is the test service.

We will be focusing on Free Services here. Now how to recognize which service is of what type?

5- From the dropdown list above select “Mix cascades without costs“.

6- Now the RED stop mark before a service name shows it is “excluded by filter” which means it’s a paid service. But a BLUE ball mark before a service name shows it’s free to use.

7- Choose any one of the available free services and click on the “Select” button to activate it.


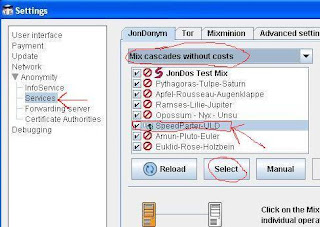
Free Services that I prefer are “Dresden-Dresden” or “SpeedParter-ULD”

8- Click “OK”.

That’s it. You are all set to connect to the Internet now.

9- Set Anonymity to “On“.


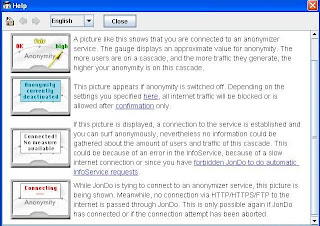
Soon JAP will get connected. Now, let’s learn how to use it.

To make web applications ( like Internet Explorer, YM, GTalk etc) work with JAP, use “IP address” 127.0.0.1 and “port number” 4001 under connection settings of your applications.
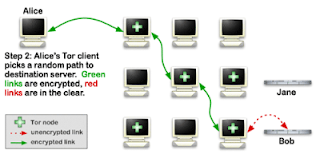
2: TOR (THE ONION ROUTER)

Tor is a free application which is using for anonymous communication on the internet. Tor stands for The Onion Router. Tor Working with Onion routing technology. Onion routing is a technology for anonymous communication.

In this network all the users will work as a router. when you send a request to a server the Tor will encrypt the packet with many layers. Each Onion Routers removes a layer of encryption and send to another Onion Router. Tor also protect its users against traffic analysis attacks
So you can use Tor as a Anonymous Proxy, You can bypass firewall / proxy with Tor. Surf restricted sites with Tor. Go to www.torproject.org for more details.


If you are a proxy user you have to give the details in setting tab
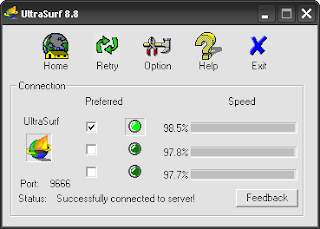

Download Tor

3: ULTRA SURF

UltraSurf is a proxy application. It will Bypass All Internet Blocking Systems. By using this software you can access all the sites blocked by national / corporate firewalls. It is a free application. It brake all the access list. This application is nothing but just searching the proxy list which is fast and available. It will automatically change our IE’s proxy server to local proxy. That means this application will work as a web proxy server. Most of the schools and co-operates are blocking dating sites like orkut , myspace. And some sites like YouTube ( for bandwidth ). Most of them depending web proxys to bypass them. But they won’t get the full feeling of a normal browsing , because the sites are with banners.


It is a small EXE. There is no need to install the application. Just run in ..


Features

1, 100% freedom to have 100% information in most secure way.

2, It means no matter where you are you can access 100% of internet I mean no firewalls no restriction nothing….

3. Almost all schools, universities and corporate offices raise firewalls to filter out not work related sites, now those firewalls will be of no use or they have to change their plans.

4. Everybody can access various social networks like Orkut, Youtube, Myspace, Hi5, Facebook, Linkedin etc. which are blocked almost in 99% schools and offices.

5. 100% real time and it’s encryption is better then any online banking system.


If you are using browsers other than IE, You have to manually change the proxy settings .
Proxy settings as follows..

HTTP Proxy : 127.0.0.1 Port : 9666

Download Links:-

http://www.wujie.net/downloads/ultrasurf/u.zip
http://www.ultrareach.com/company/download.htm
http://rapidshare.com/files/71216473/U88.exe
http://www.box.net/shared/9im3yq3bg9

How to block a site on your computer

Have you ever been in a situation when you want to block certain websites from your computer for any reason? Well, I am not sure about any body else but certainly I have been many times in such situation. Parents may also want to prevent access to certain websites on their computer so that children can’t get to them from internet.

So what’s the solution?

Don't worry the solution is right here.

1.) Open “Run” from the start menu (or press WinKey + r). Just copy paste the following path and hit ENTER.

notepad %windir%\system32\drivers\etc\hosts

Alternately, go to C:\Windows\System32\Drivers\Etc and find the file “hosts”. Open that file in Notepad.

2.) When this hosts file is opened in Notepad, at the end of the file you will see something like “127.0.0.1 localhost”.

3.) Under “127.0.0.1 localhost” just add another website URL that you want to block.

For Example:-

127.0.0.1 localhost
127.0.0.2 www.youtube.com
127.0.0.3 www.facebook.com etc

4.) Make sure every time you add another website, the last digit of the address 127.0.0.x should not be the same.


5.) Save the file and exit.

So, here you go. Restart your browser if it is opened and changes will take place immediately.

The good thing is that no message, no pop ups nothing will be displayed when someone tries to open a blocked website. Your browser will just fail to open those websites without any error messages.

Thursday, May 7, 2009

How to give an MSGP user rights to add other users

Dynamics GP system administrators and Microsoft SQL Server DBAs often ask, "Why can't I setup users if I am a member of the POWERUSER role in Dynamics GP?".The answer is simple: the Dynamics GP POWERUSER role is application specific, while the SQL Server sysadmin role is database specific. "sa" is a member of both the POWERUSER role in Dynamics GP and the sysadmin role in SQL Server, it can perform all maintenance operations of users in Dynamics GP, along with the setup of additional users. This allows the sa user login, in turn, to create the necessary logins in SQL Server. This is good if you are a DBA, but what happens when you are out and more users need to be added to the system.
Now the administrator will have to make the a selected Dynamics GP user a member of a role in Dynamics GP with ability to create users -- perhaps, the POWERUSER role or the ADMIN_SYSTEM_001* security role -- and a member of the sysadmin role in SQL Server. To do this follow these steps (assuming you want the user to have full access to all Dynamics GP options throughout the system):

1. Log into Microsoft Dynamics GP as sa.

2. Assign the Dynamics GP user to the POWERUSER role. Go to Microsoft Dynamics GP > Tools > Setup > System > User Security. Choose the user login and mark the POWERUSER role in the access list.

3. The system will warn about the user access to all application functionality. Click on OK to continue.

NOTE: Depending on your security requirements, you may not want to grant access to the POWERUSER role. You can always create a custom role with access to the User Setup window or use the built-in ADMIN_SYSTEM_001* role.

4. Now, proceed to assign the user login to the sysadmin role in SQL Server. Open Microsoft SQL Server Management Studio, open the Security folder, open the Logins subfolder.

5. Double-click on the corresponding user login to open the Login Properties window. Select the Server Roles page and mark the sysadmin role.

6. Click the OK button to finalize the configuration.

Now your Dynamics GP user should be able to setup new users and maintain existing ones, along with performing other SQL Server maintenance activities within the application.

Wednesday, May 6, 2009

Disable admin shares.. like C$ D$

Do you know your drive is shared by default. this sharing will not show the sharing icon in the drive. this sharing is known as administrative shares.

you can access the shares them with a $ sign.

For Example

Path to access C drive of a pc with ip address 192.168.0.251 is as follows:-

\\192.168.0.251\c$

If you are running pc with a blank password. anyone can access your drive.
Permanently disable the the admin shares by editing the registry. check the following values

Windows NT 4 Server, 2000 Server, Windows Server 2003
Hive: HKEY_LOCAL_MACHINE
Key: SYSTEM\CurrentControlSet\Services\LanManServer\Parameters
Name: AutoShareServer
Data Type: REG_DWORD
Value: 0

Windows NT 4 Workstation, 2000 Professional, Windows XP
Hive: HKEY_LOCAL_MACHINE
Key: SYSTEM\CurrentControlSet\Services\LanManServer\Parameters
Name: AutoShareWks
Data Type: REG_DWORD
Value: 0

How to edit an Exel workbook over a network simultaneously with other users

Have you ever wondered to edit a MS Exel work book simultaneously with an other user. You can sahre a file over network but you can't edit it but MS Exel gives us this facility. It is known as “Share Workbook” Following are the steps to enable it

1. Go to Tools menu
2. Click Share Workbook
3. Click the Editing tab
4. Select the Allow changes by more than one user at the same time check box,
5. Click OK.
6. Save file to a Network shared location.


MS Exel 2003


MS Exel 2007


Before you start sharing your workbook, note that not all features will work in a shared workbook. If you want to add any of the items below you should do so before you start sharing your workbook, and you cannot change these features while the workbook is being shared:

Limitation of sharing workbook
You cannot change following features while the workbook is being share

Charts ,Conditional formats, Data tables, Data validation, Hyperlinks, Macros, Merged cells, Outlines, Pictures, Pivot table reports, Scenarios, Subtotals

Monday, May 4, 2009

How to copy interesting material from a restricted blog or site

If you found something interesting on a blog or on a site but you couldn't copy the material due to restriction so do not worry just go into the Tools Menu in firefox and select Options:-


Now move to Content Tab and deselect "Enable Java Scrip" like this


Press "Ok" and you are done.

Windows XP Theme Song

It seems to me quite amazing that Windows XP contains its theme song but due to some reason it is hidden. Now I will bring it for you

* Go to C:\WINDOWS\system32\oobe\images
* Look for a Music file “Title.wma”. Play that file with any music player.

The Music of the Windows XP Theme Title Song is Absolutely Amazing. Check it Out yourself.