Ever Wondered What Do .com, .net, and .org Mean?
These phrases are commonly called suffixes and are one part of a domain name. A domain name is your Web address, or Internet identity. For example, a domain name can be www.yourname.com etc.
.com represents the word "commercial," and is the most widely used extension in the world. Most businesses prefer a .com domain name because it is a highly recognized symbol for having a business presence on the Internet.
.net represents the word "network," and is most commonly used by Internet service providers, Web-hosting companies or other businesses that are directly involved in the infrastructure of the Internet. Additionally, some businesses choose domain names with a .net extension for their intranet Websites.
.org represents the word "organization" and is primarily used by non-profits groups or trade associations.
.biz is used for small business web sites.
.info is for credible resource web sites and signifies a
"resource" web site. It's the most popular extension beyond .com, .net and .org.
.mobi (short for "mobile") is reserved for Web sites built for easy viewing on mobile devices.
.us is for American Web sites and is the newest extension.It has the largest amount of available names in inventory.
.bz was originally designated as the country code for Belize, but is now commonly used by small business who can't get the name they want using the .biz extension. It is unrestricted and may be registered by anyone, from any country.
.ws was originally designated as the country code for Western Samoa, but is now commonly used as an acronym for "Web sites." It is unrestricted and may be registered by anyone, from any country.
.name is the only domain extension specifically designed for personal use. It is commonly used for easy to remember e-mail addresses and personal web sites that display photos or personal information about an individual.
Wednesday, April 29, 2009
Wanna Track Your E-mail?
Hi People! I some time wish that i can track my e-mails which i have sent with my yahoo, D-mail or xyz accounts now it is possible, you can know if the email you sent has been opened by the receiver or not. Sometimes this is really necessary if your want to know if the person has read/opened your email or not. Also if you have send the email to someone very important, then being notified about the successful delivery and the opening of the email is the best thing.
SpyPig is the software which do this for us.It works with virtually all modern email programs: Outlook, Eudora, Yahoo Email, Gmail, Hotmail, AOL Email and many others. Some of the features of SpyPig are as follow:
Completely Free and Safe : SpyPig is completely FREE! No spam, no virus, no adware, no spyware. You can use it as often as you like, and there’s no catch.
Use It with Classified Ads : SpyPig is especially useful when you respond to a classified ad such as that on Craigslist (for an employment, for example) and wonder if your email reaches its target.
Basic Requirements : Both you and the recipient must use an HTML email, not plain-text or rich-text email. Visit the Requirements & Limitations page to learn more about SpyPig. All you need is to go to SpyPig Home Page and follow the 7 steps which are very easy to follow. Your E-mail tracking system is Now Ready.
Link : SpyPig Home Page
Tuesday, April 28, 2009
MX Record of a Domain
An MX record is a type of resource record in the DNS specifying how Emails should be routed using the SMTP Each MX record contains a preference and a host name.
We know How to find the IP address of a website uising “Nslookup”
With the help of this command line tool nslookup itself we can find the Mx record of that server.
For example if you want to find the MX enrty of hotmail.com
Type following line in the command line
Nslookup –q=mx hotmail.com
Result
Z:\>nslookup -q=mx hotmail.com
Server: ads.gfslho.geojit.com
Address: 192.168.9.7
Non-authoritative answer:
hotmail.com MX preference = 5, mail exchanger = mx4.hotmail.com
hotmail.com MX preference = 5, mail exchanger = mx1.hotmail.com
hotmail.com MX preference = 5, mail exchanger = mx2.hotmail.com
hotmail.com MX preference = 5, mail exchanger = mx3.hotmail.com
mx4.hotmail.com internet address = 65.54.244.104
mx4.hotmail.com internet address = 65.54.244.232
mx4.hotmail.com internet address = 65.54.245.104
mx4.hotmail.com internet address = 65.55.37.88
mx4.hotmail.com internet address = 65.55.37.104
mx4.hotmail.com internet address = 65.55.37.120
mx4.hotmail.com internet address = 65.55.92.152
mx4.hotmail.com internet address = 65.55.92.168
mx4.hotmail.com internet address = 65.55.92.184
mx1.hotmail.com internet address = 65.54.244.8
mx1.hotmail.com internet address = 65.54.244.136
mx1.hotmail.com internet address = 65.54.245.8
mx1.hotmail.com internet address = 65.55.37.72
mx1.hotmail.com internet address = 65.55.37.88
mx1.hotmail.com internet address = 65.55.37.104
mx1.hotmail.com internet address = 65.55.92.136
mx1.hotmail.com internet address = 65.55.92.152
mx1.hotmail.com internet address = 65.55.92.168

Thursday, April 23, 2009
How to remove Desktop.ini & Folder.htt virus HTML.Redlof.A
Redlof is polymorphic virus that embeds itself without any attachment to every e-mail sent from the infected system. It executes when an infected email message is viewed The HTML.Redlof.A is a very pestering virus. From what I gather, neither does it create any loss of data nor does it send any personal information across the net.
But what it does is horrible. It actually comes in the form of a script. The script is copied onto several other .htm, .html, .vbs, .asp, .htt, .jsp files on your hard drive. Then whenever any of these files are executed, the script is copied onto more files which create more files and so on.
VBS/Redlof.A@m executes directly from an infected message by using a security vulnerbility in Internet Exlorer known as Microsoft VM ActiveX Control Vulnerability. More information about the vulnerability and a fix is available from Microsoft: http://www.microsoft.com/technet/security/bulletin/ms00-075.asp
The virus also infects files with extensions "htm", "html", "asp", "php", "jsp", "htt" or "vbs".
Redlof drops the following infected files:
\Program Files\Common Files\Microsoft Shared\Stationery\blank.html
\Windows\System\Kernel32.dll
\Windows\web\kjwall.gif
\Windows\system32\desktop.ini
"blank.html" is used to replace the default stationaries for both Outlook and Outlook Express via registry causing that the every message sent from an infected system will carry the virus.
The "Kernel32.dll" is also set to registry so that it will be executed on the system restart:
HKLM\Software\Microsoft\Windows\CurrentVersion\Run\Kernel32
Download Removel tools
http://www.gdata.pl/kmdownload/download.php?op=getit&id=61
http://www.softpedia.com/get/Antivirus/Redlof-Remover.shtml
CPU-Z
What is CPU-Z
CPU-Z is a freeware that gathers information on some of the main devices of your system. A nice tool I use for check the CPU speed model RAM speed, slot usage make Etc . use and feel the power of this tool ..
These are the features of CPU-Z.
1. CPU
a. Name and number.
b. Core stepping and process.
c. Package.
d. Core voltage.
e. Internal and external clocks, clock multiplier.
f. Supported instructions sets.
g. Cache information.
2. Mainboard
a. Vendor, model and revision.
b. BIOS model and date.
c. Chipset (northbridge and southbridge) and sensor.
d. Graphic interface.
3. Memory
a. Frequency and timings.
b. Module(s) specification using SPD (Serial Presence Detect)
c. Vendor
d. serial number
e. timings table.
4. System
a. Windows and DirectX version.
Download CPU-Z from http://www.cpuid.com
Prevent from Fake Antivirus software
I have observed that users are equally responsible for the disaster which they face during there routine work. While surfing on the Internet they go to various unknown sites, Accept various pop-ups and invitation from unknown source. All such things drive them to the ultimate hassle. Now what you have to do is just go through these points and solve your created problems by your self.
1. Use Firefox as your browser rather than Internet Explorer.
2. Keep your computer updated with the latest anti-virus and anti-spyware software, and be sure to use a good firewall.
3. Never open an email attachment unless you are POSITIVE about the source.
4. Do NOT click on any pop-up that advertises anti-virus or anti-spyware software, especially a program promising to provide every feature known to mankind. (Also remember: the fakes often mimic well-known brands such as Grisoft AVG, Norton and McAfee.)
5. If a virus alert appears on your screen, do NOT touch it. Don't use your mouse to eliminate or scan for viruses, and DON'T use your mouse to close the window. Instead, hit control + alt + delete to view a list of programs currently running. Delete the "rogue" from the list of running programs, and call your computer maker's phone or online tech support service to learn if you can safely use your computer.
6. Do not download freeware or shareware unless you know it's from a reputable source.
7. Avoid questionable websites. Some sites may automatically download malicious software onto your computer.
8. Reset your current security settings to a higher level.
9. Although fake software may closely resemble the real thing, it's rarely an exact match. Look for suspicious discrepancies.
10. Check out this list of rogue/fake anti-virus and anti-spyware products.
List of rogue / fake antivirus / anti spyware products
Advanced Cleaner[3]
AlfaCleaner
AntiSpyCheck 2.1
AntiSpyStorm
AntiSpywareBot [4]
AntiSpywareExpert
AntiSpywareMaster
AntiSpywareSuite
AntiSpyware 2008 XP
Antivermins
Antivirgear
Antivirus 2008
Antivirus 2009
AntiVirus Gold [5]
Antivirus Master
Antivirus XP 2008 [6]
Awola 6.0
Brave Sentry
BestsellerAntivirus
Cleanator
ContraVirus
Doctor Antivirus
DriveCleaner [7]
Disk Knight
EasySpywareCleaner
Errorsafe
free-viruscan.com
IE Antivirus
IEDefender
InfeStop
KVMSecure
MacSweeper
MalCrush 3.7
MalwareCore
MalwareAlarm
Malware Bell 3.2
Microsoft AntiVirus
PCSecureSystem [8]
PC Antispy [9]
PC Clean Pro [10]
PC SpeedScan Pro
PestTrap [11]
Perfect Cleaner
PAL Spyware Remover
PCPrivacytool
PC-Antispyware
PSGuard
SecurePCCleaner
Security toolbar 7.1
SpyAxe [12]
Spy Away
SpyCrush
Spydawn [13]
SpyGuarder
SpyHeal
Spylocked [14]
SpySheriff [15]
SpySpotter
Spyware Cleaner
Spyware Quake [16]
Spyware Stormer
SpywareStrike
Spy-Rid
SpyWiper
System Live Protect [17]
SystemDoctor
TrustedAntivirus
TheSpyBot
UltimateCleaner
VirusHeat
Virus Isolator
VirusProtectPro
VirusRanger
Vista Antivirus 2008
WinAntiVirus Pro 2006
WinFixer [18]
WinSpywareProtect
WorldAntiSpy
XP Antivirus
XoftSpySE
Zinaps 2008
Wednesday, April 22, 2009
Create Windows Restore Point with just a single click
The Windows Restore Utility is really a magical utility that we need. It comes to our rescue in needy situations like system wont boot, system is corrupted by virus etc. So most Windows users need to create a System Restore Point most often. As i said in the earlier post Windows usually creates System Restore Points automatically, but we cannot depend on that to be happened. It may or may not happen some times. And that too is a reason to Create A System Restore Point Manually. You need to go through many steps and wizard to do this. So here is a nice and fast way to Create Restore Point with Just One and Only One Click.........
Single Click Restore Point is a small executable file that do this job in a flash. You only need to be logged into Windows with administrative Rights and just run this utility. This utility does't have an interface only it shows a Message saying that a Windows Restore Point is Created. Just that and the Restore Point is created in just One Click. The only problem is that you can't name the Restore Point Created. It will be named by the date along with the name " Created With SCRP Tool " (See the Screen Shot)
This tool will help users who struggle to Create System Restore Points in Windowsby navigating through the control Panel. Those users will surely happy with this utility.
Download Single Click Restore Point
Bluetooth 3.0 + HS with approximate data transfer rate of 24Mbps
The Bluetooth SIG officially announced its new Bluetooth 3.0+HS specification dubbed as Bluetooth High Speed Technology. The new Bluetooth versions shows markedly high rates of data transfer prior to its succeeding version, its reliance to 802.11 radio supports provides increased in data transfer at approximate rate of 24Mbps.
The new design Bluetooth 3.0+HS enables the ability to switch over to an 802.11 radio for faster transfer and its completely backwards compatible with older Bluetooth devices. For instance, you can transfer large files from camcorder-to-HDTV, PC-to-PMP and UMPC-to-printer and camera-to-PC transfers.
We still have something to dig over this new technology, how about if its possible for the older version of Bluetooth devices be upgraded into 3.0? And if we analyze the power needed for this huge data transfers, this unhealthy power consumption can eats up portable devices life-time like netbooks, cellphones, PMPs and other battery-powered portables.
These possible flaws are still on works with Atheros, Broadcom, and CSR are finding the compatible hardware solutions. We won’t still be able to see devices equipped with this standard up for another 9 to 12 months. So we can’t expect for incoming compatible Bluetooth devices like smartphones, camcorder or netbooks supporting this new spec until early 2010.
Update & Backup Hardware Drivers of your PC
DriverMax is free tool which allows you to download, update and backup all your computer drivers with the latest release in just one click. This saves you from installing the drivers one by one and rebooting each time or even when you install a new OS. Once installed it will start indexing your drivers. Being available free for Windows XP and Windows Vista users it can solve a lot of time for general users.
Here are the complete set of features :
* Export and Import your windows xp or Vista drivers. You can also get a report on this. The major advantage of exporting is when you again re install your OS, you can just use this backup to install all your hardware drivers in one shot.
* It can check for driver updates, identify the unknown hardware and give you a detailed report again on this.
* It has a popular hardware section which according to your OS ( Windows XP or Vista ) can find Best Hardware, Popular Video cards and popular processors. This has nothing to do with driver updates but this is something which can give an insight which hardware are most commonly used and so on.
* It also suggests you to create an online account so you can maintain a profile online including your computer driver updates and so on.
This software rocks to find all the faulty driver installation on your computer. A perfect freeware which you should have.
Click to Download DriverMax
Monday, April 20, 2009
Iterative PC Restart Problem
Recently I came across with a problem regarding PC restart. It was restarting Automatically and Continuously and pissing me off... So I thought of writing this Solution after reading various similar Articles on various blogs as well as analyzing it by my self.
You can disable the automatic restart behavior. Follow these steps:
1. Press [Windows][Break] to open the System Properties dialog box.
2. On the Advanced tab, click the Settings button in the Startup And Recovery section.
3. In the System Failure section, deselect the Automatically Restart check box, and click OK.
4. To enable the changes, click OK in the System Properties dialog box.
Causes
The continuous reboot problem can have a variety of causes, including
* faulty or unseated memory modules
* out-of-date corrupt, or missing drivers
* software conflicts
* overheating components
* virus or malware
* bad software
* bad hardware
Your computer may immediately fail to boot if one of your memory modules is unseated. The memory modules are long, narrow sticks that attach to the motherboard located near the processor and have clips at either end. If one or both of the clips is not closed or laying flat against the edges of the module, press down on the edge of the nearest to the clip. You may have to remove the memory module and reseat it. Restart the computer.

Your computer may also immediately reboot if another piece of hardware fails, has a loose connection, or becomes disconnected. Check that power plugs from your power supply are connected to the appropriate components and that those connections are secure. Listen for your hard drive to start spinning. If it is silent, then it may be faulty or disconnected from the motherboard. Also, be sure the fans on your motherboard or graphics card start spinning. If any component seems unresponsive, replace it.

If you’re still having trouble, use software to verify that your memory is at fault. Download a free utility such as memtest86+ (www.memtest.org) or DocMemory (www.simmtester.com), read the instructions, create a startup diskette or CD, and boot into the utility. Run the tests, and if you find memory errors, move on to troubleshooting the modules themselves. You probably won’t know exactly which memory stick has gone bad (unless you have just one), so remove them and test each one to find the offender. When you have a bad module, you’ll need to get a replacement either via a warranty or by purchasing a new one from a trusted computer retailer.

If the settings in the BIOS have changed or become unstable, you may need to reset the settings to get your system to boot again. Restart your computer and access the BIOS setup utility. When you have access to the BIOS setup utility, you should see options to Load Defaults, Load Optimized Defaults, Load Fail-Safe Defaults, or something similar. First, try loading the Optimized Defaults. If your computer still fails, re-enter the BIOS and load the Fail-Safe Defaults. If you don’t have a choice, simply load the default settings as described in your computer or motherboard manual. Confirm your choice and allow the system to reboot.
You may have to select the Save And Exit option to restart your system. Sometimes, your computer won’t even let you access the BIOS. In these instances, you may have to reset the BIOS using a more hands-on approach. The CMOS (complementary metal-oxide semiconductor) memory retains your computer’s BIOS settings but can be reset by moving a jumper on a three-pin header on the motherboard and then moving it back to its original position after a short wait. You’ll have to consult your computer or motherboard manual for specific instructions on how to perform this operation. Restart the computer.
If your system is infected with a virus or malware or experiencing system-crippling errors, you may never see error messages that can provide clues as to why your computer continuously reboots. Windows is set to reboot when it encounters a critical error. Disabling this can let you view error messages and on-screen prompts.
To change the setting in WinXP, boot into Safe Mode and access the Control Panel. If you’re using Win2000/XP with the Control Panel displayed in Classic View, simply double-click the System icon. If you’re a WinXP user viewing the Control Panel in Category View, click Performance And Maintenance and click System from the bottom of the dialog box. Click the Advanced tab and then click the Settings button from the Startup And Recovery section of the System Properties dialog box. Next, deselect the checkbox in front of Automatically Restart in the System Failure portion of the dialog box. Click OK and click OK again. Close the Control Panel and restart the computer. Now, when your system encounters an error, it will remain on-screen.
Overheating is one of the main enemies of a reliable system. A PC that runs hot will have a shorter life span for its components, and at extremes of temperature, the possibility exists that the system will be unstable and this will leads to continuos rebooting.
If your computer is having overheating trouble, you surely will be able to solve the problem through this tutorial. The typical symptom an overheating computer is when it locks (freezes up) too much and issues errors of General Protection Failure (“This program has carried out an illegal operation and will shut down”) and the infamous “blue screen of death”. If you remove the case’s cover and, with the computer open, the computer stops being troublesome, the problem is overheating. Note that these symptoms also turn up in other maintenance situations, i. e., they do not necessarily mean that the computer is overheating.


Thursday, April 16, 2009
Make a friendship with Windows Registry
If you plan on tweaking any version of Windows, you're going to have to get friendly with the Windows Registry, a database of information that defines how your PC works, including every part of Windows and its applications and interface. Editing the Registry is often the best way to tweak Windows. In fact, it's the only way to make certain changes.
Even if you've never edited the Registry directly before, you've changed it without realizing it. Whenever you change just about any setting in Windows via a menu or some other method, a Registry change is made behind the scenes, putting that new setting into effect. The menus and dialog boxes you see in Windows are often little more than a visual front end to the Registry.
But knowing how to find your way around the Registry gives you access to many more controls than Windows' menus and dialog boxes provide. To edit the Registry directly, use Windows' built-in Registry Editor, shown below.
At first glance, the Registry is a maze of apparently incomprehensible settings, overwhelming in their complexity. In fact, though, there's some method to the madness. In this article, I'll explain how the Registry works, give you an overview of its organization and offer detailed instructions on how to edit it.
NOTE:I am assuming that any Registry edits you make will be on your own computer. Always check with your IT department before altering a company-owned machine.
Careful!
Editing the Windows Registry is easy -- perhaps too easy. There is no Save button in the Registry. When you modify a value, it changes right then and there. There is also no Undo button. Once you make the change, it's done. If you're not careful, you could do serious harm to your computer setup, your applications and the way Windows works.
So before you touch the Registry, use System Restore to create a restore point so that you can revert to the previous version of the Registry if something goes awry. It's also a good idea, once you begin editing the Registry, to write down the current state of any key or value you plan to edit before you make any changes.
Creating a restore point
To create a restore point in Windows Vista, choose Control Panel --> System and Maintenance --> Restore files from backup --> Create a restore point or change settings.
In XP, choose Start --> Help and Support --> Performance and Maintenance --> Using System Restore to undo changes --> Run the System Restore Wizard --> Create a restore point and answer the wizard's questions.
Reverting to a restore point
To revert to a system restore point in Vista, select Control Panel --> System and Maintenance --> Restore files from backup --> Repair Windows Using System Restore and follow the directions for reverting to a restore point.
In XP, follow the same steps you would to create a restore point (above). When you get to the System Restore Wizard, choose Restore my computer to an earlier time and answer the wizard's questions.
Finding your way around the Registry
Before we begin editing the Registry Editor, we'll take a look at the overall structure of the Registry and its various components. The first thing you need to know is that the Registry has many thousands of settings, organized into five main sections, called Registry hives. Each hive has a different purpose.
Following are the five hives and what each does:
HKEY_CLASSES_ROOT: This hive tells Windows how to handle every file type and controls basic user interface options.
HKEY_CURRENT_USER: This hive contains configuration information about the system setup of the user that is currently logged into Windows. It controls the desktop, as well as Windows' appearance and behavior. It also manages connections to networks and devices such as printers; personal preferences such as screen colors; and the user's security rights.
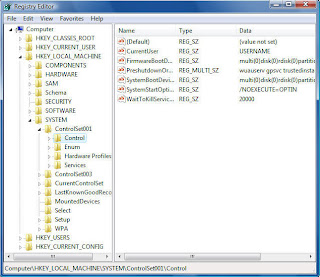
HKEY_LOCAL_MACHINE: This hive contains information about the computer itself -- details about the hardware, including keyboard, printer ports, storage ... in fact, the entire hardware setup. In addition, it has information about global security, installed software, system start-up and drivers.
HKEY_USERS: This hive contains information about every user profile on the system.
HKEY_CURRENT_CONFIG: This hive contains information about the current hardware configuration of the system, in the same way HKEY_CURRENT_USER contains information about the current user of the system.
Understanding keys and values
Underneath each hive are keys, which can in turn contain subkeys, and those subkeys can contain subkeys, and so on, organized in directory fashion, much like a hard drive.
Keys and subkeys contain one or more values, each of which controls a particular setting in Windows. Here are the six primary types of Registry values:
String value (REG_SZ): This kind of value is easy to understand and edit because it is made up of plain text and numbers. It is one of the most common types in the Registry, and the type you're likely to edit most frequently.
For example, this value
HKEY_CURRENT_USER\Control Panel\Mouse
\DoubleClickSpeed
determines the maximum number of milliseconds that can elapse between two mouse clicks for Windows to consider them a double-click (for the user currently logged into Windows).
Binary value (REG_BINARY): This value is made up of binary data: 0s and 1s. As a general rule, you won't edit binary values.
DWORD (32-bit) value (REG_DWORD): This value is represented as a number. Sometimes the value acts as a toggle -- 0 turns on the key and 1 turns off the key -- though other numbers may be used instead.
QWORD (64-bit) value (REG_QWORD): This is like a DWORD value, except that it can hold larger values.
Multistring value (REG_MULTI_SZ): This value contains several strings of plain text and numbers. The Registry Editor will let you edit these values, but it won't let you create them.
Expandable string value (REG_EXPAND_SZ): This value contains the location of files and tells Windows where to find them.
Editing the Registry
With all that as a background, you're ready to get down and dirty and start editing the Registry. Edit the Registry using the Registry Editor. To launch it, select Start --> Run (on XP) or Start --> Start Search (on Vista), type regedit and press Enter (you can also type regedit at the command prompt). In Vista, you'll have to click through a UAC prompt after you press Enter.
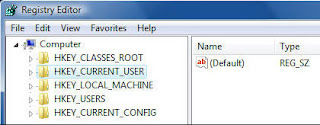
If this is the first time you've run the Registry Editor, it will open with the HKEY_CURRENT_USER hive highlighted, as shown below. If you've previously used the Registry Editor, it will highlight the last key you edited or the last place you were in the Registry.
Browse through the Registry with the Registry Editor in the same way you browse through a hard disk using Windows Explorer. Clicking a + sign (in XP) or a light triangle (in Vista) opens a key to reveal the next level down the hierarchy. Clicking a - sign (in XP) or a dark triangle (in Vista) closes the key.
You can also use shortcut keys to navigate. Pressing the right arrow key on your keyboard opens a Registry key to reveal subkeys; pressing the left arrow key closes a key and moves one level up in the key hierarchy. To jump to the next subkey that begins with a specific letter, press that letter on the keyboard.
If you're looking for a particular key, an even faster way to navigate is to use the Find command from the Edit menu. (You can also use the Find command by pressing Ctrl-F.) To find successive keys with the same value, press the F3 key.
You use the Registry Editor to edit existing keys and values, create new keys and values, or delete keys and values. Sometimes the changes take effect as soon as you make the change and exit the Registry Editor; other times, you'll have to log off and on or reboot for them to take effect.
Editing existing keys and values
To edit a value, double-click it in the right pane of the Registry Editor. A box appears that lets you edit the value. Make the change in the box and exit the Registry.
Let's try it. We'll change the click speed of your mouse by editing
HKEY_CURRENT_USER\Control Panel\Mouse\DoubleClickSpeed
As mentioned previously, DoubleClickSpeed determines the maximum amount of time that can elapse between two mouse clicks for Windows to consider them a double-click (for the user currently logged into Windows). To change the default amount of time, edit this value. In this case, the default is 500, measured in milliseconds.
To edit DoubleClickSpeed, launch the Registry Editor, then navigate to
HKEY_CURRENT_USER\Control Panel\Mouse
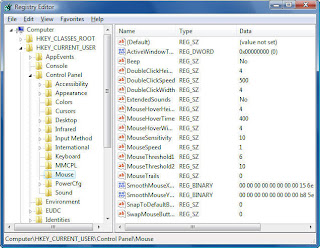
On the left-hand side of the screen is the key, and on right-hand side of the screen are all of the key's values and the data for each value. DoubleClickSpeed is of the type REG_SZ -- a string value, which means it's made up of numbers and/or letters and can be easily edited -- and its default measurement is 500 (milliseconds).
Now double-click DoubleClickSpeed. The Edit String box appears, as shown below, and the number 500 is highlighted.
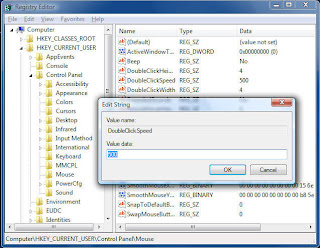
ype in a number larger than 500, and Windows will let you be more leisurely in your double-clicks; type in a smaller number, and you'll have to double-click more quickly. (Windows, by the way, recognizes only a range of between 100 and 900 for this value.)
Change the number, click OK and then exit the Registry. Your change should go into effect immediately, although you may have to reboot or log off and then on again for it to take effect.
Adding keys and values
Editing the Registry often requires that you add new keys and values. Let's take an example. Say you're going to add a new key under
HKEY_LOCAL_MACHINE/Software/Classes/Folder/shell
called Command Prompt.
This key, as I describe in the story The ultimate tweaker's guide to Windows, will let you open a command prompt from the Windows Explorer right-click menu, and the command prompt will be at your current folder location.
First, navigate to HKEY_LOCAL_MACHINE
/Software/Classes/Folder/shell. Highlight the key and select Edit --> New --> Key.
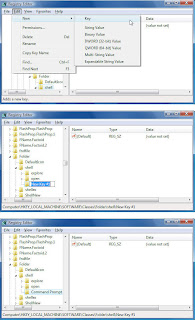
When you create a new key, it will be added as New Key #1, which will be highlighted with your cursor next to it, as you can see below. (If for some reason New Key #1 isn't highlighted, right-click it and choose Rename, and you'll be able to rename it.)
Replace the highlighted text with the name of the key you want to create, in this instance, Command Prompt.
Once you've created the new key, you can add values to it as you can any other key. Create new values in a similar way to the way in which you create new keys. Navigate to the key for which you want to create a new value, choose Edit --> New and then choose the type of value you want to create, such as String Value.
The new value will appear as New Value #1 in the right-hand pane, and there will be no value yet associated with it. Rename your new value, then edit it as outlined earlier in this article.
Deleting keys and values
Deleting a key or value is even easier: Select it and press the Delete key.
Even if you've never edited the Registry directly before, you've changed it without realizing it. Whenever you change just about any setting in Windows via a menu or some other method, a Registry change is made behind the scenes, putting that new setting into effect. The menus and dialog boxes you see in Windows are often little more than a visual front end to the Registry.
But knowing how to find your way around the Registry gives you access to many more controls than Windows' menus and dialog boxes provide. To edit the Registry directly, use Windows' built-in Registry Editor, shown below.

At first glance, the Registry is a maze of apparently incomprehensible settings, overwhelming in their complexity. In fact, though, there's some method to the madness. In this article, I'll explain how the Registry works, give you an overview of its organization and offer detailed instructions on how to edit it.
NOTE:I am assuming that any Registry edits you make will be on your own computer. Always check with your IT department before altering a company-owned machine.
Careful!
Editing the Windows Registry is easy -- perhaps too easy. There is no Save button in the Registry. When you modify a value, it changes right then and there. There is also no Undo button. Once you make the change, it's done. If you're not careful, you could do serious harm to your computer setup, your applications and the way Windows works.
So before you touch the Registry, use System Restore to create a restore point so that you can revert to the previous version of the Registry if something goes awry. It's also a good idea, once you begin editing the Registry, to write down the current state of any key or value you plan to edit before you make any changes.
Creating a restore point
To create a restore point in Windows Vista, choose Control Panel --> System and Maintenance --> Restore files from backup --> Create a restore point or change settings.
In XP, choose Start --> Help and Support --> Performance and Maintenance --> Using System Restore to undo changes --> Run the System Restore Wizard --> Create a restore point and answer the wizard's questions.
Reverting to a restore point
To revert to a system restore point in Vista, select Control Panel --> System and Maintenance --> Restore files from backup --> Repair Windows Using System Restore and follow the directions for reverting to a restore point.
In XP, follow the same steps you would to create a restore point (above). When you get to the System Restore Wizard, choose Restore my computer to an earlier time and answer the wizard's questions.
Finding your way around the Registry
Before we begin editing the Registry Editor, we'll take a look at the overall structure of the Registry and its various components. The first thing you need to know is that the Registry has many thousands of settings, organized into five main sections, called Registry hives. Each hive has a different purpose.
Following are the five hives and what each does:
HKEY_CLASSES_ROOT: This hive tells Windows how to handle every file type and controls basic user interface options.
HKEY_CURRENT_USER: This hive contains configuration information about the system setup of the user that is currently logged into Windows. It controls the desktop, as well as Windows' appearance and behavior. It also manages connections to networks and devices such as printers; personal preferences such as screen colors; and the user's security rights.
HKEY_LOCAL_MACHINE: This hive contains information about the computer itself -- details about the hardware, including keyboard, printer ports, storage ... in fact, the entire hardware setup. In addition, it has information about global security, installed software, system start-up and drivers.
HKEY_USERS: This hive contains information about every user profile on the system.
HKEY_CURRENT_CONFIG: This hive contains information about the current hardware configuration of the system, in the same way HKEY_CURRENT_USER contains information about the current user of the system.
Understanding keys and values
Underneath each hive are keys, which can in turn contain subkeys, and those subkeys can contain subkeys, and so on, organized in directory fashion, much like a hard drive.
Keys and subkeys contain one or more values, each of which controls a particular setting in Windows. Here are the six primary types of Registry values:
String value (REG_SZ): This kind of value is easy to understand and edit because it is made up of plain text and numbers. It is one of the most common types in the Registry, and the type you're likely to edit most frequently.
For example, this value
HKEY_CURRENT_USER\Control Panel\Mouse
\DoubleClickSpeed
determines the maximum number of milliseconds that can elapse between two mouse clicks for Windows to consider them a double-click (for the user currently logged into Windows).
Binary value (REG_BINARY): This value is made up of binary data: 0s and 1s. As a general rule, you won't edit binary values.
DWORD (32-bit) value (REG_DWORD): This value is represented as a number. Sometimes the value acts as a toggle -- 0 turns on the key and 1 turns off the key -- though other numbers may be used instead.
QWORD (64-bit) value (REG_QWORD): This is like a DWORD value, except that it can hold larger values.
Multistring value (REG_MULTI_SZ): This value contains several strings of plain text and numbers. The Registry Editor will let you edit these values, but it won't let you create them.
Expandable string value (REG_EXPAND_SZ): This value contains the location of files and tells Windows where to find them.
Editing the Registry
With all that as a background, you're ready to get down and dirty and start editing the Registry. Edit the Registry using the Registry Editor. To launch it, select Start --> Run (on XP) or Start --> Start Search (on Vista), type regedit and press Enter (you can also type regedit at the command prompt). In Vista, you'll have to click through a UAC prompt after you press Enter.
If this is the first time you've run the Registry Editor, it will open with the HKEY_CURRENT_USER hive highlighted, as shown below. If you've previously used the Registry Editor, it will highlight the last key you edited or the last place you were in the Registry.
Browse through the Registry with the Registry Editor in the same way you browse through a hard disk using Windows Explorer. Clicking a + sign (in XP) or a light triangle (in Vista) opens a key to reveal the next level down the hierarchy. Clicking a - sign (in XP) or a dark triangle (in Vista) closes the key.

You can also use shortcut keys to navigate. Pressing the right arrow key on your keyboard opens a Registry key to reveal subkeys; pressing the left arrow key closes a key and moves one level up in the key hierarchy. To jump to the next subkey that begins with a specific letter, press that letter on the keyboard.
If you're looking for a particular key, an even faster way to navigate is to use the Find command from the Edit menu. (You can also use the Find command by pressing Ctrl-F.) To find successive keys with the same value, press the F3 key.
You use the Registry Editor to edit existing keys and values, create new keys and values, or delete keys and values. Sometimes the changes take effect as soon as you make the change and exit the Registry Editor; other times, you'll have to log off and on or reboot for them to take effect.
Editing existing keys and values
To edit a value, double-click it in the right pane of the Registry Editor. A box appears that lets you edit the value. Make the change in the box and exit the Registry.
Let's try it. We'll change the click speed of your mouse by editing
HKEY_CURRENT_USER\Control Panel\Mouse\DoubleClickSpeed
As mentioned previously, DoubleClickSpeed determines the maximum amount of time that can elapse between two mouse clicks for Windows to consider them a double-click (for the user currently logged into Windows). To change the default amount of time, edit this value. In this case, the default is 500, measured in milliseconds.
To edit DoubleClickSpeed, launch the Registry Editor, then navigate to
HKEY_CURRENT_USER\Control Panel\Mouse

On the left-hand side of the screen is the key, and on right-hand side of the screen are all of the key's values and the data for each value. DoubleClickSpeed is of the type REG_SZ -- a string value, which means it's made up of numbers and/or letters and can be easily edited -- and its default measurement is 500 (milliseconds).
Now double-click DoubleClickSpeed. The Edit String box appears, as shown below, and the number 500 is highlighted.

ype in a number larger than 500, and Windows will let you be more leisurely in your double-clicks; type in a smaller number, and you'll have to double-click more quickly. (Windows, by the way, recognizes only a range of between 100 and 900 for this value.)
Change the number, click OK and then exit the Registry. Your change should go into effect immediately, although you may have to reboot or log off and then on again for it to take effect.
Adding keys and values
Editing the Registry often requires that you add new keys and values. Let's take an example. Say you're going to add a new key under
HKEY_LOCAL_MACHINE/Software/Classes/Folder/shell
called Command Prompt.
This key, as I describe in the story The ultimate tweaker's guide to Windows, will let you open a command prompt from the Windows Explorer right-click menu, and the command prompt will be at your current folder location.
First, navigate to HKEY_LOCAL_MACHINE
/Software/Classes/Folder/shell. Highlight the key and select Edit --> New --> Key.

When you create a new key, it will be added as New Key #1, which will be highlighted with your cursor next to it, as you can see below. (If for some reason New Key #1 isn't highlighted, right-click it and choose Rename, and you'll be able to rename it.)
Replace the highlighted text with the name of the key you want to create, in this instance, Command Prompt.
Once you've created the new key, you can add values to it as you can any other key. Create new values in a similar way to the way in which you create new keys. Navigate to the key for which you want to create a new value, choose Edit --> New and then choose the type of value you want to create, such as String Value.
The new value will appear as New Value #1 in the right-hand pane, and there will be no value yet associated with it. Rename your new value, then edit it as outlined earlier in this article.
Deleting keys and values
Deleting a key or value is even easier: Select it and press the Delete key.
Wednesday, April 15, 2009
Windows 7 Tweaks (Part #2)
Windows 7 has a very useful new feature called a Search Connector that lets you search through a Web site from right inside Windows Explorer. With it, you type in a search term and select the Search Connector for the site you want to search; Explorer searches the Web site without having to open Internet Explorer, and the results appear inside Windows Explorer. Click any of the results to head there using your default Web browser.
Normally, you'll need to get each Search Connector from the Web site through which you want to search, and very few Connectors are available. Sites normally need to adhere to OpenSearch standards in order for their Connectors to work.
However, there's a work-around that will let you easily build your own Search Connector for any site, using Windows Live Search as a kind of go-between. Don't worry, you don't need to know any code to write a Connector. Just follow these steps:
1. Copy the following text and paste it into Notepad. The text you'll need to change is in bold, all-caps text:
2. In place of NAME YOUR SEARCH, type in the name of the search as you want it to appear. In our case, we're going to build a Search Connector for FarjadArshad, so I'll just type in FarjadArshad.
3. In place of DESCRIPTION OF SEARCH, type in a longer description of the search. In our instance, it will be Search through FarjadArshad.
4. In the first SITENAME.COM entry, enter the Web site's domain. Don't use the http:// or www -- just the domain name. In our instance it will be farjadarshad.blogspot.com.
5. To the right of "count=", type in the number or results you want to appear. In our instance, we'll keep it at 50.
6. In our example, here's what the code should look like (no bold necessary):
<?xml version="1.0" encoding="UTF-8"?>
<OpenSearchDescription xmlns="http://a9.com/-/spec/opensearch/1.1/" xmlns:ms-ose="http://schemas.microsoft.com/opensearchext/2009/">
<ShortName>farjadarshad</ShortName>
<Description>Search through farjadarshad</Description>
<Url type="application/rss xml" template="http://search.live.com/results.aspx?q={searchTerms} site%3Afarjadarshad.com&count=50&format=rss"/>
</OpenSearchDescription>
7. Save the file in Notepad, choose UTF-8 from the Encoding drop-down box near the bottom of the Save As screen, and give it an .osdx extension. In our instance, we'll call the file farjadarshad.osdx.
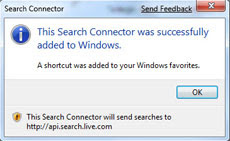
8. In Windows Explorer, right-click the .osdx file and select Create Search Connector. The Search Connector will be created, and you'll see a screen like that shown to the right.
9. You can now use the Search Connector. To get to it, in Windows Explorer go to YourName --> Searchers --> Connector, where YourName is your account name, and Connector is the name of the Connector.
User Account Control tips
The User Account Control (UAC) security feature was one of the most reviled additions to Windows Vista, with good reason -- its constant warning messages asking for permission to continue many operations drove users around the bend. UAC has been significantly improved in Windows 7 so that it's not as intrusive as in Vista, but you can still tweak it if you like.
Modify UAC
Here's how to turn UAC on or off, and make it less or more intrusive than the default:
1. Go to the Control Panel --> User Accounts and Family Safety.
2. Click User Accounts, then click Change User Account Control settings.
3. From the screen that appears, use the slider to select the level of protection you want. Here are the four levels, and what they mean:
Always notify me. Think of this as UAC Classic. It works like Vista's UAC: When you make changes to your system, when software is installed or when a program tries to make a change to your system, an annoying prompt appears.
Notify me only when programs try to make changes to my computer. This is the default; make a change yourself and UAC leaves you alone. When a program makes a change, a prompt appears. Otherwise, UAC sits there silently.
Notify me only when programs try to make changes to my computer (do not dim my desktop). This setting is identical to the default setting, with one difference: It won't dim your desktop so that you only see the UAC prompt asking you to take action. This presents a slightly elevated security risk over the default setting, because theoretically a program could allow a malicious program to interfere with the UAC prompt.
Never notify. In this one, UAC is completely turned off. This is, of course, an insecure option and not recommended for most users.
After you make the selection, click OK. Depending on the selection you made, you may need to restart it for it to take effect.
Use gadgets without UAC
If you turn off UAC as described in the previous tip, you can't use gadgets, tiny applets that run on the desktop, because Microsoft deems them a potential security threat. However, if you feel comfortable enough with that potential threat, you can use gadgets even when you've turned off UAC by following these steps.
(Important: Always create a Restore Point before editing the Windows Registry.)
1. In the Search bar, type regedit and press Enter. This will launch the Registry Editor.
2. Go to HKEY_LOCAL_MACHINE\SOFTWARE\Microsoft\Windows\CurrentVersion\Sidebar\Settings.
3. Create a new DWORD value called AllowElevatedProcess. To create the new DWORD, select Edit --> New DWORD (32-bit) Value and give it the name AllowElevatedProcess.
4. Set its value to 1.
5. Close the Registry Editor, right-click the desktop and select Gadgets. You'll now be able to add gadgets as you would normally.
Taskbar tips
One of the most significant changes to the Windows 7 interface is its new taskbar, which acts more like the Mac OS X dock than the Windows taskbar of old. Here are a few tips for using the new taskbar and tweaks for taking charge of it.
Take control of the taskbar notification area
The notification area, at the far right of the taskbar, shows system messages and alerts, and displays the icons of programs and services that typically run in the background, such as Windows 7's wireless service. But what determines when, how and which icons show up there seems one of Windows' great mysteries.
There's a simple way to find out, and better yet, to customize it.
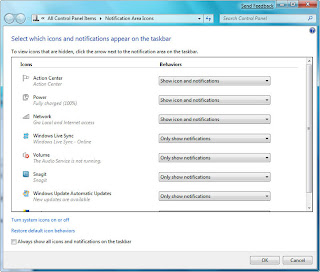
1. Right-click the taskbar, select Properties, and from the dialog box in the notification area section, click Customize. A screen like the one below appears.
Build your own Internet Search Connector
2. For each application, select from the drop-down box whether you want the icon and notifications to always be displayed, to never be displayed or to have an icon appear only when there's a notification of some kind. Click OK when you're done.
You can also customize the system icons and services that appear there, including the clock, volume, network, power and Action Center icons. At the bottom of the same screen, click "Turn system icons on or off," and from the screen that appears, choose whether to turn on or off the icon and notifications. Click OK twice when you're done.
Get back the Quick Launch bar
Windows 7's new taskbar functions as a program launcher as well as task switcher, and so the old Quick Launch bar, an area on the left side of the taskbar that contained shortcuts for frequently used programs, has been banished. However, if you really miss the little applet, you can add it back. Here's how to do it:
1. Right-click the taskbar and choose Toolbars --> New Toolbar.
2 . You'll be asked to select a folder for where the new toolbar should live. In the Folder text box at the bottom of the dialog box, enter this text:
%userprofile%\AppData\Roaming\Microsoft\Internet Explorer\Quick Launch
After you do that, click Select Folder. A link for the Quick Launch bar will be added to the taskbar. It will be on the right of the taskbar, just to the left of the Notification area, as you can see below.

It's not particularly useful docked all the way to the right with no application icons showing, so we're going to have to do a bit of work on it to make it useful. Right-click the taskbar and in the pop-up menu, remove the check next to "Lock the taskbar." Now right-click Quick Launch and remove the checks next to Show Text and Show Title.
Once you've done that, drag the vertical triple dotted line next to the Quick Launch bar to the left until you expose its icons, as you can see below. To prevent further changes, right-click the taskbar and check Lock the taskbar. You can now use the Quick Launch bar as you could in Windows XP and Vista, including adding and deleting icons to it.

Run multiple copies of applications from the taskbar
The Windows 7 taskbar serves a dual purpose, which can get confusing at times. It's used to launch programs, and also to switch between programs that are running. So you launch a program by clicking its icon, and also switch to that program after it's running by clicking its icon.
But what if you want to launch a second instance of the program? Once the program is running, it seems there's no way to launch a second instance, because when you click its icon, you only switch to the running instance.
There's a simple fix: If a program is already running and you want to launch a second instance from the taskbar, hold down the Shift key and click the icon. A second instance will launch. You can keep launching new instances this way.
Run multiple copies of Windows Explorer from the taskbar
There are times when you'll want to run multiple instances of Windows Explorer -- for example, doing that can make it easier to copy and move between different PCs on your network. Unfortunately, though, you can't launch multiple instances of Windows Explorer from the Windows 7 taskbar using the Shift-click technique. When you try it, you'll only switch to the already running instance of Windows Explorer; a new instance won't launch.
There's a simple way to enable multiple Explorer instances from the taskbar. Right-click the Windows Explorer icon in the taskbar, then right-click the Windows Explorer icon near the bottom of the context menu that appears. Select Properties. Enter this text in the Target box and click OK:
%SystemRoot%\explorer.exe /root,::{031E4825-7B94-4dc3-B131-E946B44C8DD5}
Now you're ready to launch multiple instances of Windows Explorer. Click the Windows Explorer icon as you would normally to launch a first instance. To launch a second one, hold down the Shift key and click the Windows Explorer icon. A second instance will appear. You can keep launching new instances using this same technique.
More nifty taskbar tips
Want some quick tips about the Windows 7 taskbar? Here are a few:
First, you may not realize that it's easy to rearrange the icons across the bottom of the screen -- simply drag an icon to where you want it to live. You can also add icons to the taskbar by dragging them from an application, and delete the icons by highlighting them and pressing the Delete key.
If you're a fan of using the keyboard rather than your mouse whenever possible, you can launch any program on the taskbar without the mouse. Press the Windows key and the number that corresponds to the position of the application on the taskbar -- for example, Windows key-1 to launch the left-most application on the taskbar, Windows key-2 to launch the second left-most application and so on.
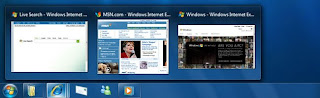
One of the nicest things about the taskbar is that when you move your cursor from icon to icon, you can see thumbnails of all open windows for each of those applications. If you're a keyboard-centric person, you can do this without a mouse. Press the Windows key-T, and you'll move the focus to the left-most icon on the taskbar. Then use your arrow keys change the focus to other icons.
Normally, you'll need to get each Search Connector from the Web site through which you want to search, and very few Connectors are available. Sites normally need to adhere to OpenSearch standards in order for their Connectors to work.
However, there's a work-around that will let you easily build your own Search Connector for any site, using Windows Live Search as a kind of go-between. Don't worry, you don't need to know any code to write a Connector. Just follow these steps:
1. Copy the following text and paste it into Notepad. The text you'll need to change is in bold, all-caps text:
<?xml version="1.0" encoding="UTF-8"?>
<OpenSearchDescription xmlns="http://a9.com/-/spec/opensearch/1.1/" xmlns:ms-ose="http://schemas.microsoft.com/opensearchext/2009/">
<ShortName>NAME YOUR SEARCH</ShortName>
<Description>DESCRIPTION OF SEARCH</Description>
<Url type="application/rss xml" template="http://search.live.com/results.aspx?q={searchTerms} site%3ASITENAME.COM&count=50&format=rss" />
</OpenSearchDescription>
2. In place of NAME YOUR SEARCH, type in the name of the search as you want it to appear. In our case, we're going to build a Search Connector for FarjadArshad, so I'll just type in FarjadArshad.
3. In place of DESCRIPTION OF SEARCH, type in a longer description of the search. In our instance, it will be Search through FarjadArshad.
4. In the first SITENAME.COM entry, enter the Web site's domain. Don't use the http:// or www -- just the domain name. In our instance it will be farjadarshad.blogspot.com.
5. To the right of "count=", type in the number or results you want to appear. In our instance, we'll keep it at 50.
6. In our example, here's what the code should look like (no bold necessary):
<?xml version="1.0" encoding="UTF-8"?>
<OpenSearchDescription xmlns="http://a9.com/-/spec/opensearch/1.1/" xmlns:ms-ose="http://schemas.microsoft.com/opensearchext/2009/">
<ShortName>farjadarshad</ShortName>
<Description>Search through farjadarshad</Description>
<Url type="application/rss xml" template="http://search.live.com/results.aspx?q={searchTerms} site%3Afarjadarshad.com&count=50&format=rss"/>
</OpenSearchDescription>
7. Save the file in Notepad, choose UTF-8 from the Encoding drop-down box near the bottom of the Save As screen, and give it an .osdx extension. In our instance, we'll call the file farjadarshad.osdx.

8. In Windows Explorer, right-click the .osdx file and select Create Search Connector. The Search Connector will be created, and you'll see a screen like that shown to the right.
9. You can now use the Search Connector. To get to it, in Windows Explorer go to YourName --> Searchers --> Connector, where YourName is your account name, and Connector is the name of the Connector.
User Account Control tips
The User Account Control (UAC) security feature was one of the most reviled additions to Windows Vista, with good reason -- its constant warning messages asking for permission to continue many operations drove users around the bend. UAC has been significantly improved in Windows 7 so that it's not as intrusive as in Vista, but you can still tweak it if you like.
Modify UAC
Here's how to turn UAC on or off, and make it less or more intrusive than the default:
1. Go to the Control Panel --> User Accounts and Family Safety.
2. Click User Accounts, then click Change User Account Control settings.
3. From the screen that appears, use the slider to select the level of protection you want. Here are the four levels, and what they mean:
Always notify me. Think of this as UAC Classic. It works like Vista's UAC: When you make changes to your system, when software is installed or when a program tries to make a change to your system, an annoying prompt appears.
Notify me only when programs try to make changes to my computer. This is the default; make a change yourself and UAC leaves you alone. When a program makes a change, a prompt appears. Otherwise, UAC sits there silently.
Notify me only when programs try to make changes to my computer (do not dim my desktop). This setting is identical to the default setting, with one difference: It won't dim your desktop so that you only see the UAC prompt asking you to take action. This presents a slightly elevated security risk over the default setting, because theoretically a program could allow a malicious program to interfere with the UAC prompt.
Never notify. In this one, UAC is completely turned off. This is, of course, an insecure option and not recommended for most users.
After you make the selection, click OK. Depending on the selection you made, you may need to restart it for it to take effect.
Use gadgets without UAC
If you turn off UAC as described in the previous tip, you can't use gadgets, tiny applets that run on the desktop, because Microsoft deems them a potential security threat. However, if you feel comfortable enough with that potential threat, you can use gadgets even when you've turned off UAC by following these steps.
(Important: Always create a Restore Point before editing the Windows Registry.)
1. In the Search bar, type regedit and press Enter. This will launch the Registry Editor.
2. Go to HKEY_LOCAL_MACHINE\SOFTWARE\Microsoft\Windows\CurrentVersion\Sidebar\Settings.
3. Create a new DWORD value called AllowElevatedProcess. To create the new DWORD, select Edit --> New DWORD (32-bit) Value and give it the name AllowElevatedProcess.
4. Set its value to 1.
5. Close the Registry Editor, right-click the desktop and select Gadgets. You'll now be able to add gadgets as you would normally.
Taskbar tips
One of the most significant changes to the Windows 7 interface is its new taskbar, which acts more like the Mac OS X dock than the Windows taskbar of old. Here are a few tips for using the new taskbar and tweaks for taking charge of it.
Take control of the taskbar notification area
The notification area, at the far right of the taskbar, shows system messages and alerts, and displays the icons of programs and services that typically run in the background, such as Windows 7's wireless service. But what determines when, how and which icons show up there seems one of Windows' great mysteries.
There's a simple way to find out, and better yet, to customize it.
1. Right-click the taskbar, select Properties, and from the dialog box in the notification area section, click Customize. A screen like the one below appears.

Build your own Internet Search Connector
2. For each application, select from the drop-down box whether you want the icon and notifications to always be displayed, to never be displayed or to have an icon appear only when there's a notification of some kind. Click OK when you're done.
You can also customize the system icons and services that appear there, including the clock, volume, network, power and Action Center icons. At the bottom of the same screen, click "Turn system icons on or off," and from the screen that appears, choose whether to turn on or off the icon and notifications. Click OK twice when you're done.
Get back the Quick Launch bar
Windows 7's new taskbar functions as a program launcher as well as task switcher, and so the old Quick Launch bar, an area on the left side of the taskbar that contained shortcuts for frequently used programs, has been banished. However, if you really miss the little applet, you can add it back. Here's how to do it:
1. Right-click the taskbar and choose Toolbars --> New Toolbar.
2 . You'll be asked to select a folder for where the new toolbar should live. In the Folder text box at the bottom of the dialog box, enter this text:
%userprofile%\AppData\Roaming\Microsoft\Internet Explorer\Quick Launch
After you do that, click Select Folder. A link for the Quick Launch bar will be added to the taskbar. It will be on the right of the taskbar, just to the left of the Notification area, as you can see below.

It's not particularly useful docked all the way to the right with no application icons showing, so we're going to have to do a bit of work on it to make it useful. Right-click the taskbar and in the pop-up menu, remove the check next to "Lock the taskbar." Now right-click Quick Launch and remove the checks next to Show Text and Show Title.
Once you've done that, drag the vertical triple dotted line next to the Quick Launch bar to the left until you expose its icons, as you can see below. To prevent further changes, right-click the taskbar and check Lock the taskbar. You can now use the Quick Launch bar as you could in Windows XP and Vista, including adding and deleting icons to it.

Run multiple copies of applications from the taskbar
The Windows 7 taskbar serves a dual purpose, which can get confusing at times. It's used to launch programs, and also to switch between programs that are running. So you launch a program by clicking its icon, and also switch to that program after it's running by clicking its icon.
But what if you want to launch a second instance of the program? Once the program is running, it seems there's no way to launch a second instance, because when you click its icon, you only switch to the running instance.
There's a simple fix: If a program is already running and you want to launch a second instance from the taskbar, hold down the Shift key and click the icon. A second instance will launch. You can keep launching new instances this way.
Run multiple copies of Windows Explorer from the taskbar
There are times when you'll want to run multiple instances of Windows Explorer -- for example, doing that can make it easier to copy and move between different PCs on your network. Unfortunately, though, you can't launch multiple instances of Windows Explorer from the Windows 7 taskbar using the Shift-click technique. When you try it, you'll only switch to the already running instance of Windows Explorer; a new instance won't launch.
There's a simple way to enable multiple Explorer instances from the taskbar. Right-click the Windows Explorer icon in the taskbar, then right-click the Windows Explorer icon near the bottom of the context menu that appears. Select Properties. Enter this text in the Target box and click OK:
%SystemRoot%\explorer.exe /root,::{031E4825-7B94-4dc3-B131-E946B44C8DD5}
Now you're ready to launch multiple instances of Windows Explorer. Click the Windows Explorer icon as you would normally to launch a first instance. To launch a second one, hold down the Shift key and click the Windows Explorer icon. A second instance will appear. You can keep launching new instances using this same technique.
More nifty taskbar tips
Want some quick tips about the Windows 7 taskbar? Here are a few:
First, you may not realize that it's easy to rearrange the icons across the bottom of the screen -- simply drag an icon to where you want it to live. You can also add icons to the taskbar by dragging them from an application, and delete the icons by highlighting them and pressing the Delete key.
If you're a fan of using the keyboard rather than your mouse whenever possible, you can launch any program on the taskbar without the mouse. Press the Windows key and the number that corresponds to the position of the application on the taskbar -- for example, Windows key-1 to launch the left-most application on the taskbar, Windows key-2 to launch the second left-most application and so on.

One of the nicest things about the taskbar is that when you move your cursor from icon to icon, you can see thumbnails of all open windows for each of those applications. If you're a keyboard-centric person, you can do this without a mouse. Press the Windows key-T, and you'll move the focus to the left-most icon on the taskbar. Then use your arrow keys change the focus to other icons.
Windows 7 Tweaks
Running the Windows 7 beta, and want to bend it to your will? No problem. I've got plenty of tips, hacks and secrets to keep you busy for a long time, including automatically opening Windows Explorer to a folder of your choice, bringing back the Quick Launch toolbar, forcing User Account Control to act the way you'd like, keeping your Explorer searches secret from others, and more.
So check out these tips. If you like them, we'll keep more coming.
Note: A few of these tips involve editing the Windows Registry. If you don't feel comfortable creating a Restore Point, finding your way around the Registry or performing tasks such as creating a DWORD value.
General tips
I'll start with a few nifty tips that can make it easier to get around and increase your computer's power efficiency.
Shake your desktop free of clutter
If you frequently run multiple programs simultaneously, your desktop can get extremely cluttered. This can get annoying if you're working on one program and want to minimize all the other windows -- you'll have to minimize them individually.
With Windows 7's new "shake" feature, though, you can minimize every window except the one in which you're currently working in a single step. Click and hold the title bar of the window you want to remain on the desktop; while still holding the title bar, shake it quickly back and forth until all of the other windows minimize to the taskbar. Then let go. To make them return, shake the title bar again.
You can accomplish the same thing by pressing the Window key-Home key combination -- although doing that is not nearly as much fun.
Kill the Send Feedback link
The beta of Windows 7 includes a "Send Feedback" link at various places throughout Windows 7, including at the top of Internet Explorer and on top of dialog boxes. Don't like the link? You can easily get rid of it, using a Registry hack.
(Important: Always create a Restore Point before editing the Windows Registry.)
1. Launch the Registry Editor by typing regedit in the Search box and pressing Enter.
2. Go to HKEY_CURRENT_USER\Control Panel\Desktop, and double-click the FeedbackToolEnabled entry.
3. Change the value to 0, exit the Registry and restart your PC. The feedback link will now be gone. To turn the link back on again, change FeedbackToolEnabled to 3 and restart.
Get a power efficiency report
Have a laptop and want to get more battery life out of it? Windows 7 includes a hidden, built-in tool that will examine your laptop's energy use and make recommendations on how to improve it. To do it:
1. First, run a command prompt as an administrator. To do this, type cmd in the search box, and when the cmd icon appears, right-click it and choose "Run as administrator."
2. At the command line, type in the following:
powercfg -energy -output \Folder\En Energy_Report.html
where \Folder represents the folder where you want the report to be placed.
3. For the next minute, Windows 7 will examine the behavior of your laptop, and will then analyze it and create a report in HTML format in the folder you specified. Double-click the file, and you'll get a report -- follow its recommendations for ways to improve power performance.
Windows Explorer tips
Windows Explorer is the heart and soul of the Windows interface, and overall it works quite well. But you can make it better.
Set a new Windows Explorer launch folder
When you run Windows Explorer, it always opens to the Libraries folder. That's fine if you use Microsoft's default file organization, which designates Libraries as the overall container for your folders. But what if you don't? You might prefer to have Windows Explorer open to Computer or any other folder you choose. Here's how to do it:

1. Right-click the Windows Explorer icon on the taskbar (it's the one that looks like a folder), and then right-click the Windows Explorer icon from the context menu that appears and select Properties. The Windows Explorer Properties dialog box appears.
2. You'll have to edit the Target field on the Shortcut tab of this dialog box in order to change the default location at which Explorer opens. If you want Explorer to open to a specific folder, simply enter the name of the folder, substituting your folder name for Folder, below, like this:
%windir%\explorer.exe c:\Folder
So to open Explorer to the folder named Budget, you would type this in the Target field:
%windir%\explorer.exe c:\Budget
If you want Explorer to open to special, pre-set locations, such as Computer, you'll need to enter special syntax in the Target field. Following is a list of three common locations and the syntax to use, followed by the syntax for the Libraries folder in case you ever want to revert to the default.
* Computer: %windir%\explorer.exe ::{20D04FE0-3AEA-1069-A2D8-08002B30309D}
* Documents: %windir%\explorer.exe ::{450D8FBA-AD25-11D0-98A8-0800361B1103}
* Network: %windir%\explorer.exe ::{208D2C60-3AEA-1069-A2D7-08002B30309D}
* Libraries: %SystemRoot%\explorer.exe
3. After you've changed the Target field, click OK. Next time you launch Windows Explorer, it will open in the new location you've designated.
Show all your drives in Windows Explorer
Depending on your system settings, when you go to Computer in Windows Explorer, you may be in for a shock -- you may not see all your drives such as memory card readers if those drives are empty. If this disconcerts you, there's a simple way for you to see them even if there's nothing there:
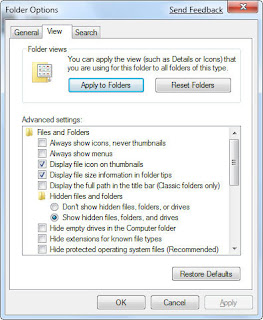
1. Launch Windows Explorer and press the Alt button to reveal the top menu.
2. Select Tools --> Folder Options and click the View tab.
3. Under "Advanced settings," uncheck the box next to "Hide empty drives in the Computer folder." Click OK. The drives will now always be visible.
Protect the privacy of your Explorer searches
When you search through your PC from Windows Explorer, you can see the most recent searches that have been performed. If you share a PC and don't want others to see what you've searched for, you can turn off the recent searches feature:
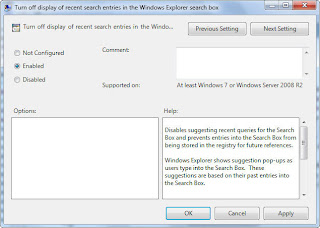
1. In Explorer's Search box, type GPEDIT.MSC and press Enter to launch the Group Policy Editor.
2. Go to User Configuration --> Administrative Templates --> Windows Components --> Windows Explorer.
3. Double-click "Turn off display of recent search entries in the Windows Explorer search box" and select Enabled from the screen that appears. Then click OK. The recent searches feature will now be turned off.
Tuesday, April 7, 2009
Creating Gmail Account in Mozilla Thuderbird
1.Enable POP in Gmail.
You can retrieve your Gmail messages with a client or device that supports POP, like Microsoft Outlook or Netscape Mail.
To enable POP in Gmail:
#. Sign in to Gmail.
#. Click Settings at the top of any Gmail page.
#. Click Forwarding and POP/IMAP.
#. Select Enable POP for all mail or Enable POP for mail that arrives from now on.
#. Choose the action you'd like your Gmail messages to take after they are accessed with POP.
#. Configure your POP client* and click Save Changes.
2.Open Thunderbird, and select 'Account Settings...' from the 'Tools' menu.
3.Select 'Email account,' and click 'Next.'
4.Enter your full name in the 'Your Name:' field. Enter your full Gmail email address (username@gmail.com) in the 'Email Address:' field, and click 'Next.' Google Apps users, enter your full address in the format 'username@your_domain.com.'
5.Select 'POP' as the type of incoming server you are using. Enter 'pop.gmail.com' in the 'Incoming Server:' field, and click 'Next.' Google Apps users, enter the server names provided, don't add your domain name in this step.
6.Enter your email address (including '@gmail.com' or '@your_domain.com') in the 'User Name:' field, and click 'Next.'

7.Enter a name for your email account in the 'Account Name:' field, and click 'Next.'
8.Verify your account information in the dialogue box, and click 'Finish.'
9.Select 'Server Settings' listed beneath your new account.
10.Check the box next to 'Use secure connection (SSL),' and ensure that '995' appears in the 'Port:' field.
11.Select 'Outgoing Server (SMTP)' listed beneath your new account.
12.Enter 'smtp.gmail.com' in the 'Server Name:' field under 'Outgoing Server (SMTP) Settings,' and enter '587' in the 'Port:' field.
13.Check the box next to 'Use name and password,' and enter your email address (including '@gmail.com' or '@your_domain.com) in the 'User Name:' field.
14.Select 'TLS' under 'Use secure connection,' and click 'OK.'
15.Verify that the information listed under 'Congratulations!' is correct, and click 'Finish.'
You can retrieve your Gmail messages with a client or device that supports POP, like Microsoft Outlook or Netscape Mail.
To enable POP in Gmail:
#. Sign in to Gmail.
#. Click Settings at the top of any Gmail page.
#. Click Forwarding and POP/IMAP.

#. Select Enable POP for all mail or Enable POP for mail that arrives from now on.
#. Choose the action you'd like your Gmail messages to take after they are accessed with POP.
#. Configure your POP client* and click Save Changes.
2.Open Thunderbird, and select 'Account Settings...' from the 'Tools' menu.

3.Select 'Email account,' and click 'Next.'

4.Enter your full name in the 'Your Name:' field. Enter your full Gmail email address (username@gmail.com) in the 'Email Address:' field, and click 'Next.' Google Apps users, enter your full address in the format 'username@your_domain.com.'

5.Select 'POP' as the type of incoming server you are using. Enter 'pop.gmail.com' in the 'Incoming Server:' field, and click 'Next.' Google Apps users, enter the server names provided, don't add your domain name in this step.

6.Enter your email address (including '@gmail.com' or '@your_domain.com') in the 'User Name:' field, and click 'Next.'

7.Enter a name for your email account in the 'Account Name:' field, and click 'Next.'

8.Verify your account information in the dialogue box, and click 'Finish.'
9.Select 'Server Settings' listed beneath your new account.
10.Check the box next to 'Use secure connection (SSL),' and ensure that '995' appears in the 'Port:' field.

11.Select 'Outgoing Server (SMTP)' listed beneath your new account.
12.Enter 'smtp.gmail.com' in the 'Server Name:' field under 'Outgoing Server (SMTP) Settings,' and enter '587' in the 'Port:' field.

13.Check the box next to 'Use name and password,' and enter your email address (including '@gmail.com' or '@your_domain.com) in the 'User Name:' field.
14.Select 'TLS' under 'Use secure connection,' and click 'OK.'
15.Verify that the information listed under 'Congratulations!' is correct, and click 'Finish.'
Monday, April 6, 2009
Configure Yahoo Account on Thunderbird
If you have an account at GMail or Yahoo, it could be nice to have access to email from those accounts locally in your Thunderbird client. Through this part I will show you how to access email accounts from those services.
The first thing you need to do is download a program that creates a mail server that sits between Yahoo mail and Thunderbird, called YPOPs. The installation file (ypops-win-0.7.3.exe) can be found on the following link:-
http://sourceforge.net/project/showfiles.php?group_id=52835&package_id=52066.
After it's been downloaded, double-click the file and you should get this screen.
Read through the license, and if it's OK, press next.
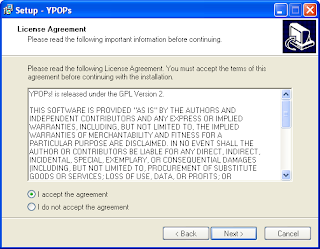
Next you're asked where to install YPOPs; the default is OK, so just press next.
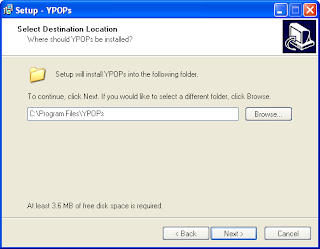
Here you're asked about where to put the program's shortcuts - the default is OK here as well, so just press next.
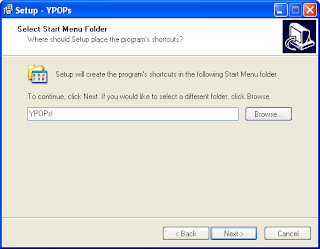
On the following screen you're asked whether the installation program should add a desktop icon - this is handy if you for some reason should need to start YPOPs manually. Check the box if you want to, and press next.
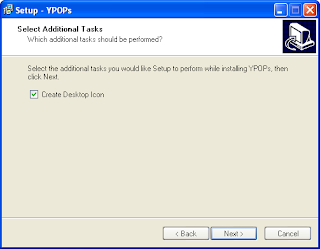
Finally you get a confirmation window with your options, if everything is OK, press Install.
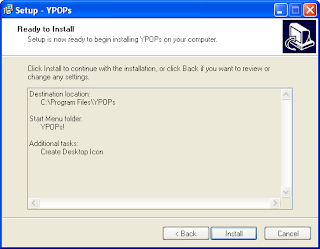
As the program is getting installed, you'll get asked whether YPOPs should be started automatically when the computer starts. This is a good idea, as you don't have to do it yourself - and it doesn't take up much memory or RAM when it's running - so press Yes here.
At the end of the setup you get this screen, with an option to start YPOPs immediately. Check the box and press finish.
Setting up YPOPs
When you're running YPOPs for the first time, you have to agree to the terms of use for the program. Read it through, and if it is OK, press "I Agree".
On YPOPs you can configure how it should run on your local computer. Changing the default settings here is a good idea, as virus scanners may interfere with the application when it's running with its default settings. So change the POP3 port to 111 instead of 110, and SMTP port to 26 instead of 25. Press OK and restart your computer or restart YPOPs for the changes to take effect.

Setting up Thunderbird for YPOPs
Finally we have to setup an account in Thunderbird that will access YPOPs running on your computer. Go to Edit > Account settings... and select Add account... - you should get the following window.
Select "Email account" and press next.
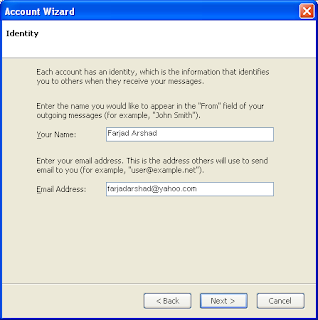
Here you enter the name associated with the Yahoo account, as well as the email address. Press Next.
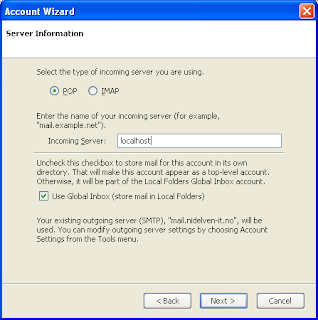
In this window you enter settings for the type of account and where it is accessed - select POP as the type, and use the incoming server 'localhost'. You might also be asked for an outgoing server here, if so, also enter 'localhost' in that box. Press next.
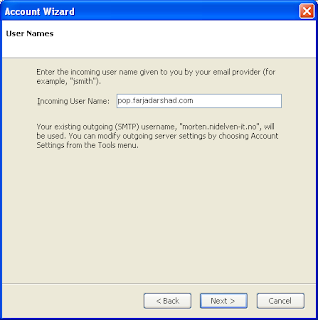
Here you are asked for the username of your Yahoo account. Enter it and press next.
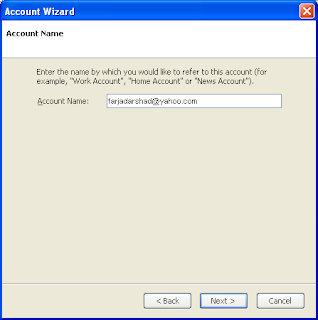
Finally you're asked for the account name - the email address will do just fine here. Press next. Check that everything is OK and press Finish.
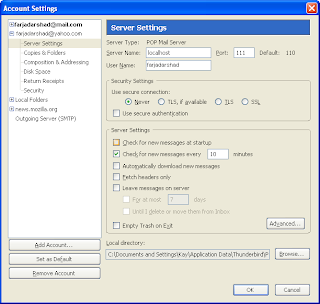
Now, since we're running YPOPs on a non-standard port, we need to tell Thunderbird to connect to port 111 instead of 110, as it usually does. Enter 111 in the port box, and press OK. If you're also using localhost as the SMTP server, go to Outgoing server and enter port 26 there.
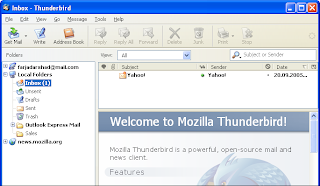
Now, after all this hard work, we can go to local folders and click on "Get mail". You'll be asked for your Yahoo accounts' password; enter it and Hurra! There's your email.
The first thing you need to do is download a program that creates a mail server that sits between Yahoo mail and Thunderbird, called YPOPs. The installation file (ypops-win-0.7.3.exe) can be found on the following link:-
http://sourceforge.net/project/showfiles.php?group_id=52835&package_id=52066.
After it's been downloaded, double-click the file and you should get this screen.

Read through the license, and if it's OK, press next.

Next you're asked where to install YPOPs; the default is OK, so just press next.

Here you're asked about where to put the program's shortcuts - the default is OK here as well, so just press next.

On the following screen you're asked whether the installation program should add a desktop icon - this is handy if you for some reason should need to start YPOPs manually. Check the box if you want to, and press next.

Finally you get a confirmation window with your options, if everything is OK, press Install.

As the program is getting installed, you'll get asked whether YPOPs should be started automatically when the computer starts. This is a good idea, as you don't have to do it yourself - and it doesn't take up much memory or RAM when it's running - so press Yes here.

At the end of the setup you get this screen, with an option to start YPOPs immediately. Check the box and press finish.

Setting up YPOPs
When you're running YPOPs for the first time, you have to agree to the terms of use for the program. Read it through, and if it is OK, press "I Agree".

On YPOPs you can configure how it should run on your local computer. Changing the default settings here is a good idea, as virus scanners may interfere with the application when it's running with its default settings. So change the POP3 port to 111 instead of 110, and SMTP port to 26 instead of 25. Press OK and restart your computer or restart YPOPs for the changes to take effect.

Setting up Thunderbird for YPOPs
Finally we have to setup an account in Thunderbird that will access YPOPs running on your computer. Go to Edit > Account settings... and select Add account... - you should get the following window.

Select "Email account" and press next.

Here you enter the name associated with the Yahoo account, as well as the email address. Press Next.

In this window you enter settings for the type of account and where it is accessed - select POP as the type, and use the incoming server 'localhost'. You might also be asked for an outgoing server here, if so, also enter 'localhost' in that box. Press next.

Here you are asked for the username of your Yahoo account. Enter it and press next.

Finally you're asked for the account name - the email address will do just fine here. Press next. Check that everything is OK and press Finish.

Now, since we're running YPOPs on a non-standard port, we need to tell Thunderbird to connect to port 111 instead of 110, as it usually does. Enter 111 in the port box, and press OK. If you're also using localhost as the SMTP server, go to Outgoing server and enter port 26 there.

Now, after all this hard work, we can go to local folders and click on "Get mail". You'll be asked for your Yahoo accounts' password; enter it and Hurra! There's your email.
Creating Mail Filters in Mozilla Thunderbird
Having a big flow of e-mail's dropping in your inbox can be time consuming to read, to deal with this and save yourself some time, and be able to read the right e-mails first, you might want to add a filter so Thunderbird can place the different mails in different folders. In this article I will try to show you how to make such a filter.
First thing you need to do is create a new folder, I will use the folder "Sales" as the target mail folder.

As you see I've highlighted "Local Folders", right click in "Folders" menu and choose "New folder", you will now get this window:

Name your folder (I used "Sales", choose whatever you like), choose where it should be located and press "OK". If things are done right, you should now have a new subfolder under "Local folders". You can also choose to make a new folder during the setup of making a filter, but I found it more easy to make the folder first.

Go Tools > Message Filters and you will get this window, to make a new filter press "New". As you see from the screenshot you can choose which account this filter will apply for. Pressing "New", you will get this window:

First you want to give the new filter a name, I use "Sales" for this example. Now, the settings are the real limit for what you want here. The best way is to explore a bit on your own for what settings you want. I made a filter which filters mail with comes to the mail address "sales@nidelven-it.no", and place them in the folder "Sales" and labels it as Important (gives it a bright, easy to spot color). When you are done, press "OK", and you'll get this window:

You now have a new filter. :) You can change the settings/add/remove/disable/enable filters as you like. Play a little, explore. :)
Run a filter on existing E-Mails
Often, you will find yourself creating rule as a response to a flow of email. Fortunately, Thunderbird lets you run your filters on pre-existing emails: select your filter, and click the "Run Now" button.

Subscribe to:
Posts (Atom)