Adding Tables:
First, to create a table choose the Insert tab > Tables and either insert or draw a table in your document or choose Quick Tables to insert a custom-designed table into your document. When you do this, the table will be inserted at the cursor.
You can erase the data in it by selecting the table, clicking in it, and then clicking the plus sign in its top left corner. Now press Delete to remove its contents but not its formatting.
You can also type a pattern to create a table. To do this type a plus symbol to start and then a series of dashes the width of the first column. Type another plus symbol and dashes for each subsequent column and then finish with another plus symbol. The line should look something like this:
+---------------+---------------+---------------+----------+
Now when you press Enter Word will automatically convert the text into a four column table with one row. To add more rows, click in the last cell and press Tab. If this process does not work, enable it by selecting the Office button, then choosing the Word Options > Proofing > AutoCorrect Options > Auto Format as You Type tab, and finally clicking on the Tables checkmark.

Adding Lines and Borders
Click in the table to display the Table Tools > Design tab and the Layout tab on the Ribbon. The Design tab has options you can use to draw and erase lines from your table.
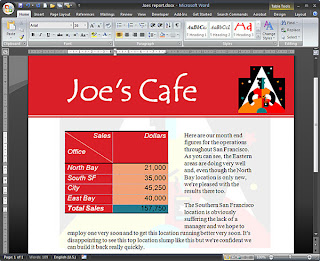
You can use the draw tool, for example, to draw an angle line through a table cell so you can create both row and column headings in one cell — this is often used in the top left cell of a table. The line is only a visible divider and doesn't split the cell in two parts so you will need to right align one piece of text and left align the other to ensure the headings appear in the correct parts of the cell. Use the Borders options to configure borders for the selected cell, or select the table and use it to format the entire table.

Totaling Numbers
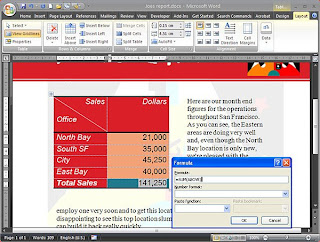
If you have a column of numbers in a table you can add them using a formula. So, for example, to place at total in a cell at the foot of a column, click in the last cell in the column and from the Table Tools > Layout tab select Formula. Now type the formula:
=SUM(ABOVE)
Select a Number Format and click OK. The cell will now contain the result of the calculation. Note that if any of the values in the column change, you must recalculate the formula by clicking on it and press F9.
You can highlight cells that contain formulas so they are easy to see by clicking the Office button, selecting Word Options > Advanced, and selecting the Field Shading: Always option. This ensures that fields are shaded on the screen but they won't be shaded on the printed version.

Repeating Headings
If your table spans more than one page, Word can repeat the header rows on each page to make the pages easier to read. To do this, select the rows that contain the header information that is to be repeated on each page and choose Table Tools > Layout tab and click Repeat Header Rows.
Numbering Rows
To number the rows in a table, select the column to contain the numbers and click the Numbering button on the Home tab. Each cell will be numbered appropriately — if the cells are empty the numbers will fill them, and if there is text in the cell the numbers will appear before the text.
If you move the contents of a row up or down — which you can do by pressing Alt + Shift + Up Arrow (or Alt + Shift + Down Arrow), the numbers will adjust accordingly.
Formatting with Styles and Themes
To format a table click in it and from the Design tab choose a Table Design from those displayed. To highlight alternate columns or rows, click Banded Columns or Banded Rows from the Design tab.
You can add your own formatting to a table by selecting various options from the formatting area of the Home tab and the Table Tools > Design tab. If you use theme colors for the changes and later change the theme, the entire table look will change accordingly.
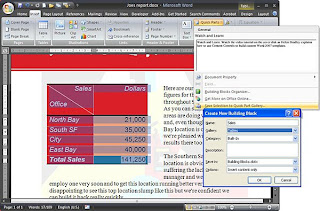
If you have a nicely formatted table that you want to be able to reuse later on, save it by selecting the table and choosing the Insert tab > Quick Parts. Select Save Selection to Quick Part Gallery, type a name for the Building Block, and then select Tables as the Gallery to save it to. To use this in future, click Insert > Table > Quick Tables, choose the table from the list and then edit it as required.
Sorting Data
You can sort the data in a table so it appears in alphabetical or numeric order based on a column's contents. To do this, select the table and choose Layout > Sort.
Select the column to sort by and the type of data in that column. If your table has a header row, select Header Row to protect that row from being sorted.
If you have column totals or more than one header row, don't select the entire table. Instead, select only the rows to sort. Then select No Header Row and Word will only sort the selected rows protecting your headings and totals.

No comments:
Post a Comment